


Chopper
-
Posts
4,881 -
Joined
-
Last visited
-
Days Won
270
Everything posted by Chopper
-

MKE-Trooper – Mandalorian Scout Trooper WIP
Chopper replied to MKE-Trooper's topic in Scout Trooper: "The Mandalorian" WIP
The black strap connects to the back of your bund or your flightsuit. I have not seen a specific suit up guide or video for the mando scout. You can use the CRL photos for how it's supposed to look. The cummerbund is positioned about halfway over and under your belt. https://databank.501st.com/databank/Costuming:Scout-Trooper-The-Mandalorian -
The length of the shoulder bells looks okay, but yes, the width seems to be on the bigger side. The bells on the film armor, which the RS suit is derived from, were fairly wide as well. I would start getting the rest of your costume fitted and sized up, before you trim the bells. And for the flak vest, the width of the bells doesn't matter anyhow.
-
FYI, none of the images you posted are displaying.
-
That is the right amount of weathering. Congrats on successfully avoiding the charbroiled look 😁.
-
Rust-Oleum Custom Lacquer - Automotive Paint
Chopper replied to Gulliver's topic in ROTJ Biker Scout Armor/Helmet
I have not heard of anyone using that specific shade of white. However, if you want to give it a try, you can buy it and spray it on some scrap abs plastic to see how it looks. -
They'd need to either drill or model an appropriate diameter hole to insert a dowel or acrylic rod.
-
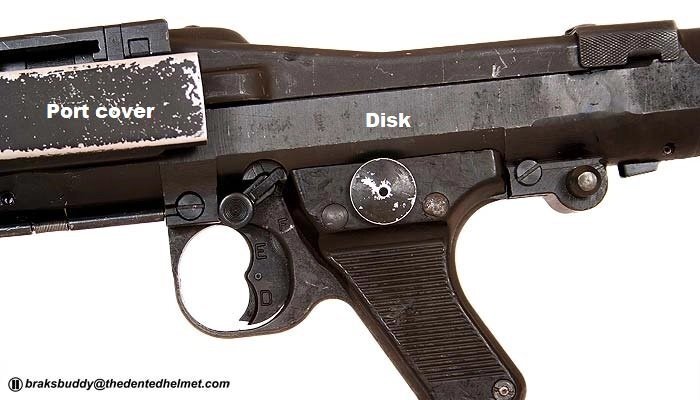
No, it is not one part, nor intended to be. The charging handle needs to be added on the right side. The disk needs to be on the left side in the position indicated in the photo I posted the other day.
-
The cylinder on the right side is the charging handle. That part needs to be added along with the disk and the wire. Can't comment on the correct size at the moment, but @Aradun has provided that info in the past.
-
You are looking to get 501st approval, correct? Personally I recommend you go with the semI-gloss white. Clearcoat is fine but it also tends to add a yellow tint over time. And fyi, using a black underlayer and then scraping the edges is not the style of weathering used in ROTJ. The armor was white abs, so there was no black underlayer. Any weathering used light spray paint misting. For boots, you can look at Crowprops, Chefs Creations, and Chrisx909x on these forums. Prices may vary, but expect $150+. https://forum.501stpathfinders.com/topic/19003-biker-scout-vendor-list/ https://forum.501stpathfinders.com/topic/23318-rotj-biker-scout-soft-goods-ongoing/ For the tubing, look for pool or vacuum tubing in the outer diameter that fits your detonator box. They can vary depending on the maker. Yes you can hand sew the suede as long as it's neatly done. Pro-tip -- get a metal thimble for your thumb, or it's going to be quite sore.
-
Yep, they're displaying now.
-
This is how it appears on at least 2 different browsers:
-
FYI, the links you posted are not working.
-
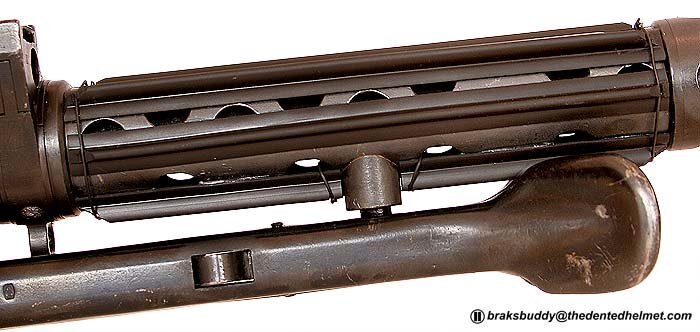
Do you have a particular 3D model that you're looking at? If so, give us a link and we can take a look. The singlepoint scope, same as the one used on the holdout blaster, needs to be integrated into the larger rifle scope. The prop scope does not need to function as an actual scope. See attached photos for additional details. T tracks. Example from regular DLT19, but they're the same type.
-
Great work. Looks good.
-
Yes, the regular gray primer should work fine -- it doesn't have the bondo mixed in.
-
Filler primer is basically paint primer + bondo and isn't really made to serve as a surface coat. It may start rubbing off and not be very durable over the long term. The black clips are generally positioned a little more than halfway between the detonator box and the end caps.
-
The adjusted boot length looks good.
-
RS Prop Masters Kit - Missing Pencil Marks for Trimming
Chopper replied to Gulliver's topic in ROTJ Biker Scout HQ
That was nice of them. Just keep the unmarked parts as spares in case anything breaks. -
General painting tips for painting cast urethane resin: Cast helmets usually have mold release residue on them, which will prevent the paint from adhering properly. Clean it with a toothbrush and dish soap, then make sure the soap is fully cleaned off and the helmet fully dried before going further. Lightly wet sand the helmet with some high grit sandpaper, 600 or 800 grit. Again, make sure any residue is fully cleaned off before painting or you'll get orange peel or paint crackles.. Prime the helmet with paint primer, the color doesn't matter, you can use white or black if you want. Again wet sand the helmet with high grit sandpaper, 600 or 800 grit. Make sure the helmet is clean and fully dry. Once it's fully primed and dried, you can start painting with the glossier paint layers. Note that once the paint start to dry after about 15-20 min, then you need to wait until it's fully dry -- 24-28 hrs, before painting another coat. Otherwise you'll get orange peel or paint crackles.
-
Congratulations
-
The most common method is to put some hot glue along the left and right sides of the lens on the inside of the face plate.
-
Tusken Raider turned Biker Scout
Chopper replied to Cat's topic in Scout Trooper: "The Mandalorian" WIP
The Kropserkel helmet build is almost exactly the same due to their similar construction. Give this a watch and see if it answers your questions: There's also some additional photos, here: And some photos in the scoutpedia of the original screen used scout helmet: -
Longshadow's Mandalorian Biker Scout Build...
Chopper replied to longshadow71's topic in Scout Trooper: "The Mandalorian" WIP
There's some photos in this build thread that might help: -
Tusken Raider turned Biker Scout
Chopper replied to Cat's topic in Scout Trooper: "The Mandalorian" WIP
Hiya, the ear hole placement looks fine. -
Should i retire or fix my rs props rotj scout trooper armor?
Chopper replied to TK 74182's topic in ROTJ Biker Scout HQ
You can repair cracks to a point, but the repair is usually only temporary. While the choice to retire the costume is ultimately a personal one, as Kris said you can always look into getting replacement parts. And with the soft goods, it sounds like it's less of a wear issue and more of a tailoring issue? In which case, you can seek out an alterations shop to try and get a better fit. You can also add velcro to keep things together, as in this thread:

