Chopper
-
Posts
4,887 -
Joined
-
Last visited
-
Days Won
272
Everything posted by Chopper
-

Best balaclava/Neck Gaiter for open collar
Chopper replied to theenglishdjentleman's topic in ROTJ Biker Scout Soft Parts
DarmanProps on etsy makes one like that, with a velcro closure option: https://www.etsy.com/listing/642686929/stormtrooper-neck-seal?click_key=0c63b9f6dc15e97688b6b76a595ecb2f2fcd1b0b%3A642686929&click_sum=dbec4136&ga_search_query=neck%2Bseal&ref=shop_items_search_1&frs=1&crt=1&sts=1 -
Hello, I believe you've already seen it, but this post covers most of the existing scout armor makers: http://forum.501stpathfinders.com/index.php?/topic/17774-the-ultimate-armor-comparison-thread/ And if you are interested in Level 2, you should look at this post to get a sense of the armor makers who are not quite accurate enough for Level 2/Lancer, though they are fine for Level 1/Basic clearance. http://forum.501stpathfinders.com/index.php?/topic/21881-rotj-scout-armor-kit-accuracy-and-level-2-lancer-applications/ Let us know if you have any questions and good luck!
-
WIP wannabe Lancer by OnkelPaschulke
Chopper replied to OnkelPaschulke's topic in ROTJ Biker Scout WIP
The elastic is an issue with the Kolossus coveralls as well. You can just a longer butt flap from the suede and then attach it a little bit higher up, above the cinched elastic area. -
ROTJ Scout - WIP: A Buildthread
Chopper replied to afaster.master.blaster's topic in ROTJ Biker Scout WIP
Hi Ryan, what do you mean by not being able to get the shoulder bells to stick? Like they're not staying in place when you move? Some other notes -- You might want to tighten your collar closure a bit, as it's nearly to the end of your helmet snout. Your chest armor is riding high and your back armor is riding low. You might want to try adding some velcro to your flak vest and the chest plate of your armor to help keep in in place. Your pouches might also be a bit low, but I'd work on adjusting your chest plate first. Nice work, keep at it. -
Question on Kolossus Coveralls
Chopper replied to DukeOfNachos's topic in ROTJ Biker Scout Soft Parts
Correct. This thread covers the mods: http://forum.501stpathfinders.com/index.php?/topic/19259-undersuit-mods/ You can hand sew it if you want. If you want to go that route I'd invest in a thimble unless you want your thumb to hurt from pushing the needle through the suede. The lower back part of the coveralls is fairly accessible by hand or machine via the front zipper. -
Question on Kolossus Coveralls
Chopper replied to DukeOfNachos's topic in ROTJ Biker Scout Soft Parts
The Kolossus suits and lighter and more breathable than the standard RedKap suit. The only caveat is that there's a cinched elastic back, which can make attaching the but flap a challenge. You can get around the issue by stitching it above the cinched portion, which will be covered by the bund. -
Thanks for the images. Yes, that edge looks too long. If you look at the images in the Scoutopedia you'll see a good comparison of about where it should be trimmed: I would trim yours to about here:

-
Ahhh okay. Yes, in that case the caps will very likely need to be trimmed. Go ahead and post a photo.
-
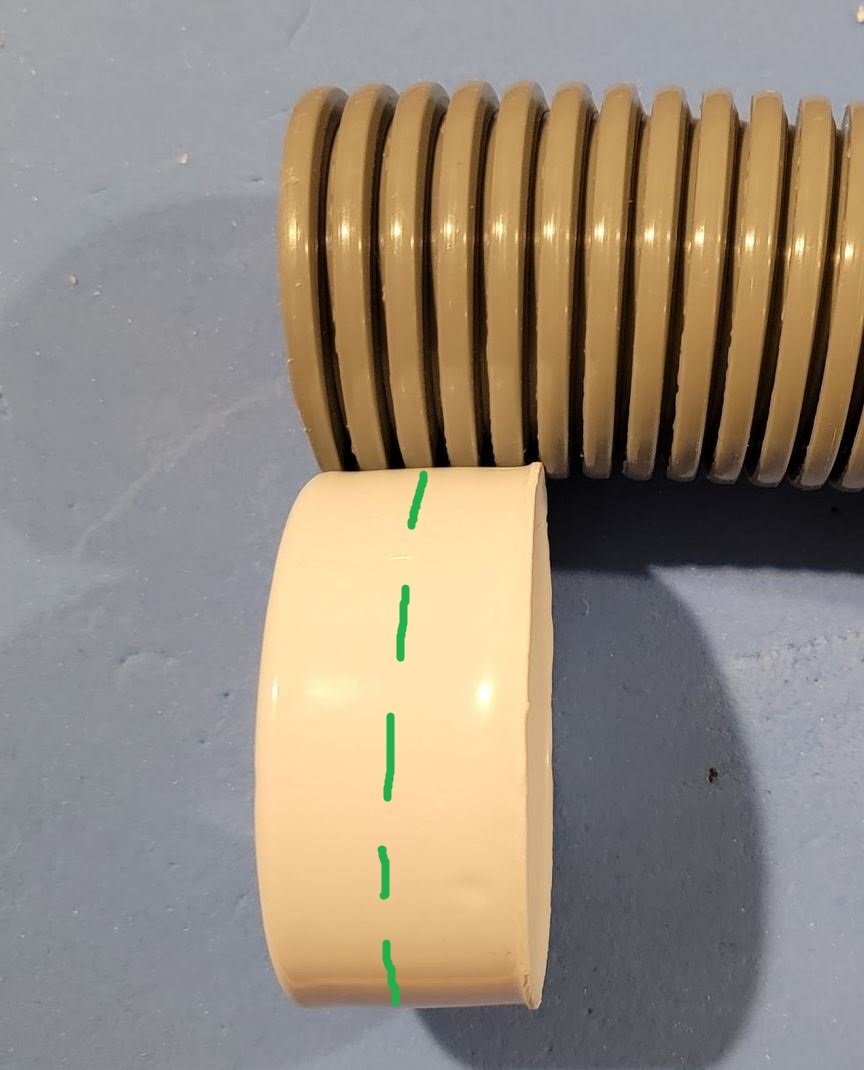
We don't require a level of measurement specificity, so long as it's close to the photos in the CRL. 1" height seems high for an end cap, but if you go ahead and put one on the tubing and give us a photo, then we can take a look. What kit did you purchase? Studio Creations? Those greebs you posted earlier look like they're from Mon Cal/Far Away Creations?
-
Scout Trooper Belt Clips 3D Print
Chopper replied to EC-17 Holdout Blaster's topic in ROTJ Biker Scout HQ
Is there a particular reason that you don't want to use the standard metal one? https://www.theclip.com/store/metal-belt-clip-661 https://www.ebay.com/itm/284927356932?hash=item4256fe7004:g:CPAAAOSwNh9i8xO1&amdata=enc%3AAQAHAAAA4LuL6%2BNGuaaFg74FupM2OR7W3CF5OOfw5qW0C6zkUTV113aXay1y74tcYdSTU2MdrvMm8hLvVQExxHfS8%2FnE47WJHgZg0DUv632h3AClJWSvHP1%2FgtlDbYzZe8vpxf9Pidb4OFPOF1yphaMeM1GddIs7yDdH5%2BQ%2BewJS6kLSXFfefg6UcNVd1xoY7qbHu8RFl1sDhcmUkTVc02UAvfgcHIcPEXv1JkHSYgOyutNqCHc9deMLncLBuUbekcU%2B13PtsrozUg9i303itADrUhOlbiS0YSJ5pnsARIj342OJ7S4Q|tkp%3ABFBMitnx0fRg -
Congrats Lancer!
-
Wampa and Imperial Boots both use leather. You could try talking to Gio at Crowprops to see if he can do his scout gloves in non leather material.
-
Scout Build using Studio Creations
Chopper replied to ItBelongsInAMuseum's topic in ROTJ Biker Scout WIP
Moved to the WIP subforum. To paint the black snout area, you want to use flat black spray paint. You'll need to mask the area before painting. I like using the Scotch blue sharp lines brand and the 3M 1/8" artists curve tape for the top arched section. The black portion typically extends slightly over the indent edge for the snout greeblie. These photos from the Scoutopedia may help: -
If you're looking to build towards Lancer, then you should peruse this post before buying anything: http://forum.501stpathfinders.com/index.php?/topic/21881-rotj-scout-armor-kit-accuracy-and-level-2-lancer-applications/ For Crowprops, are you talking about his fully built boots, or just the underboots? His fully built boots originally had some issues with a pinch point in the center of the dogbone, but I'm not sure if he's resolved that or not. See this review for more info: http://forum.501stpathfinders.com/index.php?/topic/21923-crow-props-scout-boots-and-gloves-my-take/
-
Some tips for keeping your scout costume together while trooping
Chopper replied to Chopper's topic in ROTJ Biker Scout HQ
Yes, the velcro makes it more difficult to slide onto the belt and I eventually abandoned that idea. I haven't tried any other methods of holding the detonator on, but for me personally, it seems to stay on pretty alright as is. -
Try this:
-
ROTJ Scout - WIP: A Buildthread
Chopper replied to afaster.master.blaster's topic in ROTJ Biker Scout WIP
Hi Ryan, You've already self-identified most of the issues I can see -- namely shoulder bells, pouches, and cod. I agree that you should bring your cod up a bit, maybe another inch or so. You want it to lie flat, on the front of your body, and not get pulled between your legs. Lower your forearm armor. It should sit on the top edge of your gloves. Let us know if you'd like us to take another look, as your build progresses. -
Fragarock's Scout Build
Chopper replied to fragarock's topic in Scout Trooper: "The Mandalorian" WIP
Looks like you have an old Hyperfirm holdout blaster. You don't see those as often anymore. Nice work on the paint upgrade. -
Has anyones fiberglass Scout armor gone missing?
Chopper replied to TK-602's topic in ROTJ Biker Scout HQ
It looks like that particular goodwill is in Michigan? -
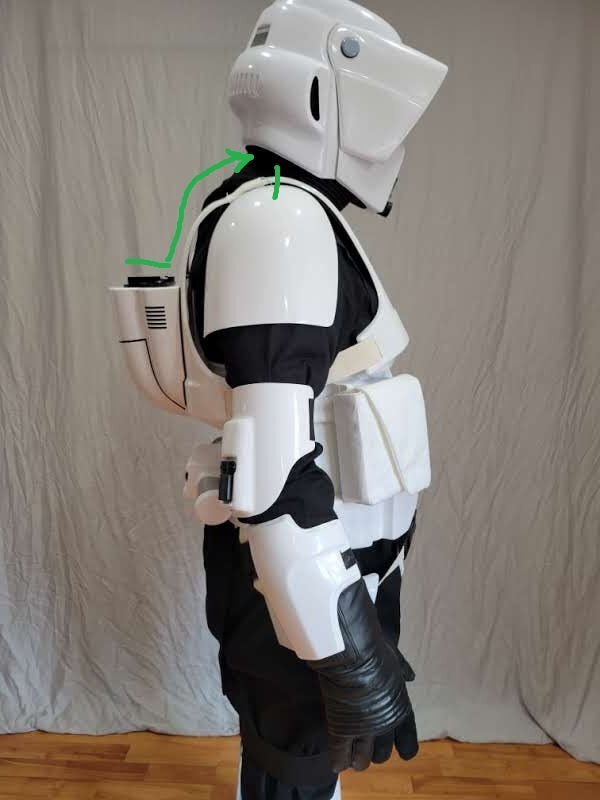
Juan, where you've positioned the chest and back armor looks much better. I've marked in green about where you want to trim the bridges to meet. Remember, it's night-impossible to put pieces back once they've been trimmed, so measure and check, then measure and check again, before cutting.

-
You can glue the visor and face shield assembly together, yes. For gluing abs, you can use either the Oatey abs cement or all purpose cement, which can be found in the plumbing section of most hardware stores. There's also devcon plastic weld, which is an epoxy that'll work as well.
-
To be clear, you're talking about adhering the sides and cap of the helmet?
-
Scout Build using Studio Creations
Chopper replied to ItBelongsInAMuseum's topic in ROTJ Biker Scout WIP
Bondo or seam filling is not needed. You can continue making micro adjustments, but it doesn't need to fit perfectly flush -- they didn't in the film either. -
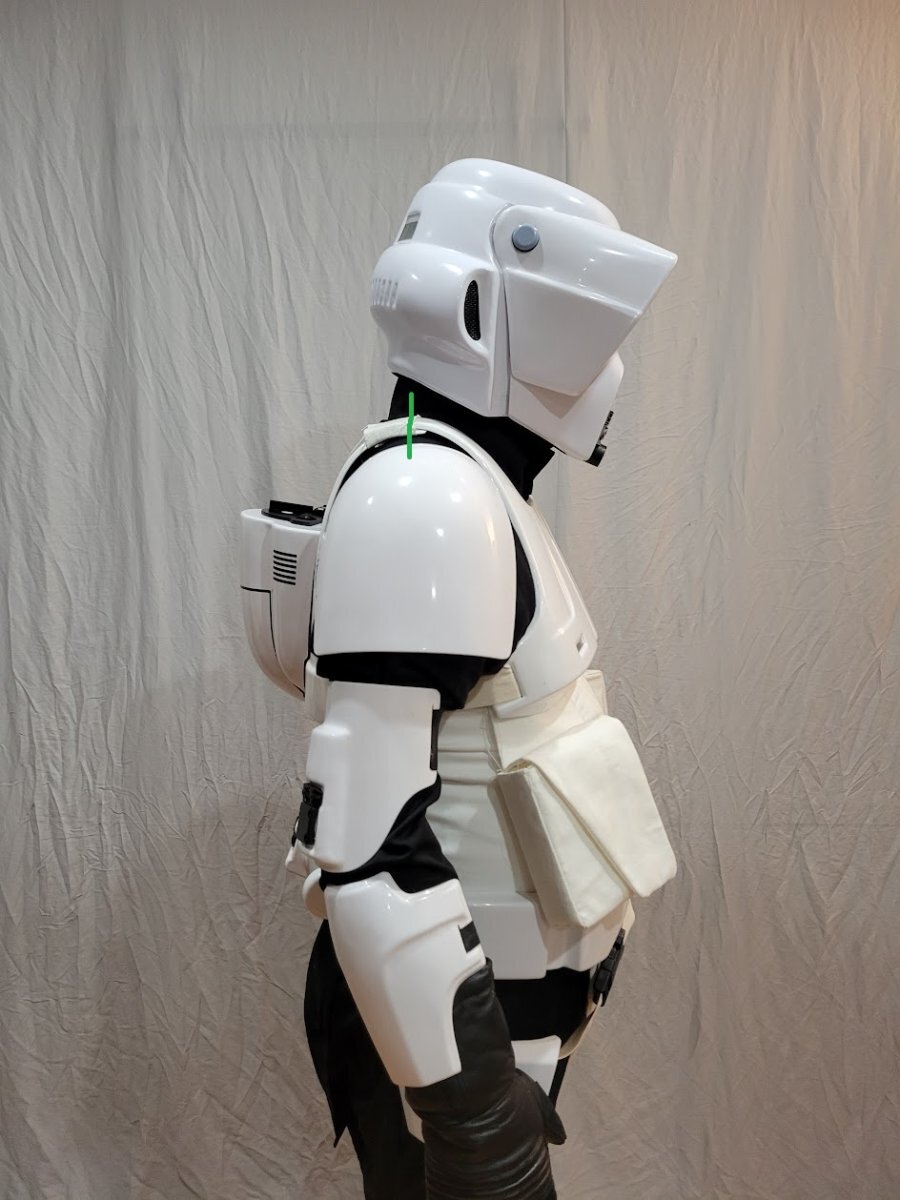
Juan, yes I agree with Dennis. In addition to what he mentioned, the primary item that you should look at is your back armor positioning and your shoulder bridges. The front side of your armor looks fine. I think you're going to need to trim your shoulder bridges so that your back armor comes up further. Before trimming anything, overlap the two bridges and secure them with tape, so that you can be sure of the proper positioning. Give us a look before cutting anything, just to be safe.

-
[woobiee] 1st and New build! (Lancer probably)
Chopper replied to woobiee's topic in ROTJ Biker Scout WIP
I'd just leave it for now.