Chopper
-
Posts
4,888 -
Joined
-
Last visited
-
Days Won
272
Everything posted by Chopper
-

First Time 3D Printed ROTJ Scout Trooper
Chopper replied to wegotdeathstar's topic in ROTJ Biker Scout WIP
If you get the all abs helmet from RS, then that one will be lighter. There's also their red label helmet, which has a fiberglass back section, similar to how the mon cal helmet uses a rotocast back section. I believe you want option 1 for the suede. -
Kevin, I'm really sorry but I'm having a hard time understanding what you're trying to check? Can you please clarify? What is supposed to be 5" from the edge of the hole? You're already using paper to make your pattern, so you can always get your pattern close, suit up, put your boot on, wrap the paper around the boot and make small sizing and fitting tweaks from there. That's what I did when I built my boots.
-
Thank you for the review, Frank. Always nice to have a non-leather option available. Question: did Gio add the air holes in the palm? Or did you request that special? I can't recall those being on his earlier scout gloves?
-
How far over is the attachment tab in the back, once you've tightened it to fit? It should ideally be generally be close to centered, but it doesn't need to be perfectly centered.
-
Nice, looks better. I should note that your bund looks a little loose though. Have you done the velcro in back yet, or are you still getting it fit and adjusted?
-
The first item to get into place is the belt. As a rough guideline I usually tell people to find your belly button and then put the top edge of the belt just below that. Is that about where yours is? Your belt looks a little high, but you tell me where it's sitting on you. The bottom edge of the bund sits on top of the belt, so once you get the belt positioned right, it's a lot easier to adjust the other parts of the costume.
-
Yes, you could hand sew it. It's black on black, so not very visible from more than a foot away. Just make sure to start your hand stitching before the machine stitching ends, so it doesn't become unravelled. But first, give it a try on, once your cod and bund are finished.
-
Not a big deal to adjust. If you unpick just the upper top edges of the riding patches, then you can cut a curve in them a bit and you'll be good. But before you do that, how does it look when you're wearing it? That photo looks like it's on a table?
-
Fragarock's Scout Build
Chopper replied to fragarock's topic in Scout Trooper: "The Mandalorian" WIP
I would recommend against trying to lower your boots. As Pete said, they look fine as is and I wouldn't expect any issues with what you have right now. -
I think that you're good for basic approval at this point. An additional refinement would be to bring in your shoulder bells slightly. Maybe an inch or so.
-
First Time 3D Printed ROTJ Scout Trooper
Chopper replied to wegotdeathstar's topic in ROTJ Biker Scout WIP
Personally, I would do resin, but it depends how much finishing and sanding you want to do. At 0.05 layer height I'd guess maybe one light coat of filler primer and you should be good. Can't hurt to try it first and if you're not happy, you can go with resin. -
One other thing in addition to what Pete mentioned -- when you get your boxes adjusted, try and center the rear parachute buckles on the straps.
-
First Time 3D Printed ROTJ Scout Trooper
Chopper replied to wegotdeathstar's topic in ROTJ Biker Scout WIP
For 3D PETG prints I do a primer and sanding coat to remove the print lines using the gray Rusto Filler Sandable primer. Then, once the lines are gone I use Rusto Painters Touch White Primer and finally a coat with Rusto Painters Touch Gloss White. -
That looks great.
-
Fragarock's Scout Build
Chopper replied to fragarock's topic in Scout Trooper: "The Mandalorian" WIP
Usually the outer piece is just held in place with a dry fit between the piece and the slot. You are welcome to glue it once it's fitted in place though. The cuts in the boot holster are a requirement in the ROTJ scout CRL, not the Mando Scout CRL. The WTF holster plate had ridges, but not cuts, so we recommend that you just leave it flat on the RS holster. If you choose to go with a Studio Creations holster in order to fit your hyperfirm blaster, those have ridges as well. There is no specified spacing from the edge. Use the Mando Scout CRL photos as a guide to eyeball the approximate spacing. -
Fragarock's Scout Build
Chopper replied to fragarock's topic in Scout Trooper: "The Mandalorian" WIP
From the photos you posted earlier in the thread, it looks like your blaster is using the old hyperfirm molds, or a derived version of it. The hyperfirm scout blaster was significantly oversized width-wise, which is why it won't fit into the RS holster. You have several options: 1) Get a new blaster or 3D print a blaster that will fit the RS holster 2) Get a holster from Studio Creations, which is bigger and will fit the Hyperfirm blaster 3) Get approved without a blaster, as basic approval doesn't require one I'll address your questions from yesterday in a moment, standby. -
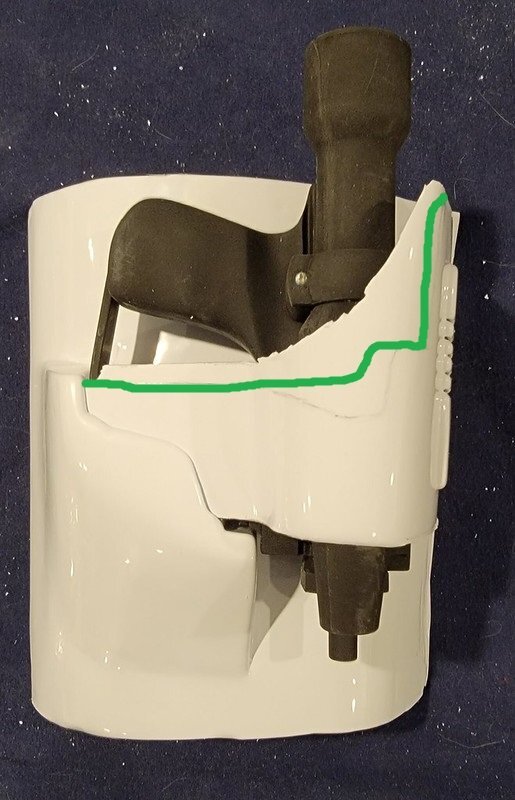
There isn't much of a big dip on the side, that's more an effect from the curve of the part. See photos from scoutopedia and my own approximate markup in green.

-
The chest armor, bund, and belt placement looks okay to me. As a rule of thumb, I tell folks to try and position the top edge of the belt just under your navel. That's approximately where it should sit.
-
The thumb loop is not a requirement. It is optional. If you choose to include it, it is typically sewn in place between the velcro and the vinyl.
-
Yes, that looks about right.
-
The visor cut looks okay. Since there are a lot of different scout helmet vendors, each with different sculpts, we don't have exact standard measurements for the helmet cuts. Anything I could offer from the RS or screen used helmets wouldn't translate well to the WTF helmet. Where your pencil marks are now seem like a good place to start. You can get a decent sense of the specifics of the WTF helmet build in this thread, here:
-
Fragarock's Scout Build
Chopper replied to fragarock's topic in Scout Trooper: "The Mandalorian" WIP
Nice work Frank. One small item to note -- the rectangular detonator greeb should have that top indent removed. See photo from the CRL, below: -
I can't speak to what kinds of paint are typically available in Australia, so I'll defer to @M.J for that, but flat, matte, or semi-glass black finish is just fine for the scout blaster. If you want a paint that won't rub off, then you should use spray paints.
-
Great job trimming the tank. Looks great. Green circle looks fine for the bottom rivet. Yes, you can trim along the the red line at the bottom if you'd like. The red cut line looks fine, but you might want to draw it in pencil first to double check.
-
WIP - HokieScout24 - ROTJ Scout Trooper Build *First Ever!*
Chopper replied to HokieScout24's topic in ROTJ Biker Scout WIP
I'd still encourage you to get a replacement tank topper from studio creations. The one that comes with the WTF kit is ridiculously oversized and the casting quality can be iffy as well. https://studiocreations.com/howto/bikerscout/forsale_bike_replacementparts.html From the CRL: Your local GML has final say on basic approval but IMO some of the scout stuff WTF supplies can push the limit.