


Chopper
-
Posts
4,888 -
Joined
-
Last visited
-
Days Won
272
Everything posted by Chopper
-
You can bring the bicep armor up a bit, where the vest sleeves overlap it slightly. It's fine to have the forearm armor overlap the gloves as well. Generally, the angles of forearm armor should be at the 3 and 9 o-clock positions, left and right, with the forearm armor angled slightly forward, at about the 2 and 11 o-clock positions.
-

Need help putting a visor in my scout trooper
Chopper replied to NorvelleScout05's topic in ROTJ Biker Scout Armor/Helmet
If you're using the welding shield that many of us use, then know that it's pretty heat resistant -- after all, it's for welding! 😁 I didn't have much luck with the hair dryer, so I used a heat gun to help bend mine a bit. Like with all things heat gun related, it does take some finesse to not go too far and melt it though. -
Need help putting a visor in my scout trooper
Chopper replied to NorvelleScout05's topic in ROTJ Biker Scout Armor/Helmet
Are you talking using heat to bend the replacement visor to better fit the face plate? Or to remove the old visor? -
Yeah, the heat gun is a little risky for those who don't have a lot of experience with it. If you've used one a lot and have a good sense of how much is "too much", then yeah, it's a great tool to use.
-
FogOut Remnant Scout Build. (Approved)
Chopper replied to FogOut's topic in Scout Trooper: "The Mandalorian" WIP
Looks great -
Biker Scout Boots, but supported on the inside…
Chopper replied to Scarif20J's topic in ROTJ Biker Scout Soft Parts
Most people use an elastic strap stitched behind the holster to prevent boot droop, but a few have done what you're describing. Let me check around and see if I can find any photos of it. -
Remnant Scout WIP Build Log (PsyfoolRulez)
Chopper replied to PsyfoolRulez's topic in Scout Trooper: "The Mandalorian" WIP
I see no issues whatsoever for clearance. I expect that you should get an easy approval. -
I've seen those paint cracks on a few Altman helmets before, usually in those exact spots around the visor. I think it's a stress/flex point, which eventually leads to the paint cracking. Finding an exact paint match is tough. You might need to do some tests by painting plastic spoons or something similar, but you can try Rusto Painters Touch 2x semi gloss white or Rusto appliance white to start. With paint cracks like that you may need to do a bit of sanding first, or else it'll just crack the paint again.
-
FogOut Remnant Scout Build. (Approved)
Chopper replied to FogOut's topic in Scout Trooper: "The Mandalorian" WIP
Yes, as Pete said, you can try to smooth it out a bit with an iron, but otherwise you should be good. -
Yes, many scouts have been approved using the cod, bund, vest, and coveralls from KriptonTop. As long as the sizing and fit is good, you should have no issues.
-
Harbinger’s TB WIP (501st/Lancer Approved - but never done!)
Chopper replied to Harbinger's topic in ROTJ Biker Scout WIP
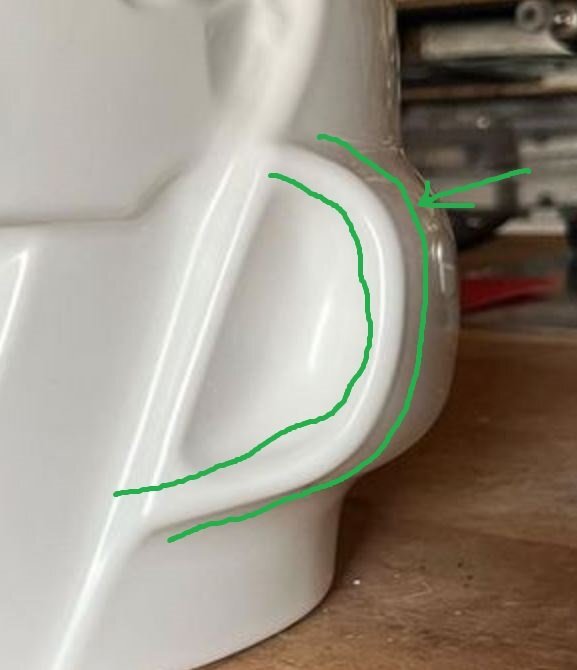
If you're talking about stitching circled below, the only vendor who does this is Chef's creations and that's because he has a cobbler sewing machine. It is not required for Level 2.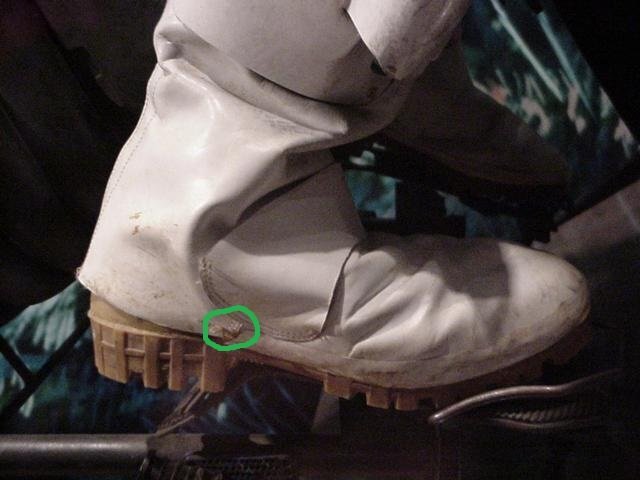
-
Remnant Scout WIP Build Log (PsyfoolRulez)
Chopper replied to PsyfoolRulez's topic in Scout Trooper: "The Mandalorian" WIP
I see no issues. Nice work on all of your weathering. -
Looks pretty good
-
The spray method works for a quick clean. If you need to do a full clean, you can hand wash your undersuit in the bathtub with cold water and a little Woolite, then leave it to air dry. I've cleaned isolated stains off of my bund by wetting the area, then scrubbing the stained area with a toothbrush and (again) Woolite detergent.
-
@M.J might have some suggestions for local vendors who are making soft parts. Most of the other options will involve overseas shipping. Chef's Creations in the UK makes tailored soft goods, as does KriptonTop on Etsy. KriptonTop is in S. America, so it's best to select FedEx shipping. There's also Steph's Imperial Outfitters on Facebook and xChris909x on these forums. Both Steph and Chris are US based.
-
TB-92802 Lancer Deployment Request (APPROVED)
Chopper replied to Harbinger's topic in Lancer Deployment Request
Thanks again for your patience, Brien. The Lancer review team has gone through your application and we have the following comments for you: Shoulder bells are arched back. You might need to trim the chest armor front side shoulder bridge a little bit, which would even it out. Before trimming anything, try overlapping the front and back armor bridges to determine the correct positioning. We'd like better photos of the detonator cap indent -- maybe with a ruler or flat surface on top? We can't make out much of an indent with the current photos. There appears to be a white edge line on your suede patches? Is that leftover chalk? If not, you can get some Fieblings leather dye to get rid of the white edging. Lower knee strap appears to be 1" instead of 1/2" or 3/4" as per the CRL Boot dogbones extend onto the sole portion of the boot and need to be trimmed. As per the CRL: "Dogbone ends above the toe strip on both sides." The entire review team wants to commend you on a tremendous application -- you really did an exceptional job with your build. Just a few small things to address. Please let us know if you have any questions or any clarifications. -
TB-81998 Lancer Deployment Request (APPROVED)
Chopper replied to BikerScout98's topic in Lancer Deployment Request
Nice work on the side slot repairs. As for the chest pouches, when I mentioned providing a "tentative photo to check the positioning", that was in response to your question about the full suit up. You're welcome to double check the position with us by posting a photo with only your chest armor, bund, pouches, and belt -- just to confirm the correct placement. However, the measurement photos you've sent don't give us a sense of how your pouches fit overall. It's really up to you -- you can adjust your pouches, give us a confirmation shot, then a full final front-side suit up. Or you can adjust the pouches and do the full suit up. Either way, we'll take a look and let you know. -
What material is the armor made from? Fiberglass? 3D print? ABS?
-
TB-81998 Lancer Deployment Request (APPROVED)
Chopper replied to BikerScout98's topic in Lancer Deployment Request
You are welcome to give us a tentative photo to check the positioning, but the final submitted photo should be a full front side suit up. Also, if you are going to go ahead and update the side strap cuts, then we would like to see a photo of the final work there as well. -
FogOut Remnant Scout Build. (Approved)
Chopper replied to FogOut's topic in Scout Trooper: "The Mandalorian" WIP
Compared with the SDCC Mandalorian photos, the cod fabric looks a little thin to me. You might want to add some thin batting in between the material, if possible. -
Oh maybe you're right!
-
TB-81998 Lancer Deployment Request (APPROVED)
Chopper replied to BikerScout98's topic in Lancer Deployment Request
Most folks use velcro to hold their pouches in place. That's the most common solution because it's easiest to make small adjustments to the positioning. -
Oh very interesting. I'm eager to see what Jeff rolls out.
-
Thanks Arne. Looks like a decent helmet and I don't see any major issues so far with regard to clearance. I did notice that on his model, the surface around the ear hole looks like it's flat, while the production helmets are more rounded. VS
-
Check this post for adding photos via dropbox: http://forum.501stpathfinders.com/index.php?/topic/22990-sharing-photos-with-dropbox/#comment-215704

