


Chopper
-
Posts
4,888 -
Joined
-
Last visited
-
Days Won
272
Everything posted by Chopper
-
At this time we are allowing either collar type for Level 2/Lancer.
-
You don't need to remove it. The CRL states you can do either -- mandarin collar flap, or folded collar.
-

Harbinger’s TB WIP (501st/Lancer Approved - but never done!)
Chopper replied to Harbinger's topic in ROTJ Biker Scout WIP
How's it look when you fold it over? Is there enough collar material to fold it over? -
Harbinger’s TB WIP (501st/Lancer Approved - but never done!)
Chopper replied to Harbinger's topic in ROTJ Biker Scout WIP
Agreed. I've seen varying finishes, depending on the source, but the the helmet from StarWarsHelmets also has a semi-gloss finish. -
Harbinger’s TB WIP (501st/Lancer Approved - but never done!)
Chopper replied to Harbinger's topic in ROTJ Biker Scout WIP
I would be very careful about adding a layer of clearcoat to your bucket. Clearcoats can react strangely to different solvents, so you might end up with the dreaded crackles, which would leave you having to sand and repaint the entire bucket on your own. As for the det tubing, if you are not able to secure grey colored wiring, then I'd go with a gray acrylic paint, as you won't end up with that forever sticky curing process you're experiencing now. -
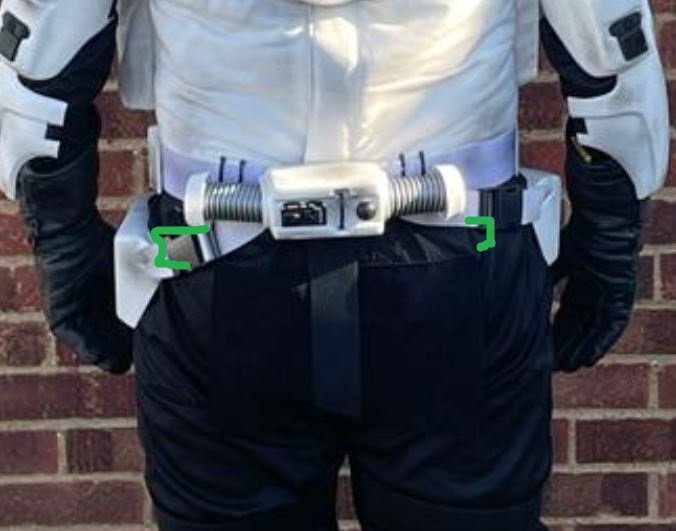
Hi Jordan. Looks good overall. The only item I can see that *might* be an basic clearance issue is that the top of your butt flap ends below the belt. It might need to get re-stitched higher up, with the top edge under the belt. I would consult with your UK armor to get a read as to whether that will be an issue locally or not. I'd also suggest adding some velcro to keep your bund pulled up. As I said though, overall, looking good.
-
FogOut Remnant Scout Build. (Approved)
Chopper replied to FogOut's topic in Scout Trooper: "The Mandalorian" WIP
Congrats! -
Note that the blaster is optional for basic approval clearance. Looking at that link -- for only $26 I'm willing to bet that what you receive is not going to look anything like the photo. Just a guess though. Lou, aka DVH, is no longer producing blasters and the person he sold his molds to hasn't started production yet. If you, or a friend, has access to a 3D printer, you can print @MrPoopie's blaster files.
-
I would look at this thread for a detailed build tutorial: http://forum.501stpathfinders.com/index.php?/topic/17305-lancer-build-tutorial/ Note that the thread is from 2017, so be careful check any strapping or other requirements against the current CRL: https://databank.501st.com/databank/Costuming:TB_Scout_trooper
-
Based on the photos you posted, and taking into account the items you've already identified as needing to add, I do not see any basic clearance issues so far.
-
The transistor on the handle of prior DVH blasters should normally have a magnet. There might have been a run or two where the handle magnet was not included, but it was normally supposed to have one.
-
FogOut Remnant Scout Build. (Approved)
Chopper replied to FogOut's topic in Scout Trooper: "The Mandalorian" WIP
If you know your EU shoe sizing, I've found that to be the most accurate for Imperial Boots fit. -
At this time we are allowing either collar type for Level 2/Lancer.
-
ROTJ Scout - WIP: A Buildthread
Chopper replied to afaster.master.blaster's topic in ROTJ Biker Scout WIP
Depending on the sewing machine, you can use a denim or leather sewing needle to punch through the suede + coverall fabric. And if that doesn't work and you have to continue hand sewing, consider getting a metal thimble, which will save your fingers. You can mount the mud flap above the gathered waist, since it will be covered by the bund and belt anyhow. -
Thanks for the photo. While I can certainly see the bicep flaring issue on the first photo, I see zero issues with any flare in the second photo. I think switching to velcro has done the trick.
-
Do you have any photos of the bicep flaring issue while you're wearing the costume?
-
The CRL has changed as of 1 Aug 2022, but you can still get cleared with the mandarin collar even after the change went into effect.
-
ROTJ Scout Trooper 2022 CRL Update - the Open Collar!
Chopper replied to BikerScout007's topic in Announcements
I suspect that you'd only need to get your new flight suit cleared, rather than going through a full approval, but that will ultimately need to be a local discussion between yourself and the garrison GMLs. -
Harbinger’s TB WIP (501st/Lancer Approved - but never done!)
Chopper replied to Harbinger's topic in ROTJ Biker Scout WIP
Going for all of that might be overkill. I had the same issue with my kit and I just put some velcro on the front of my flak vest, and also on the inside of my chest armor. It stays in place without any issue. -
Lens Material for Helmet?
Chopper replied to ItBelongsInAMuseum's topic in ROTJ Biker Scout Armor/Helmet
Go for the Hobart 770580 Face Shield Replacement Lens, available from Amazon: https://www.amazon.com/gp/product/B002VECKRO/ref=ppx_yo_dt_b_search_asin_title?ie=UTF8&psc=1 -
If you're talking about bending the whole det box @shashachu, I can't see that working well and would avoid it. The det tubing tends to curve a bit once you cinch in it with the zip tie. Have you tightening it there yet?
-
Congrats Brien, great job!
-
Harbinger is correct. You should use 1/8" diameter pop rivets for the Scout costume.
-
@StudioCreations that's so much for offering this as a part of your kit. This is a huge help to the scout community.
-
Whoops! Sorry yes, still hadn't had my coffee. The bicep armor should be at 3 and 9.

