Chopper
-
Posts
4,844 -
Joined
-
Last visited
-
Days Won
269
Everything posted by Chopper
-

Mikerscout Scout(Mandalorian) Lancer approved
Chopper replied to MikerScout's topic in Scout Trooper: "The Mandalorian" WIP
Don't sweat it too much, dude. These things happen. I remember the horror I felt as I melted one of my shoulder armor parts with the heat gun. I was actually going to take my initial approval photos the next day...I just wanted to tweak it a little bit. I think there's a number of things going on. Some of it could be chemistry, in that the various solvents aren't playing nice together. Another part of the issue is that bondo isn't great for structural fills. Bondo works fine for gap filling in places that aren't meant to flex or bear loads. Those parts on the sides of the helmet, near where the visor rotates up, gets a ton of flex. If you have your armor trimmings, I try to make an ABS paste to fill those sorts of gaps. I think your approach makes sense. Leave it be for a few days, let everything cure, and see how it looks. If you have to buy a new helmet b/c the plastic is still soft, well...that does really suck, but I can tell you that pretty much all of us have been in that boat before. -
-
Mikerscout Scout(Mandalorian) Lancer approved
Chopper replied to MikerScout's topic in Scout Trooper: "The Mandalorian" WIP
If you can, you might want to see if it's possible to carefully trim away some of the material from the top of the visor.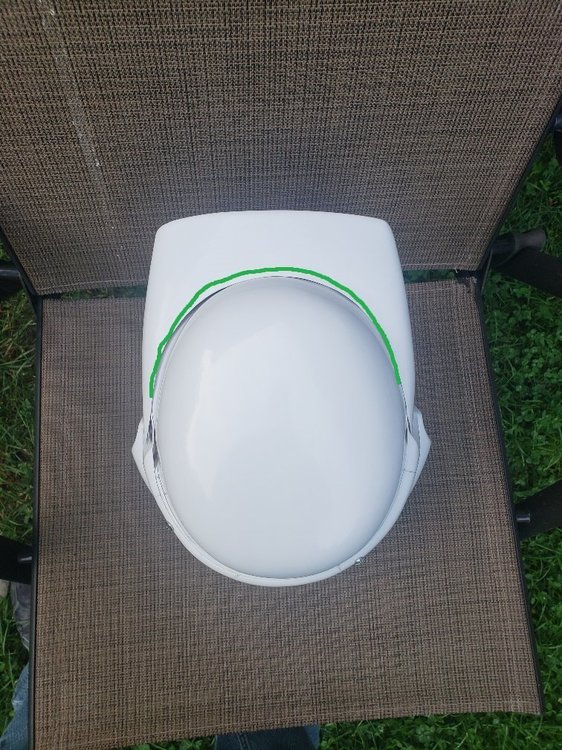
-
Mikerscout Scout(Mandalorian) Lancer approved
Chopper replied to MikerScout's topic in Scout Trooper: "The Mandalorian" WIP
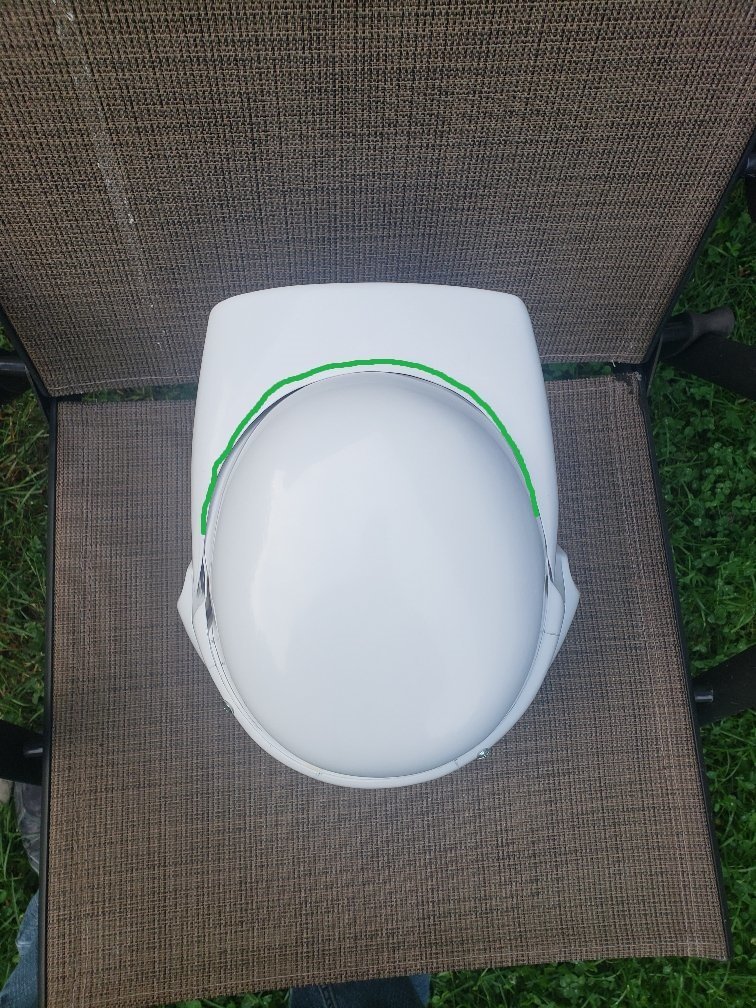
I do have one comment about the top of your visor? It looks like it's jammed right up against the top of the helmet? Are you able to open it all the way without scraping? The original ROTJ scouts had the 3M head band riveted to the helmet. The rivets went through the "wings" on the sides of the band and through the left and right sides of the helmet, underneath where the visor comes down, so you can't see the rivet heads from the outside. -
Some tips for keeping your scout costume together while trooping
Chopper replied to Chopper's topic in ROTJ Biker Scout HQ
Yeah, I think it would work. I don't think it would work as well, because your point of attachment is no longer directly attached to the weighty area, but my guess is it'd work ok if you had a lighter 3D printed blaster or something like that. -
I can't imagine you having any issues with approval for that rifle. Very nice work.
-
Mikerscout Scout(Mandalorian) Lancer approved
Chopper replied to MikerScout's topic in Scout Trooper: "The Mandalorian" WIP
If you're doing a Mando build then the red brown weathering will likely cover any discernable color differences. -
The dog bone should cover it up in both instances. You can always check out how the dog bone looks with a little tape beforehand. The original sierras didn't have that same sort of "bump" where the laces string up in the boot, so what we have to do in order to get a similar look differs slightly when we're adapting a work boot for our purposes. The only real question is whether or not the different positioning changes how the shaft looks? Do you end up with a small upper shaft but a big lower portion? I'd try mocking it up a bit to see what looks best for you.
- 254 replies
-
- 1
-

-
- lady
- rs prop masters
- (and 4 more)
-
One of the few downsides of the SC armor is that the blaster housing on the holster is a big large. I believe it was originally designed for the Hyperfirm blaster, which was oversized as well. Also, I can't tell if it's the reflection or the angle of the photo, but is the holster mounted askew a bit? It looks canted upwards, which might also be causing the blaster to sit funny? Here's a photo of one of the originals: You can add a bit of foam padding inside the front edge of the holster housing to help it sit better. It should be ok, as long as it isn't noticeable.
-
For Level 1 (Basic Clearance) in the CRL, it says: "Secured at the back using 50mm (2") black hook and loop fastener." If you don't want to bother with opening and closing the velcro when gearing up, it'd be much easier to just leave the velcro in place and then slide it on, if that's what you're going for?
-
What you've done is no small feat. Great work. And the skills you're learning will definitely pay off down the line.
-
Yeah, no worries. And just for your own knowledge base, a lot of folks used to see this photo and think: "I need to make the visor seam perfectly flush!" Thing is, that's the stunt helmet. The stunt helmet was a single piece and didn't have an opening faceplate. The more you know, right?
-
You can try shaping it with the heat gun, maybe to get it to close a little better. Just keep in mind that the actual helmets used in ROTJ didn't close perfectly/seamlessly either. A little bit of a gap on the sides is a-ok!
-
What you've got looks great so far. The toe and upper portion is generally the hardest part, so you should have a relatively easier time from here on out.
- 254 replies
-
- 2
-

-
-
- lady
- rs prop masters
- (and 4 more)
-
Jenny, you should put the bottom edge of the strip at the blue arrow you indicated.
- 254 replies
-
- 2
-
-
-
- lady
- rs prop masters
- (and 4 more)
-
[woobiee] 1st and New build! (Lancer probably)
Chopper replied to woobiee's topic in ROTJ Biker Scout WIP
Having the suede line up with the arc of the cod is not a requirement or something we look for in Level 2 reviews. Both examples you've shown are within the ballpark of what's acceptable. -
Overall it looks good to me. Nice work on the snout paint as well.
-
If you have an Ace Hardware, I've found that they usually carry a better selection of rivets than Lowes or Home Depot.
-
Spray paint for thermal detonator tube portion
Chopper replied to hokie1's topic in ROTJ Biker Scout Armor/Helmet
I would use a satin or matte color in a "neutral gray" shade. You can get a good sense of the color in this photo from the magic of the myth exhibit: You can spray it and a number of people certainly have, but the solvents in most spray paints react strangely to rubber coatings like you have on wire cording -- sometimes they don't really ever dry, which leaves you with a slight stickiness that never goes away. Now, full disclosure I haven't used this specific color in real life, but you might want to look at something like this, which is an acrylic spray paint in neutral gray: https://www.amazon.com/Liquitex-Professional-Spray-Paint-Neutral/dp/B008N7HCXK -
Yeah, get the washers -- especially if you're riveting plastic. When you crunch down the rivet gun it deforms the shaft. If you're working with plastic, that'll add stress and lead to breakage down the line. One other thing -- make sure you get aluminum rivets/washers. You really don't want to have to deal with drilling out steel rivets if you need to replace anything.
-
Yeah as long as they're small flange 1/8" diameter, then they should be good.
-
Truth be told, there aren't a whole lot WTF helmet build threads. That said, you can look at these two threads for some additional visual info: http://forum.501stpathfinders.com/index.php?/topic/20405-tb-80225-wtf-helmet-build/&tab=comments#comment-185533 http://forum.501stpathfinders.com/index.php?/topic/19025-wtf-armor-build/&tab=comments#comment-171672
-
Yeah that could work. It's not crazy expensive either. If you end up giving it a try, please report back and let us know how it works out.
-
I'd look at replacement lenses for tactical goggles. You'd need to make sure that the dimensions fit your particular helmet and that they're not too light to see in through, otherwise there aren't a ton of other options. Most of us use the welding shield b/c we can cut it to fit.
-
Ah, yeah. Yes, those should be trimmed down a bit if you can. I'd try to get closer to the top of the boxes...without actually cutting off the top of the boxes.