


Chopper
-
Posts
4,844 -
Joined
-
Last visited
-
Days Won
269
Everything posted by Chopper
-

[woobiee] 1st and New build! (Lancer probably)
Chopper replied to woobiee's topic in ROTJ Biker Scout WIP
I can't remember where we found that out from, but that's how the drop boxes in ROTJ were rigged as well. Nice work so far. -
By overlap, do you mean the amount of plastic between the boxes? The overlap between the front pieces and the back pieces doesn't need to be even, it just needs to look like a one piece belt. The spacing that you set for the boxes should be the same on both the left and right side. If I'm misinterpreting your question, let me know and we'll get it figured out.
-
The 2" measurement is from the front (red line).
-
[woobiee] 1st and New build! (Lancer probably)
Chopper replied to woobiee's topic in ROTJ Biker Scout WIP
HAH, true. Go ahead and stick with the CRL image. That's a-ok. -
[woobiee] 1st and New build! (Lancer probably)
Chopper replied to woobiee's topic in ROTJ Biker Scout WIP
Andy, everything you're doing looks awesome. For real. Two things to note -- 1) Check the direction of your parachute buckles. The "Slotted" end should be facing towards you. See photo below. 2) This is a super minor point, but I'd move your back right-attachment point just a smidge to the right. But seriously, great work overall. The end result is going to be something you'll be very proud of.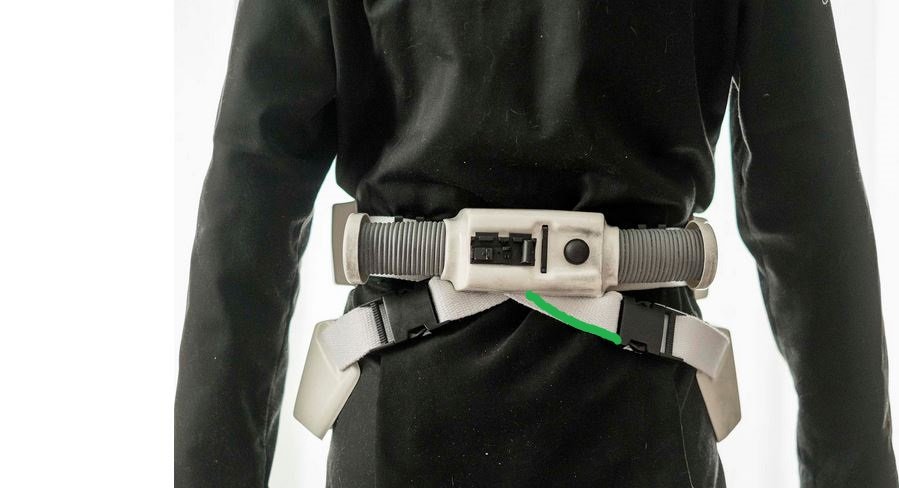
-
When I stitched the velcro onto my pouch tabs, I just tried to keep the stitching towards the edges and I didn't stitch the bottom edge. I also didn't do any diagonal stitches or anything like that. I don't move my pouches all that much, so it just needs to hold. It's not like my knee or bicep armor, that I'm putting on and taking off all the time.
-
Looks pretty good to me.
-
Oh nice. I have one of those bags too. There's very little information to go off of, aside from the brief point that we see it on screen, so it's hard to be super specific in the CRL. The straps can be nylon/polypro/cotton webbing. I used 1" cotton webbing for mine, but any of the options I mentioned will work. You can get a sense of the strap length vs a person from the screen photos here:
- 254 replies
-
- 1
-

-
- lady
- rs prop masters
- (and 4 more)
-
[woobiee] 1st and New build! (Lancer probably)
Chopper replied to woobiee's topic in ROTJ Biker Scout WIP
Good luck my dude. Sounds like you're on the right track. -
Nice Chris, that looks a lot better.
-
Hey Chris, I think the front side looks good. The only item you want to be aware of, in terms of shape, is to make sure that the squared ends on the upper left and right don't show from under your cod. Just eyeballing, but I think it's ok. The patch on the back looks a bit too large, I think, as the front and back shouldn't be equal in size/shape. I've made a quick mark in green about where the back side patch should be.

-
Again, before you do any surgery, the question is how it all looks from behind the codpiece? The cod sits on front, so it covers quite a bit and you might not need to adjust anything.
-
You take the zipper off, resew the coveralls, and then either sew the existing zipper back on, or, if it's too long, then you get a shorter zipper. And looking back at your initial suit up photos, are you sure the crotch is too low, especially before you do any surgery to the coveralls? It looks ok in this photo?
-
I think the corrections you've made to the riding patches sound good. If you've got a photo, it'd be easier to verify, but just eyeballing what you had before, along with your stated changes, I think you're in the right ballpark. There are plenty of folks who have tailored the suit to bring the waist up, but I've never heard about anyone making an adjustable roll with snaps before. That said, as long as it' s all covered by the bund, then it should be fine. Just make sure that it doesn't end up giving you an odd looking lump around the waist that shows up from beneath the bund.
-
It's totally a good way to go. Proceed! 😁
- 254 replies
-
- 1
-

-
- lady
- rs prop masters
- (and 4 more)
-
Yeah that looks fine. You're good.
- 254 replies
-
- 1
-
-
- lady
- rs prop masters
- (and 4 more)
-
The white marine vinyl from Joann fabrics is commonly what most people use, yes. I can't recall if you already posted a photo -- how much grain is there in it?
-
[woobiee] 1st and New build! (Lancer probably)
Chopper replied to woobiee's topic in ROTJ Biker Scout WIP
The original pouches were actually sewn onto the bund. You don't need to do that, but if you want to sew velcro onto the pouch tabs, then you should just try and keep the stitching close to or along the edges, so it's not too obvious. And don't do a diagonal stitch through the center or anything like that. For the bund, you do not need to hide the threading at all. In fact, on screen you could see the stitching to attach the velcro along the back. -
I would look at @Sabrina's build here, as she had similar issues and ended up using a little heat to bend the shoulder bridges to fit more comfortably.
-
What brand of helmet are you working with? It's not even all the way around. My RS is about 14mm along the top edge and 12mm along the sides. There's no exact measurement, just try to get close to what you see here, if you can.
-
What you've got right now looks great. Keep it up.
- 254 replies
-
- 1
-
-
- lady
- rs prop masters
- (and 4 more)
-
Hi Chris, looks like you're on to a good start. The only additional advice I can offer right now is to steer clear of using the shrimper boots as a base. There are some folks who did use them, or something similar, for their scout boots in the mid-2000s or so, but times and standards have changed significantly since then. If you'd like to build your own boots, I'd stick with getting a gum soled work boot and building it up, as per Cheesewhoopy's tutorial here: http://forum.501stpathfinders.com/index.php?/topic/19708-biker-scout-boots-tutorial/ Gio at Crowprops also makes an underboot that uses his version of the original sierra sole. Or if you want to buy a pre-made boot, then there's Imperial Boots.
-
[woobiee] 1st and New build! (Lancer probably)
Chopper replied to woobiee's topic in ROTJ Biker Scout WIP
Hi Andy, just as a follow up -- the Armory team took a look at the current IB bund and, even though the twill fabric is better than the canvas-like fabric they had used earlier, it still doesn't fit with the "smooth white cotton fabric" similar to what was used in ROTJ. It's fine for basic, but we're very sorry to say that it would not clear Level 2. You should be able to find a cotton/polyester blend fabric that has a similar look to what was used in the film. Given your excellent construction of the pouches and working from Mickey's tutorial, I have no doubt that this should be quick work for you. -
You can usually find pieces of black pig leather suede on ebay that work for the riding patches. This, for example, should do the job: https://www.ebay.com/itm/283761786191?hash=item4211853d4f:g:zH8AAOSwjyZeMeFe
- 254 replies
-
- 2
-
-
- lady
- rs prop masters
- (and 4 more)
-
I think you may find this post useful:
- 254 replies
-
- 2
-
-
- lady
- rs prop masters
- (and 4 more)