Chopper
-
Posts
4,844 -
Joined
-
Last visited
-
Days Won
269
Everything posted by Chopper
-

[woobiee] 1st and New build! (Lancer probably)
Chopper replied to woobiee's topic in ROTJ Biker Scout WIP
Well, it's a good thing you asked them directly, hah. -
[woobiee] 1st and New build! (Lancer probably)
Chopper replied to woobiee's topic in ROTJ Biker Scout WIP
Frankly, I would reach out to RS and ask if they can tell you what type of paint was used for the scout weathering. ABS paste isn't a commercial product. You make it from armor trimmings + acetone in a glass jar. I would also hold off on any reinforcements until you get your armor fit properly. https://www.whitearmor.net/forum/topic/42866-how-to-make-abs-paste/ -
[woobiee] 1st and New build! (Lancer probably)
Chopper replied to woobiee's topic in ROTJ Biker Scout WIP
I'm not certain what kind of paint they used for the weathering, so I can't say for sure. If they used enamels or lacquers, then it probably won't have any effect. If they used acrylics, maybe, but then again, I've dipped acrylic painted action figures in boiling water to remove parts and the paint was unaffected. -
[woobiee] 1st and New build! (Lancer probably)
Chopper replied to woobiee's topic in ROTJ Biker Scout WIP
Great progress as usual. It's pretty common to have to trim the shoulder bridges a little to make the armor fit better on the torso. You can overlap the bridges and use some tape until you get the fit right. Then give us a look, mark it, and then you can trim. I need to adjust the chest on my RS scout too, as it's a bit wide as well. You can dip the sides in hot water and mold them by hand, as it's a bit easier to control the heat and shape that way. You can also bring it in a bit by heating up the center seam with a hair dryer. Either way, be careful and go slow, as that's a significant stress point and you don't want to weaken it. -
[woobiee] 1st and New build! (Lancer probably)
Chopper replied to woobiee's topic in ROTJ Biker Scout WIP
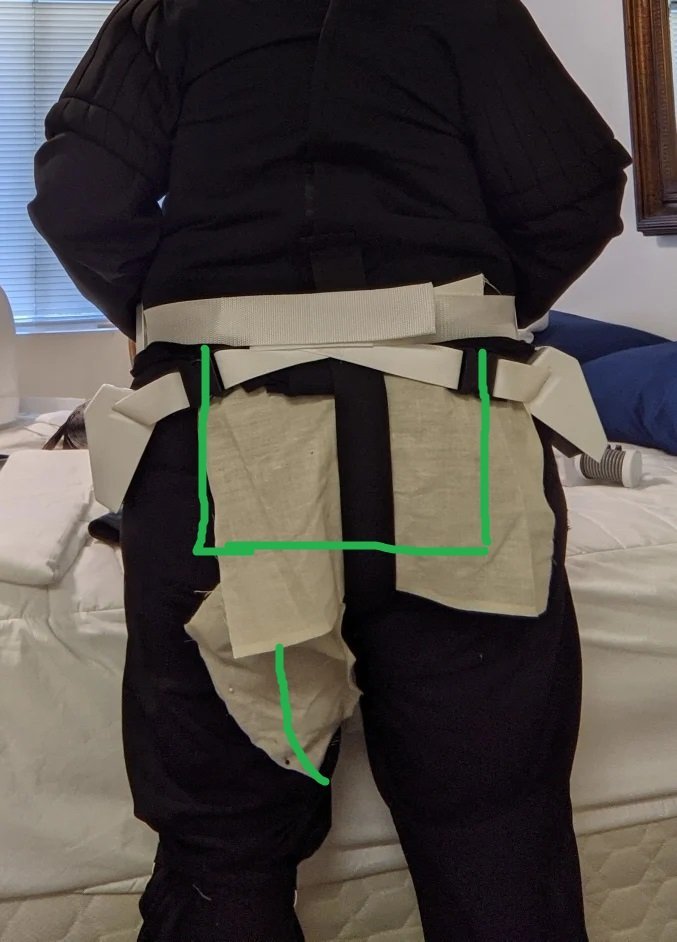
I think you're in solid shape with your soft goods progress. Yes, I agree that you could bring in the thigh straps by 0.5" to make them a little more snug. They don't need much. The dimensions of your butt flap are pretty good, remember there's no exact measurement, as people's builds differ, but the alterations you mention are ok as further refinements. I think the back patches are a little big by maybe an inch or two in the back. I did some approximate marking in the attached photo to try and give you an idea of what I mean.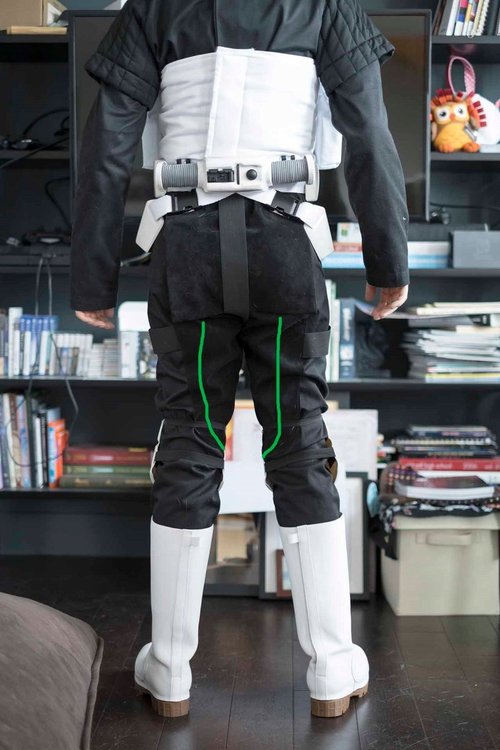
-
[woobiee] 1st and New build! (Lancer probably)
Chopper replied to woobiee's topic in ROTJ Biker Scout WIP
Yeah looks like the stitching is only along the bottom edge for the crl photos. -
[woobiee] 1st and New build! (Lancer probably)
Chopper replied to woobiee's topic in ROTJ Biker Scout WIP
Great work dude and thanks for the extra info on the IB suit suede. We'll keep that in mind for future Lancer apps. As for your butt flap, i think that doubling it up makes it a bit thick. The CRL model has stitching around the edges of the butt flap, but I belive that's just the edges. Gino's scout only used a single layer. -
It's not an exact measurement or a hard rule, but the thigh straps should be approximately halfway between the belt and the knees.
-
I haven't personally put the new SC parts next to the RS kit, maybe @BikerScout007 or @MrPoopie have seen the two next to each other as a part of the Scout Team Six crew? I can tell you that the retired scout in the photo below is 6ft5 and is wearing the Strider/CfO armor, which is pretty close to the RS kit in terms of size/accuracy.
-
Mikerscout Scout(Mandalorian) Lancer approved
Chopper replied to MikerScout's topic in Scout Trooper: "The Mandalorian" WIP
Yeah, I mean that's the good thing about mocking it up before cutting...you can always move it back down a bit! -
Mike, this is Strider's weathering tutorial for your reference: https://www.youtube.com/watch?v=2be0cuCSoLQ For avoiding lens fog, you have a few options: 1) If you hot glued in your lens, leave a small gap between where the bottom of the lens contacts the face plate. Basically, instead of having the lens glued flush to the bottom edge of the eyehole, you leave a 1-2mm space that lets air out. You can't see it unless someone is staring directly down from above, and even then the top of the visor is going to block anyone viewing from that angle. 2) There's some swim goggle anti-fog paste called Cat Crap (no joke). It basically leaves a thin oil residue on the lens that prevents fogging. https://www.amazon.com/EK-USA-Cat-Crap-Eyeglasses/dp/B001ONRP8C/ref=sr_1_2?dchild=1&keywords=catcrap&qid=1627232462&sr=8-2 3) Fans, though this will add weight, noise, and cut down on the space in your helmet.
-
Mikerscout Scout(Mandalorian) Lancer approved
Chopper replied to MikerScout's topic in Scout Trooper: "The Mandalorian" WIP
Try bringing the back up another 3/4" to 1" and see how that looks. -
Mikerscout Scout(Mandalorian) Lancer approved
Chopper replied to MikerScout's topic in Scout Trooper: "The Mandalorian" WIP
I would say try raising the back armor a bit. Try overlapping the shoulder bridges and giving us a look before doing any trimming on the bridges though. -
Yes it does look much better. Nice work. Can I ask about the bottom edges of your patches? It's hard to tell from the photo, is it rounded at the bottom or squared?
-
That does look a little thin, but it's the really heavy grain that's a bit concerning to me. There can be a very slight grain in the vinyl, but that seems like it's too much.
-
I've seen people put the speaker in the chest pouches, though it can weigh it down a bit and look odd. I've also heard about some people putting it into the tank on the back armor. Either way, as TB-61231 said, folks tend to end up running the wires under the flak vest and up the collar.
-
Mandalorian Scout Lancer drafting
Chopper replied to BikerScout007's topic in Scout Trooper: "The Mandalorian" HQ
Yeah, and there's a bit of a shine to it, which is typical of synthetic strapping. -
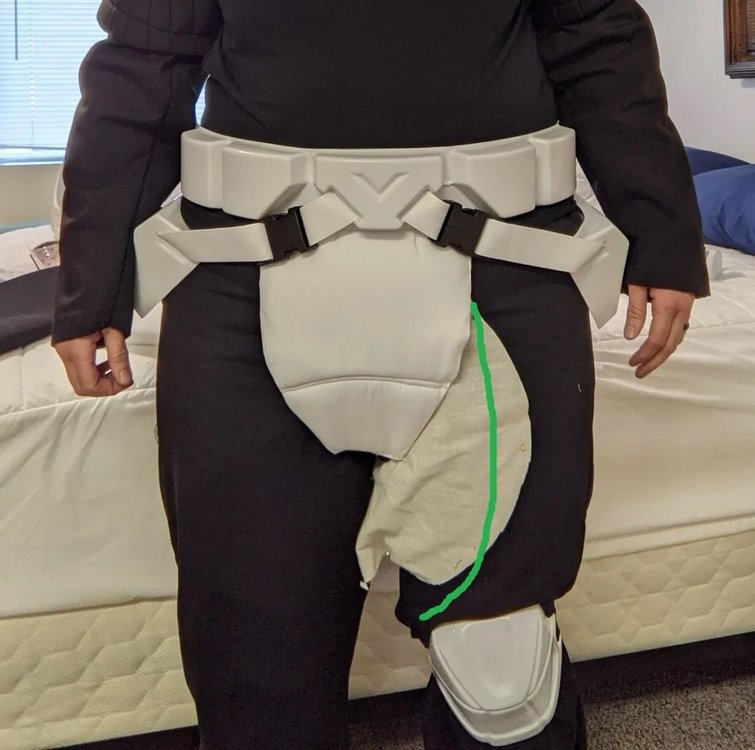
The codpiece looks a-ok to me. Also, this may already be on your radar, but you may want to bring in some of the bagginess in your legs a bit as well.
-
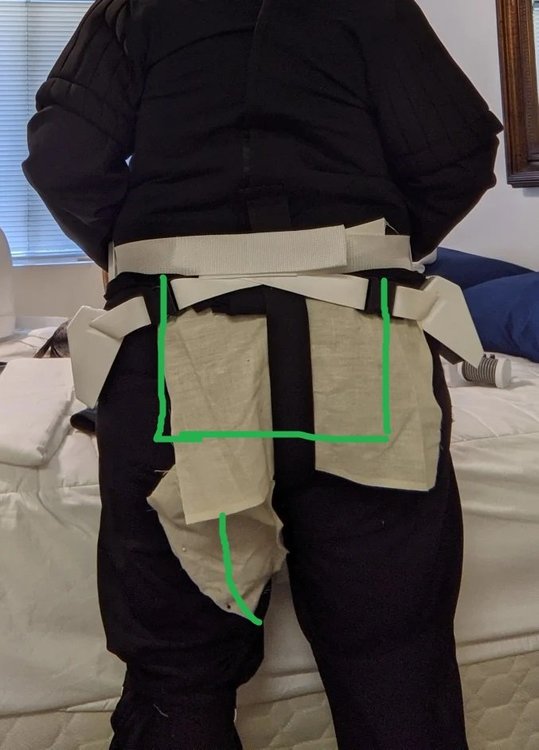
Hey, I made some adjustments in green based on the photos you posted. I think you're right that the back flap is too wide/long. Also, try for less riding patch on the back, and you can narrow it a bit on the front as well.
-
TB 10738 LANCER SPEC CLEARANCE (APPROVED)
Chopper replied to Dave Walker's topic in Lancer Deployment Request
Hi Dave, thank you for your application and congratulations on your approval with UKG. If you could do us a favor, can you please re-post your photos at a higher resolution and properly oriented? Doing so makes it easier for the review team to see the details in your application and makes the whole process work much more efficiently. You will need to use an image hosting site such as dropbox or imgur to post the photos at full resolution. Thank you and again, congrats on your approval! -
Niiiice!
-
Attention: New Vanguard Approved - ST-30412
Chopper replied to BikerScout007's topic in Announcements
Congrats on a job well done! -
Alright, so Retrofire and I chatted a bit and here's some options for you -- A lot of this is going to come down to your goals. Are you aiming for Level 2/Lancer? You've done such a great job with the soft parts, that I would hope you're going to try for Lancer, but I realize the armor sizing has complicated things a bit right now. Are you ok with possibly selling your RS kit and buying a different vendor's armor? If you're ok with going down that route, you might be better suited with a Mon Cal/Far Away Creations armor set and a Studio Creations helmet. The Mon Cal armor is better suited for smaller sized folks, especially the chest and back armor and the Studio Creations helmet is on the smaller side as well. If you want to mix and match parts from the various US-based vendors, you can prob find an ideal fit, though it's going to be more complicated in terms of getting all of your parts together at once. That's what we can offer in terms of advice right now. Let us know and we can go from there.
- 254 replies
-
- 1
-

-
- lady
- rs prop masters
- (and 4 more)
-
Awesome, thank you very much for the follow up!
-
I would check with your GML regarding basic clearance, but my inclination is yes, it's a bit too heavy. I'd say it was too heavy for a Level 2 application, if you wanted to go that way.