


Chopper
-
Posts
4,888 -
Joined
-
Last visited
-
Days Won
272
Everything posted by Chopper
-

[woobiee] 1st and New build! (Lancer probably)
Chopper replied to woobiee's topic in ROTJ Biker Scout WIP
Yes, the IB scout boots have known issues for Level 2, as per our advisory list here: http://forum.501stpathfinders.com/index.php?/topic/21881-rotj-scout-armor-kit-accuracy-and-level-2-lancer-applications/ See also Dekard's post from 5 August in the following link for remediation: http://forum.501stpathfinders.com/index.php?/topic/22556-rotj-and-remnant-boot-differences/ -
Position is generally fine, but the SC holsters tend to run long. I would recommend making a 1/2" trim-mark at the top and bottom of the holster with some pencil and letting us see how it looks.
-
The cuts look fine. You might want to round off this corner a bit with a file or emory board. Note also, that there are some issues with the Imperial Boots scout boots for Level 2/Lancer. Some modifications are needed. See Dekard's post from 5 August in the following link: http://forum.501stpathfinders.com/index.php?/topic/22556-rotj-and-remnant-boot-differences/

-
[woobiee] 1st and New build! (Lancer probably)
Chopper replied to woobiee's topic in ROTJ Biker Scout WIP
Yes, Pete/Retrofire and I talked about it and it's okay. -
[woobiee] 1st and New build! (Lancer probably)
Chopper replied to woobiee's topic in ROTJ Biker Scout WIP
Andy, the way you have the holster positioned in your photos is a-ok. No need to do any trimming or further re-orientation. -
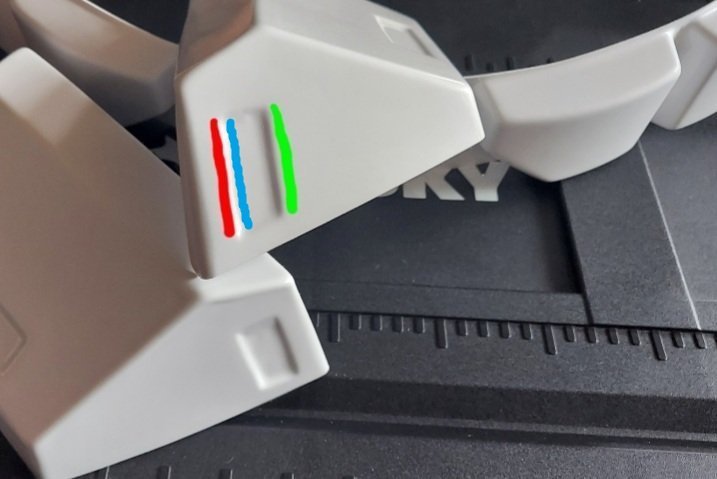
Go ahead and file down that lip on the drop boxes. Also, try and put your strapping cut here (in blue).
-
Correct, the elastic goes on the inside. You can put a washer on the inside as well, to help hold the elastic and keep it from fraying.
-
The washer goes on the top of the greeb, but the rivet head can go on either the inside or outside.
-
WIP wannabe Lancer by OnkelPaschulke
Chopper replied to OnkelPaschulke's topic in ROTJ Biker Scout WIP
Sounds good Arne. You're on your way! -
Hi Simon, welcome to the Pathfinders. @Jennk182 from the Scottish Garrison is on staff here, so you will be in good company. There are quite a few Lancer's who have used Chef's armor kit, so I don't anticipate that you should have many issues. Again, welcome and the detachment armory team is here if you have any questions.
-
I didn't use the wire for the greeblies -- you shouldn't need it. I used E6000 to secure my bicep greeblies and I haven't have any issues yet. The top tank greeb placement looks fine. Don't forget to paint the white circle. It's ok that you have the round greeb on the left side, but, if you haven't already glued it down, I would try and center it better on that side of the detonator.
-
[woobiee] 1st and New build! (Lancer probably)
Chopper replied to woobiee's topic in ROTJ Biker Scout WIP
Looks great Andy! -
Hey MAD, the Pandatrooper build is a little bit outdated, but it's still a pretty good guide on how to put together a SC kit. You don't need to do everything he did, but it should still be useful. Hopefully it will help. http://forum.501stpathfinders.com/index.php?/topic/9781-pandatroopers-sc-biker-scout-build/&tab=comments#comment-81496 Because the thread is somewhat older, make sure also to check the CRL for any references to strapping etc. https://databank.501st.com/databank/Costuming:TB_Scout_trooper
-
Nice Chris. A few pointers -- you might want to bring your knees up a bit, so they're not dropping into your boot tops. Velcro helps to keep them in place. Also, you could bring your shoulder bells in maybe 3/4", so that they're closer to the bridges.
-
There are not a lot of options to make the bright white of the SC armor match the RS kit. RS changed the paint color of their helmet when they started making the armor kits. The helmet used to be more of a pure white, but since there's a bit of a "cream" color to the RS plastic, I believe they started using a custom matched paint for their helmet. It's not pure white and it's not "racing white", it's somewhere in between. Rusto makes a "blossom white" paint, which is only very slightly off white. You could try buying a can and doing a paint test on a scrap of plastic. The match doesn't need to be exact, just closer than it would be out of the box.
-
Congrats Phil. Great job!
-
You're talking about the slash pockets at the front waist? Sometimes the white from the pocket lining shows, so I just stitched the opening closed. You can't see them once your gear is worn over it.
-
Hi Scott, the Pilot Bay armor is an update on Altmann's scout armor, so it's really best suited for larger folks. If that isn't a good fit for you, I suggest looking at some of the other armor vendors in this thread: http://forum.501stpathfinders.com/index.php?/topic/17774-the-ultimate-armor-comparison-thread/&tab=comments#comment-159857
-
Hi Miko, welcome to the Pathfinders. If you want to get started, you can begin by checking out the various armor vendors listed in this thread: There's also a vendor list here: Again, welcome, and let us know if you have any questions.
-
Sean C - scout helmet and armor build WIP
Chopper replied to sconlon68's topic in ROTJ Biker Scout WIP
Nice work and congrats pathfinder! -
Just try and get the pattern as close as you can. A lot of folks sketch it out in pencil beforehand, so feel free to give us a look before you start cutting.
-
[woobiee] 1st and New build! (Lancer probably)
Chopper replied to woobiee's topic in ROTJ Biker Scout WIP
Hi Andy, As far as the photos you've posted, I think your chest plate and shoulder bells look really good. For your vest sleeves, I don't think they're particularly flared, but you might want to bring the inside hem edge up a bit if you can. See photo. Otherwise, don't worry about it. Leave the gloves be for now.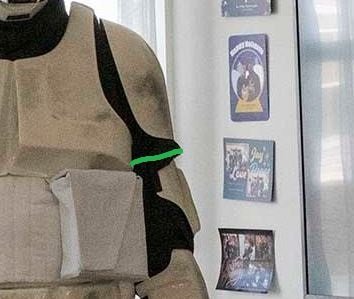
-
Sean C - scout helmet and armor build WIP
Chopper replied to sconlon68's topic in ROTJ Biker Scout WIP
Nice work finishing up your build. Overall, I think you should be alright for basic approval. Your GML may ask you to correct your left dropbox strap, which is twisted. I'd also bring in your pouches a bit, but these are minor issues. Good luck! -
Mine are cut with velcro on the ends/inside for adjustment purposes.
-
Studio creations bucket help. Lancer hopeful.
Chopper replied to Hiker Scout's topic in ROTJ Biker Scout Armor/Helmet
And since the amazon link now appears to be sold out, other buying options for the same shield: https://www.hobartweldshop.com/shade-3-face-shield-replacement/ https://store.cyberweld.com/hobart-face-shield-replacement-lens-770580.html https://www.ebay.com/itm/293791871328

