


Chopper
-
Posts
4,888 -
Joined
-
Last visited
-
Days Won
272
Everything posted by Chopper
-
At this time there are unfortunately very few finished non-3D print DLT19 makers. Diamond State Props is no longer active and the same is true for Praetorian Arms. Hellhounds Props does makes them, however I believe that his backlog got so significant that, after some complaints, he is no longer accepting new orders.
-

Needing help with spray paint results
Chopper replied to JBar's topic in ROTJ Biker Scout Armor/Helmet
Sorry, scratch that, I read your request backwards. I thought you were looking for a more off white, vs a pure white. My apologies. If you want pure white, then you're looking for what would be called "appliance white". That said, minor differences in shade aren't necessarily an issue once you're wearing everything together. I remember when I first got approved I had the SC armor with the Altmann helmet. The shade's weren't an exact match, but it also wasn't all that noticeable. -
Needing help with spray paint results
Chopper replied to JBar's topic in ROTJ Biker Scout Armor/Helmet
You might want to try the Rusto Painters Touch 2x "Blossom White". That shade has a very slight off white color to it that might match. -
Hey, what's up Alan. For the ROTJ scout, the WTF armor and helmet are not approvable for Lancer/Level 2. The WTF armor is just fine for Level 2 for the Mando scout, as that's what they used in the show. The WTF helmet would not be approvable for the Level 2 Mando scout. The ultimate armor comparison thread is here: http://forum.501stpathfinders.com/index.php?/topic/17774-the-ultimate-armor-comparison-thread/#comment-159857 The ROTJ Lancer advisory list is here: http://forum.501stpathfinders.com/index.php?/topic/21881-rotj-scout-armor-kit-accuracy-and-level-2-lancer-applications/
- 1 reply
-
- 4
-

-
Very few elements in the original Star Wars trilogy were perfectly symmetrical. This is before the era of 3D computer designs, after all. The clamps are slightly in the way, but I think where you have it positioned right now, with the raised ridge along the centerline, appears to be fine.
- 1 reply
-
- 4
-
-
WIP wannabe Lancer by OnkelPaschulke
Chopper replied to OnkelPaschulke's topic in ROTJ Biker Scout WIP
Arne, I actually think that your belt is about in the right position. The top edge of the belt should sit approximately just under your belly button. Where is it now? Can you bring your chest and back armor up a bit further? You can test the fit by overlapping the shoulder bridges. Look at how close the top of the chest armor is to the neck in the photos below. I think addressing that will help bring the pouches up. -
WIP wannabe Lancer by OnkelPaschulke
Chopper replied to OnkelPaschulke's topic in ROTJ Biker Scout WIP
Nice work Arne. Looks good. -
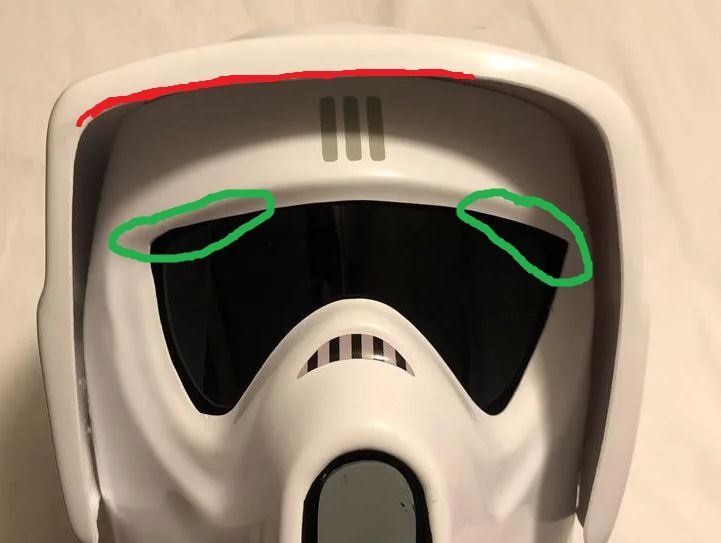
From what I can see, the biggest issue with the eyehole is the upper right and left corners, which I've marked in green. It looks like you've cut into the the ramped area along to top edge of the brow, which should be generally even along the top of the eyeslot. I don't know if there's enough material left to try and even that area out. You might also want to even up the top edge of the visor, which I've marked in red. Now, for basic clearance, it's probably fine, though your GML gets the final word. If you intend to apply for Level 2, then you would need to address those issues. If you want to go that route, then I would look at replacing the faceplate.
-
For basic approval, the tank should not have the red square, nor should it have any lighting systems. Nether are listed or depicted in the CRL.
-
Hot glue on the sides and some on the top. Leave the bottom unglued with a very small gap between the lens and the front of the faceplate. This helps prevent fogging.
-
WIP wannabe Lancer by OnkelPaschulke
Chopper replied to OnkelPaschulke's topic in ROTJ Biker Scout WIP
^^^ That is not exactly the same, but pretty close to what I did. -
WIP wannabe Lancer by OnkelPaschulke
Chopper replied to OnkelPaschulke's topic in ROTJ Biker Scout WIP
Arne, one note, since you're working on a Level 2 build -- are those shoulder bridge covers between between .5 inch and 1 inch wide? Hard to tell with the close up. I've seen some people glue the zip tie mount. Velcro tends to pop off if your arm pulls the bell too hard, but individual mileage may vary. For my shoulder bell attachments, I skipped the mount and cut a very small hole using an exacto knife on the bottom of my bridge cover and then looped the zip tie through that. Additionally, you can reference the post from April 22, 2017 in Strider's Lancer build thread, where he talks about his method for mounting the bell attachments. http://forum.501stpathfinders.com/index.php?/topic/17305-lancer-build-tutorial/ -
First Time ROTJ Scout Trooper Build (3D Printed)
Chopper replied to Cpt_Chops's topic in ROTJ Biker Scout WIP
Hey Thomas, welcome aboard. From what I can see, everything looks great. The surface quality you've shown in the photo of the forearm and knee armor look great. It should absolutely be acceptable. For the inside parts of the print -- if we can't see it and it isn't visible, then it's up to you. My take? You don't need to make the inside perfectly smooth. All you'd need to do is make it smooth enough that it doesn't catch on anything or feel uncomfortable when worn. Do the insides need to be surface smooth like the visible portions? No. The only concern I would have with painting the insides is that the paint will likely streak some white marks on your black coveralls over time. That's not a huge deal though. Great work overall. Looking forward to seeing you finish the build. -
Nice work. I can't imagine that you will any issues whatsoever with approval. Having struggled with some of the issues of the Imperial Surplus Armor myself, I was also intending to print the shin plates from Mr. Paul's files as well. Well, at some point...hah. Again, great work! Your attention to detail is outstanding as always.
-
Needing help with spray paint results
Chopper replied to JBar's topic in ROTJ Biker Scout Armor/Helmet
The issue could be a number of different things, but the results in your photos look like what happens when the solvent/propellant/and paint ratios aren't coming out right. Where are you storing the paint cans? Inside? Outside? Non-headed garage? What's your paint technique? How far back are you holding the can from the surface? Where are you painting? In a garage? Outside? Is it windy? Are you sanding the primer before applying the top coat? How long are you waiting between the primer drying and applying the top coat? How many coats are you applying of top coat? -
[woobiee] 1st and New build! (Lancer probably)
Chopper replied to woobiee's topic in ROTJ Biker Scout WIP
Congrats Andy and welcome aboard. Don't forget to request 501st Pathfinder access here: http://forum.501stpathfinders.com/index.php?/forum/162-access-requests/ -
Both the Studio Creations holster and the Chef holster are perfectly acceptable for a Level 2/Lancer submission. If you want to go with the Chef holster, that's not a problem.
-
Those look like Chef's boots. Yes they should be fine for Level 2. Are you not planning on using the holster from your new Studio Creations kit?
-
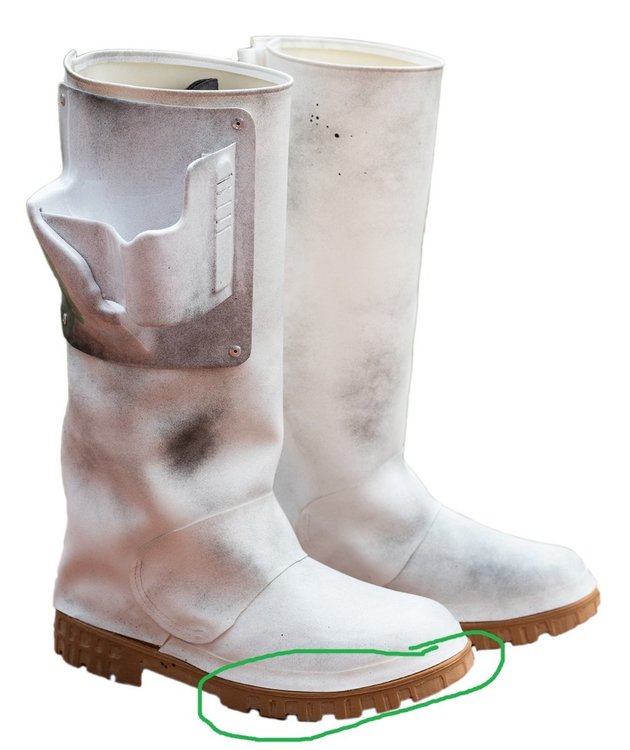
Thank you, Nico. The review team has discussed the matter of you purchasing a new set of SC armor and we're going to recommend closing this Lancer application until you've assembled your new kit. On top of reducing the weathering, there are number of parts on your current armor that would need replacing or repairs, such as the holster and tank. Also, now that we're seeing the belt, the double rivets on the sides would need to be removed and filled as well. Once your new armor is assembled, you'll need to post a new application photos. In addition, we have some follow up notes: The shoulder bridge covers are obscured by your thumb and measuring tape. As per the CRL, they should be between ".5 inch and 1 inch wide". Yours appear to be bigger than that. Please remember to check that item when you're building your new armor. Your new pouches look fine. As I mentioned above, your belt is the old 3-piece SC belt. The two rivets would need to be removed and the holes filled. As per the CRL: "Belt has the appearance of being a one-piece construction. Any joins or seams are filled." Since you are purchasing a new SC armor set, you can use the newer one piece belt that's included. For your cod and bund, I think you should be able to still use your bund, as long as you can unpick the attached codpiece without damage. I do not think you can salvage the codpiece, as it will likely be too short to work effectively on its own. You will likely need to sew or buy a new codpiece. For the boots you will need to add cuts to the front portion of the sole. See the area I've circled in your boot photo below, vs the CRL photo. We do not see any cuts in that area of boots. While the cuts do not have to exactly match the Sierra Sneaker soles, they should approximate the pattern on the work boot sole. Thank you again for your application and please let us know if you have any additional follow up questions.

-
No problem at all!
-
Do you mind sharing where you got it from? Offhand, there are quite a few inaccuracies with that tank topper. Basic clearance ultimately rests with your local GML, but in my opinion it shouldn't be approvable for either basic or level 2 clearance. From the CRL (basic level): The top of the tank is flat with a black tank topper detail attached. Tank topper features the same greeblies as seen on the screen-used armor. Tank topper has a white painted circle and red line detail. While that tank topper is a rough approximation of the scout tank topper, it's far enough off that it shouldn't be approvable. Check with your GML. If you need a replacement tank topper, Studio Creations offers a la carte parts: https://studiocreations.com/howto/bikerscout/forsale_bike_replacementparts.html
-
Hi Nico -- To be clear you are planning on purchasing a full new set of Studio Creations armor?
-
The ROTJ scout basically had some misting/blaster spots, which I think you've approximated. Less is more, so I wouldn't do any more weathering than what you have now.
-
How to best weather the bag
Chopper replied to JBar's topic in Scout Trooper: "The Mandalorian" Weapons/Accessories
MikerScout dyed his to match the belt strap. See the link below. Otherwise, if it's just looking too "crisp", you could run it through the washer a few times to take some of the sheen off of it. Other options might be some light misting with a spray can, but I'd rather see a photo before committing to paint. -
WIP wannabe Lancer by OnkelPaschulke
Chopper replied to OnkelPaschulke's topic in ROTJ Biker Scout WIP
You might want to try mocking up a cod with heavyweight paper, or cardboard, just to work out the proportions. It takes a lot less work to cut a new piece of cardboard, than it does to sew a new cod.


