


Chopper
-
Posts
4,886 -
Joined
-
Last visited
-
Days Won
271
Everything posted by Chopper
-
Gotcha, the screen used helmets cut two slits in the side portions under the faceplate and glued in some 1" elastic. See photos below. Other options include attaching the elastic to the helmet bolts, or if you're using a hardhat liner, to the liner. Also note that the chin cup is totally optional, so you don't have to have to use one.
-
What brand of helmet are you using?
-
Hello and welcome. Looks like you're well on your way. Let us know if you have any questions as you progress with your build.
-
The scout armor was made to be tossed around, so it's not surprising that some screenshots show one side of the tubing as longer than the other. There is no specific defined length for the tubing -- it should be generally proportional to your body. If you look at the rear CRL photo, the length of the tubing should be just a bit inside where the webbing meets the belt.
- 1 reply
-
- 2
-

-
ROTJ or Mando Scout? I can't recall exactly how the WTF tank is shaped in relation to the back armor, but you'll need to rough trim the tank down enough that it's close to fitting, then make small cuts until you can get it to fit more flush. There's no real magic technique to it, aside from going slowly and working carefully. Note that on the ROTJ scout, the back tank wasn't perfectly trimmed and wobbled around quite a bit, as it was only held on with an elastic loop. These photos should give you a good idea of what to shoot for.
-

WIP wannabe Lancer by OnkelPaschulke
Chopper replied to OnkelPaschulke's topic in ROTJ Biker Scout WIP
The riding patches are certainly one of the most challenging parts of making your own coveralls! -
Armor Weathering 101 Help
Chopper replied to RobbyTheRobotR1D1's topic in ROTJ Biker Scout Armor/Helmet
I used Rustoleum Painters Touch 2x flat black primer, but it doesn't necessarily need to be that specific brand. The soft goods, bund, cod, pouches, boots are also weathered, though they should be weathered more lightly than the hard armor parts. Just a little very light misting. You really don't want to overdo it with the soft goods, as reversing it is basically impossible. -
Armor Weathering 101 Help
Chopper replied to RobbyTheRobotR1D1's topic in ROTJ Biker Scout Armor/Helmet
Hey there, take a look at Strider's Lancer build thread, here: http://forum.501stpathfinders.com/index.php?/topic/17305-lancer-build-tutorial/ In the thread, he has a video that covers the weathering technique: https://www.youtube.com/watch?v=2be0cuCSoLQ&feature=youtu.be In short, stand back a bit and do some misting with a rattlecan, or if you have one, an airbrush. With weathering, less is more, so don't go too heavy. If you want to practice on some scrap or a paper plate, you can always do that first. And let us know if you have any questions. -
zv288bot's Rebel's Biker Scout Build Thread
Chopper replied to Zv288bot's topic in Rebels Biker Scout HQ
"Appliance White" might match better, if you can find it at the hardware store or home depot. There's also Tamiya TS-26 Pure White, which is a brighter type white. https://www.hobbytown.com/tamiya-ts26-pure-white-lacquer-spray-paint-100ml-tam85026/p-xuychffqcqsbg4yz -
Nice, yes there are a few of us who have a background in scale models, myself and @Retrofire included. I think you'll find that the skill set is easily transferable. Good luck!
-
Here's a comparison between the Mon Cal/FAC helmet and the RS helmet. Mon Cal on the left, RS on the right. Built correctly, the Mon Cal helmet is absolutely approvable.
-
TB - 81931 Lancer Request (APPROVED)
Chopper replied to Hiker Scout's topic in Lancer Deployment Request
Hi Chris, you will need to use a hosting site such as imgur, flickr, or dropbox, which are free, to host your application images. Please also check this post for other requirements regarding the application process: -
WIP wannabe Lancer by OnkelPaschulke
Chopper replied to OnkelPaschulke's topic in ROTJ Biker Scout WIP
That edge looks fine. You might want to sand it a bit more with a nail file or a piece of 400 or 600 grit sandpaper. As for the ABS paste, have I already linked this post from whitearmor? That should give you an idea of the proportions/consistency. It's not an exact science. https://www.whitearmor.net/forum/topic/42866-how-to-make-abs-paste/ I apply the sludge with a tongue depressor, or popsicle stick, then I let it cure for about a day. Once its fully cured, you can sand it down as if it were regular plastic. Start with lower grit sandpaper, and work it to 400 or 600 grit to smooth it out. Try applying it on a small area first, so you can get the hang of it. -
Hello! Thoughts about my costume for approval?
Chopper replied to Aurel's topic in ROTJ Biker Scout HQ
The extra trapezoid detail is not mandatory in any way for basic approval -- it's totally optional. And should you choose to use it for a Level 2/Lancer review, then it should only be when using the 4 rank version. Note also that the 4 bar ranks are double thick. Honestly, it'd be easier to just keep the 6 bar rank and remove the trapezoid. The Lancer review process is administered by the Detachment. See this link for more information about the application process. http://forum.501stpathfinders.com/index.php?/topic/20150-lancer-deployment-request-rev-2021/ -
Just slide the metal clips over the belt webbing. I used to also have some velcro on the back to keep it affixed, but I ended up removing it from the tube b/c it wasn't necessary.
-
Hello! Thoughts about my costume for approval?
Chopper replied to Aurel's topic in ROTJ Biker Scout HQ
Congrats on your approval! One comment on the back tank detail -- I recognize that your GML asked for it for basic approval, but note that the little trapezoid on the horizontal pinstripe is only used with 4 "rank" stripes. From the CRL, Level 2: "If tank has extra trapezoid detail on the center tank pin striping, only 4 thick rank bars are acceptable." -
That sounds like a worthy use of your existing scout armor set. I hope that he enjoys it!
-
HELP Helmet Paint Scuff
Chopper replied to RobbyTheRobotR1D1's topic in ROTJ Biker Scout Armor/Helmet
Possibly yeah. Before spraying the helmet, I'd test the shade you intend to use on a plastic spoon or something first to see how well it matches. -
HELP Helmet Paint Scuff
Chopper replied to RobbyTheRobotR1D1's topic in ROTJ Biker Scout Armor/Helmet
I've never heard of using olive oil to remove car paint before. Different types of paints require different types of solvents. If you used automotive grade paints, I can't see it doing much to remove the paint smear, aside from maybe staining it a bit. -
HELP Helmet Paint Scuff
Chopper replied to RobbyTheRobotR1D1's topic in ROTJ Biker Scout Armor/Helmet
Having experienced this sort of thing many times with my own helmets, try to make sure that the fix for this small thing doesn't end up turning into a big thing, like a helmet repaint. Believe me, I've been there and sometimes the fix cascades and ends up being worse than the original problem. I would also advise avoiding "goof off" or other paint thinners, as that will likely take off the original RS helmet paint along with the touch up paint. A toothpick will work when removing paint from straight ABS, but on a painted surface, like the RS scout helmet, it will probably scratch the original paint surface. 90% iso alcohol on a q-tip might remove some of the paint. You can do a test in a small corner to see if the iso alcohol does anything, but try and be conservative about it. I'm willing to bet that it likely won't, since you said it was car paint, which is probably lacquer based. Regardless, good luck and let us know how it goes! -
HELP Helmet Paint Scuff
Chopper replied to RobbyTheRobotR1D1's topic in ROTJ Biker Scout Armor/Helmet
Whose helmet maker do you have? There aren't a ton of options to get a perfectly seamless paint blend, short of a full repaint, and that's a big lift. You can try getting some of those triangular makeup sponges from CVS and using them to dry-dab some white acrylic paint around the mark. It might diffuse the edges and discoloration a bit. If you can match the paint shade and have an airbrush, then you can probably blend it fairly well. Spray paint would not look as nice, so I'd avoid that option for a touch up. Armor is going to get dinged and weathered as you troop. You can always look towards swapping to a weathered scout. After all, look at how dinged up the screen used scout gear was! It'll blend in perfectly! -
The first of a thousand questions about my build...
Chopper replied to RZill's topic in ROTJ Biker Scout Armor/Helmet
It's actually harder to tell from the inside of the forearms, but I'd go with the red stripe. Reference this photo from the Scoutopedia, which also gives you a decent view of the front of the forearm as well: -
Hey Ron, I went ahead and answered your question in the other thread.
-
The first of a thousand questions about my build...
Chopper replied to RZill's topic in ROTJ Biker Scout Armor/Helmet
There are not a ton of photos of that side of the forearm armor in ROTJ, see screenshot image below. I'd try and round out the front edge there as I marked in green in the attached photo. That should get you close to how it should be cut.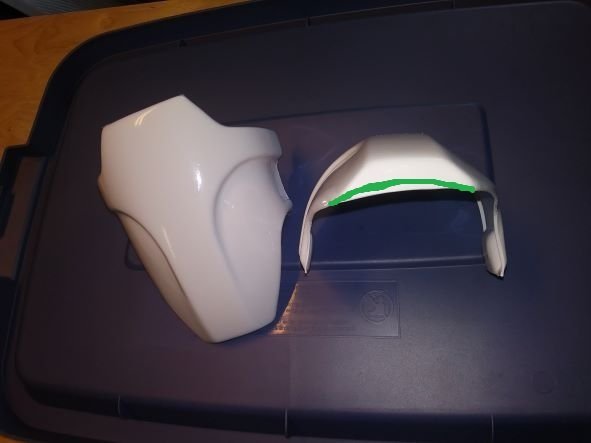
-
At this time there are unfortunately very few finished non-3D print DLT19 makers. Diamond State Props is no longer active and the same is true for Praetorian Arms. Hellhounds Props does makes them, however I believe that his backlog got so significant that, after some complaints, he is no longer accepting new orders.
