


Chopper
-
Posts
4,888 -
Joined
-
Last visited
-
Days Won
272
Everything posted by Chopper
-
The item that's most clearly specified in the CRL is the velcro. For Level 1: The boots are secured up the back using 25mm (1 inch) white hook and loop fastener. I do think the grain on the vinyl you used is a little too much. Sometimes there's a little grain, which is okay, but the material in the photos looks "pebbled". Check with your GML.
-
Try overlapping the shoulder bridges by about an inch and secure the halves with tape. Then take another look. That'll inform how much you need to trim.
-
Honestly, I'm not seeing a huge difference in shade. Either should be fine.
-
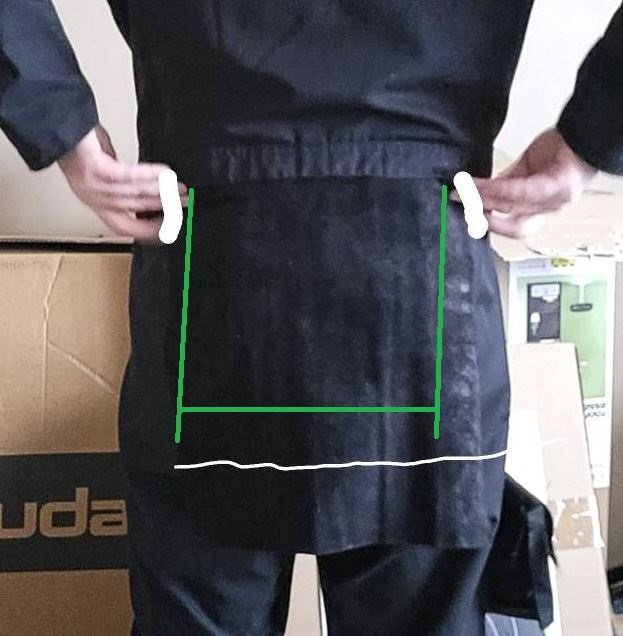
The butt flap is an area where folks tend to over-estimate the size. That's not such as bad thing, as its easier to remove material vs put it back. Look at the CRL photo -- the flap isn't that big. I did some eyeball approximate markups on the sizing for your build in green below. Try and get it in that general ballpark.
-

Gree gets around. Biker Scout WIP (WTF and 3d print)
Chopper replied to Gree23's topic in ROTJ Biker Scout WIP
Congrats -
The requirement for single direction t-bits has not been added to the CRL yet, and even then it would be a L2 requirement. For basic, the exiting t-bits are fine.
-
Those cuts should be fine, and mostly hidden by the strapping. I think hitting them with a nail file should clean 'em up easy enough.
-
A full V2 would probably be overkill, as he didn't overall all of the parts, The shoulder, bicep, forearm, det box, and knee parts are the same. Are the detonator caps concave or flat? The chest and back are different with the V2, but the V1 will still pass clearance.
-
That is the last gen Studio Creations kit, but it should still clear approval without issue. The only issues I see are the old style 3 piece belt, the double rivets to attach the back belt webbing, and the large strapping holes in the drop boxes. You might want to pick up a new belt and boxes from Studio Creations, but otherwise, everything else should be ok.
-
Unfortunately, that tank topper is not going to work, even for basic clearance. That's the Don Jarr tank topper and it's very oversized. Once you remove the tank topper you'll need to further trim the top of the tank so it fits more flushly along the back armor, as is shown in the photo Dennis posted. Can you clarify your assembly of the boot holster? Did you cut a slot and push the holster section through the slit? Is the yellow portion glue? The protruding section should not be outwardly visible and needs to be flush. Are you able to trim it without the holster section coming out? Those rank stripes are thick. It's fine to have 4 thicker ones, since we saw that on screen. I recommend you remove the 2 top ones so that you have 4. We are happy to continue to help with your build, but do you know of any armor parties or fellow garrison mates who are experienced armor builders? There's only so much we can do remotely when it comes to armor trimming and assembly. If possible, I do think it might be helpful if you were able to team up with someone and work on the armor build side by side.
-
Looks good
-
I'd go with the longer forehead stripes. The Trooperbay logo decal is fine for approval.
-
FYI, the images in your latest post aren't displaying.
-
If the tank topper plate is thick enough that, when mounted, it appears as if it was riveted onto the top of the tank, then the indent should be fine. If the indent makes the tank topper flush with the surface, then it would need to be filled.
-
FYI, E6000 may not work so well for mounting the lens. If it doesn't work for you, most people use hot glue on the inside, along the sides of the lens.
-
The screen used chin strap used with the cup was just a piece of elastic. However, if it is not outwardly visible then you can do whatever works for you.
-
Good call. You should be able to cut the welder's shield with a pair of lexan scissors.
-
That should work just fine.
-
What's your method of lining the pockets to hold stuff?
Chopper replied to JBar's topic in ROTJ Biker Scout Soft Parts
if you cut the body-facing part of the foam blocks into a L_⅃ shape, then you can use the interior to put stuff into your pouches, while still retaining the shape. -
FYI the GA aerator, depicted on the right in the earlier photo, is not accurate and should not be used.
-
Hi Chris, the CRL is considered both a visual and written guide, so the indents on the tank will need to be filled in. A few folks have recently picked up the galactic armory files and asked us about them. We are still reviewing them for 501st compliance, but we do have a few initial notes which you can read here: https://forum.501stpathfinders.com/topic/24366-doms-scout-trooper-rotj-wip/#comment-230139 https://forum.501stpathfinders.com/topic/24378-galactic-armory-stl-files/#comment-230152
-
Also, Fibre-Metal by Honeywell FM4001 Quick-Lok Helmet Adapter Kit https://a.co/d/1EQc3Dr
-
You have to cut a square hole in the sides of the visior shroud to fit them into the sides of the helmet and a round hole in the dome portion of the helmet. It's pretty easy to see once you have the parts in hand. https://forum.501stpathfinders.com/topic/10270-fs-accurate-tb-helmet-hardware-kit-headband-kit-ongoing/
-
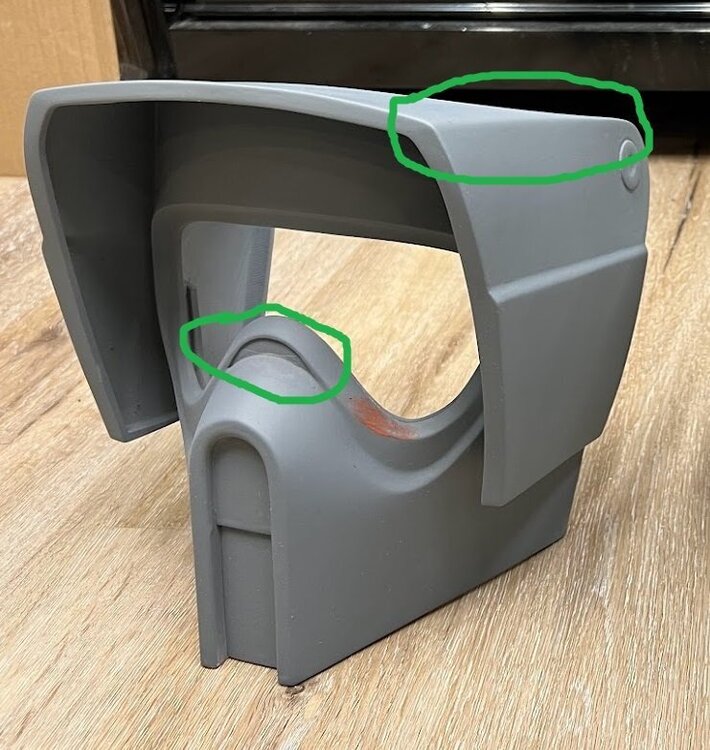
Hey Dom, just a FYI, but the Galactic Armory 3D model does have a few areas that you should address for clearance -- You might want to do some sanding to try and round out that hard edge at the upper corners of the visor shroud. The screen helmets had a much softer edge in that area. The indent above the snout and just below the eyeslot should be flat/flush and it should be covered by a decal once finished. I'm guessing the indent on the bottom half of snout is for the aerator?
-
A visible seam in the flak vest is okay, but it's also okay if you don't have one. When sewing leather, make sure you're using a leather needle for your machine.


