

KOtrooper
-
Posts
771 -
Joined
-
Last visited
-
Days Won
32
Everything posted by KOtrooper
-
Before I go to town gluing down the dog bone... Does everything look ok with my boots? Wasn't sure if my dog bone should be wider to try and cover the lace bump more. Sent from my Pixel 3a using Tapatalk
-
Is the visor pulling away because it's too strong? If not you could try some gaffers tape and/or e6000.
-
I'd make a paper template to get a rough cut out of your material. Try and hot glue it in. That said, a more accurate look is a curved motorcycle shield. I got a few off of eBay for $12. Sent from my Pixel 3a using Tapatalk
-
The motorcycle lens will be loads easier to work with. That's what I have. If you want to stick with the Montana Gold for your colors, you can use Montana Gold Red Orange G2090 Sent from my Pixel 3a using Tapatalk
-
Baby powder and black shoe polish helped me in weathering the pants. Undershirt doesn't need it. Sent from my Pixel 3a using Tapatalk
-
Did you hem the vertical part where the Velcro is? I didn't on mine... Now wondering if I was supposed to. Sent from my Pixel 3a using Tapatalk
-
If lexan scissors don't work, try a rotary tool with a cutting wheel. Sent from my Pixel 3a using Tapatalk
-
Pleased with the progress on the boots. Hopefully the rest goes smoothly. Sent from my Pixel 3a using Tapatalk
-
Thanks. I'll try scuffing it up on the back when I continue working on the boot. The e6000 worked great though and the contact cement continued to make a tighter bond.
-
Boots progress. Took some trial and error to get the wrinkles out of the vinyl but a bit more heat and stretching worked well. The contact cement helped the rest of the wrinkles disappear. The contact cement didn't form a really tight bond after an hour (I could still pull the fabric away). Not sure if it's the heat or older cement. I put some e6000 at the ends of the fabric to help the bond. We will see if that worked tomorrow. Sent from my Pixel 3a using Tapatalk
-

Rad’s Shoretrooper Grunt Vanguard Request (APPROVED)
KOtrooper replied to Rad's topic in Vanguard Deployment Request
Fantastic. The team will take a look and get back to you! Sent from my Pixel 3a using Tapatalk -
Not really. A lot of us just use a sweatshirt type pattern to make our own. Mine is split down the middle and held together with nylon webbing/buckles to allow for more airflow. Some zip up the front or back. If You're sewing the lines, you'll want about 4mm in-between. I used headliner foam to back my fabric and give it a little bit of puff. Sent from my Pixel 3a using Tapatalk
-
I just assembled mine using e6000 and hot glue to tack some of the areas together. I did smaller sections at a time (letting the e6000 cure for 24 hours). Was a slow process but worked well for me. Sent from my Pixel 3a using Tapatalk
-
It did get crooked. I loosened up the e6000 (easy to do in the heatwave we're having) and am regluing it with different clamps. I think I'll print a second one a bit bigger and see if that looks like a better fit.
-
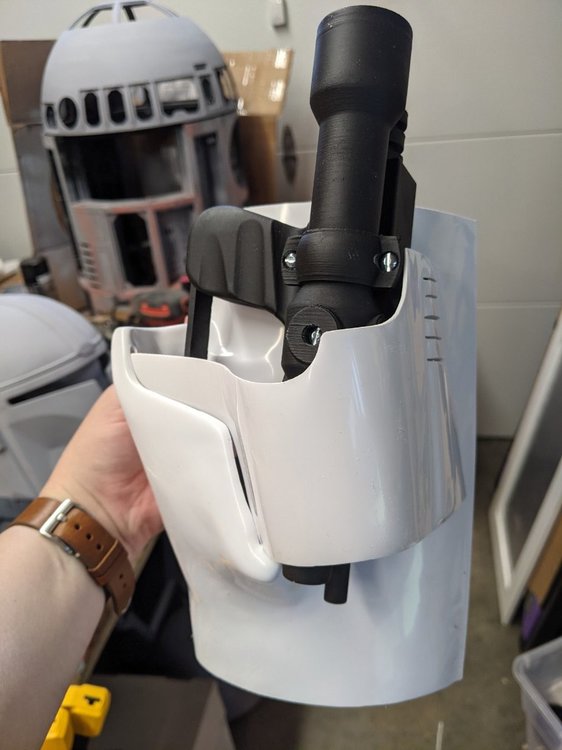
I'm still working on my EC-17 but is this fitting the holster ok?
-
Back armor is done. The bottom rivet doesn't go through both pieces as the plastic isn't close enough. The top rivet does go through both... And of course I attached that one first. Sent from my Pixel 3a using Tapatalk
-
Finished cutting the boots and none of my skin was cut in the process. Had a few close calls though. Ended up using a box cutter and changing out the blades halfway through each shoe. Did slight touch ups with a rotary tool. Sent from my Pixel 3a using Tapatalk
-
Thanks. I ended up just using the rivets I bought at Ace Hardware.
-
Those look so clean! I hope mine come out that smooth on the toe. Great job!! Sent from my Pixel 3a using Tapatalk
- 254 replies
-
- 1
-

-
- lady
- rs prop masters
- (and 4 more)
-
Thanks, that makes me feel better. I'll drink around with it later with fresh eyes. Maybe play with a Velcro solution or something. I really don't want to mess with a heat gun on the bucket at this late in the process. Sent from my Pixel 3a using Tapatalk
-
Bucket is assembled! I'm going to draw up and make my own decals to color match the gray I used so that's a later step. But it's assembled!! One side doesn't want to stay closed. The flashing from the back is pushing on the face of the mask. Should I trim it or use a heat gun to bend it in a bit? Sent from my Pixel 3a using Tapatalk
-
Spray paint for thermal detonator tube portion
KOtrooper replied to hokie1's topic in ROTJ Biker Scout Armor/Helmet
You might also have success in coating it with plastidip and then paint. I've only used the Montana gold (acrylic) paint over it but it works great. Sent from my Pixel 3a using Tapatalk -
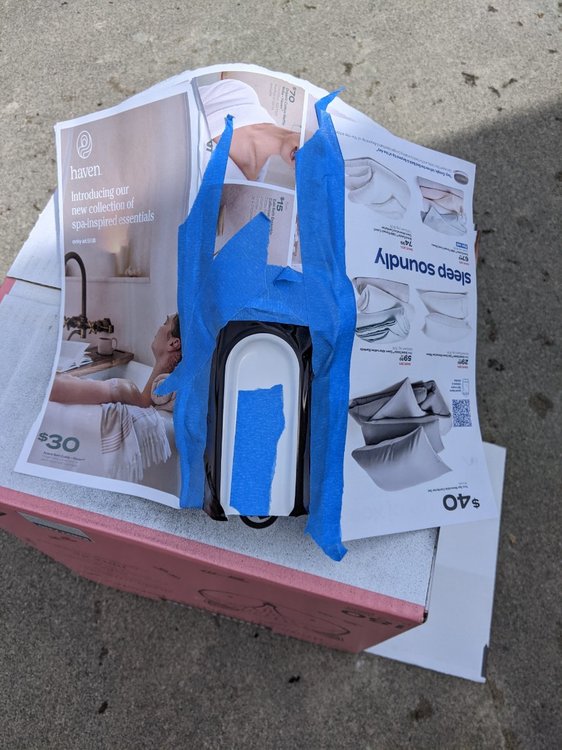
Thanks Corey! I couldn't find my thin masking tape for curves so I made a masking template and cut it out on my Cricut. Here's a SVG file to use. Note that I made it for my Studio Creation's helmet. I don't know how well it'll work on other snouts. https://www.dropbox.com/s/tkxadc0vdvwc7st/bikerScout_snout_SC.svg?dl=0 You'll want to use Oracle 631 (which is a low-tack/temporary use). Do not use Oracle 651 (it is permanent). Hobby Lobby's line of vinyl is similar to 631. You could also print this on card stock and trace it on a bunch of blue painter's tape. In the photo, the vinyl template is black. I then used blue painters tape to cover the rest of the bucket to protect it from overspray.
-
Just got back from Ace hardware. Got the last few packs! How are the trim lines looking on the face of my helmet? Sent from my Pixel 3a using Tapatalk
-
After a few misfires, the bund is done. Currently on the hunt for the proper rivets. The big box stores are not friendly to Biker Scouts. Sent from my Pixel 3a using Tapatalk


