


Strider
-
Posts
769 -
Joined
-
Last visited
-
Days Won
47
Everything posted by Strider
-
TB-27615 requesting Lancer status (APPROVED)
Strider replied to sibbel29's topic in Lancer Deployment Request
Thanks for your application. Please stand by while the staff is conducting the review. -
The Ultimate Armor Comparison Thread!
Strider replied to BikerScout007's topic in ROTJ Biker Scout Armor/Helmet
Great job, Mickey - this is going to be very helpful for people having to decide on a specific set of armor. You may want to add Spike's armor to that list as well if you can find a reference. Cheers -
Thanks guys, much appreciated I've revisited the soft parts so many times, I really hope this was the last time, haha.
-
Inspired by Gino's scout build exhibit at SW celebration I decided to redo the all soft parts using accurate measures and materials. The fabric for the cummerbund and cod is a 100% cotton with a mercerized satin finsh. The weight is 350g per meter or 115g per m2. Fabric example using studio lightning: The height of the cummerbund is 8.5 inches and about 9 inches on top of the arc. The fabric for the pouches is a soft white canvas 100% cotton of medium weight that I have dyed off-white with black tea. Based on Gino's measures that were taken from an original template (as we were told) I've drawn this template: https://www.docdroid...mplate.pdf.html Close up example of the pouch and CB fabric: And here's how it looks on the mannequin:
-
Hey bro, atm I'm not making any armor parts but I'll let you know when I do. Thanks!
-
I just wonder why they even bother giving out new release dates. This is, what, the 8th new release update? Wake me up when somebody indeed holds the efx helmet in his hands ;-)
-
It's also pretty expensive for a 3D. Plus it's potentially sized too small. It could be an alternative for trooping since they're super lightweight but otherwise I'd stay clear of the 3D prints for now.
-
Thermal Detonator (TD) The TD looks like a real tiny part but there's actually a lot of effort that goes into it. First off, let's start with the individual parts: - plastic shell - 2 greeblies - zip tie - tube - cable (still optional for Lancer at this point, you could also use a vacuum cleaner hose e.g.) - 2 end caps - belt clips You can find decent belt clips online like these here >>> http://www.knifekits...roducts_id=4192 but since I like my parts to be accurate I took a shot at making them myself. This was my reference pic: I started with drawing a template and transfered it onto a steel panel. After that I cut out the form with a dremel, sanded it, bent it to the appropriate form and painted it black. For the hose I used a 1 3/8" hose garden hose and for the cable two 12' HDX extension cords. You'll need to cut off the ends and pull them apart. This is the hose and the cable I used: Link to cable: http://www.homedepot...2-417/100672779 After tieing up the cable around the hose I painted it using a Vallejo light grey: One more quick note...make sure to twist the cable when you're wrapping it so the the flat side faces up. The split sides should be next to each other (this tipp comes from Shaun actually I just let the final pictures speak for themselves: Reference: Final results: One word of caution though re the greeblies: In the film both combinations were seen however for reasons of standardization the current Lancer standards require that the larger greeblie sits on the left side (when you look at it). UPDATE from CRL: The face of the thermal detonator has a short side and a long side: On the long side is a black rectangular thermal detonator greeblie, either prongs up or prongs down; On the short side is a round black greeblie; If thermal detonator face is symmetrical (sides are even), greeblies may go on either side. Detonator box is gloss white or semi-gloss and may be lightly weathered. OPTIONAL Level two certification (if applicable): Thermal Detonator end caps are concave and not flat. Thermal Detonator face must have a short side and a long side; symmetrical TDs are not permitted.
-
Ah, just stumbled across this thread... great to see introductions have already been made! Shaun, rest assure Boris is the best man for the job
-
Try to hit up Dauitsch here on the forum, he's from Germany too and makes excellent soft parts if you can get a spot on his waiting list. Cheers
-
TB-43043 Requesting Lancer Status (APPROVED)
Strider replied to Hadde's topic in Lancer Deployment Request
Great, that's the spirit:) Looking forward to your upgrades, bro! -
TB-43043 Requesting Lancer Status (APPROVED)
Strider replied to Hadde's topic in Lancer Deployment Request
Well, yeah I understand but you're throwing a couple of things together. Let me try to entangle: If Lancer CRL say the belt webbing is cotton (although we know it was nylon) it will be accepted. We currently have a couple of things on our list that require changing. But since we don't want to confuse people by constantly changing the CRLs the changes will only be updated periodically. Furthermore, before any change is implemented there are thorough discussions about whether to make it required, optional or dismiss it at all. While the Lancer approval process lasts it's always possible that further things are pointed out by other members of the Lancer review team so this is nothing unusal. -
TB-43043 Requesting Lancer Status (APPROVED)
Strider replied to Hadde's topic in Lancer Deployment Request
Nope, pouch padding looks good to me. Okay, for clarification: The Lancer requirements are of course the current Lancer CRL as shown on the 501st page. Having said that, the last couple of months have seen quite a bit of new findings re the scout costume (some of them confirmed or speeded up by Gino's scout display) and the CS felt it would be unfair not to acknowledge those if people want to incorporate them in their builds already. So until the current Lancer specs will eventually be updated things like the tank strap or the 2 inch stracp for the upper arm armor (amongst others) will also be accepted for Lancer. -
TB-43043 Requesting Lancer Status (APPROVED)
Strider replied to Hadde's topic in Lancer Deployment Request
Hey bro, just to clarify on some general points before I answer the specific questions. First off, since our Lancer specs have been extended by the end of last year, the bar has in effect been raised. Moreover, the Lancer review team has changed and different people may have different focus points. I really hope our feedback has not been discouraging - in the end we're only here to help you become the best scout you can be (at least costume-wise ;-) Regarding your specific question: Reference pic for mud flap lenght: Reference pic for belt trimming (basically directly above and below the boxes): The picture above is also a good guideline for the fit of the pouches. The BSN template you're refering to is unfortunately outdated and incorrect. But even this one always needs to be adjusted to the individual. In the "Lancer Build Tutorial" I've provided a template with screen accurate measures (taken from Gino's scout on the SWCO) which may be a good starting point if you are around the height of the original scouts (about 6 feet I believe): >>> http://forum.bikerscout.net/index.php?showtopic=17305&view=findpost&p=155978 Hope that helps and please let us know if you have any other questions! @Mattcamaro: I leave it up to our XO to make that announcement. -
TB-43043 Requesting Lancer Status (APPROVED)
Strider replied to Hadde's topic in Lancer Deployment Request
Hi Derek, thanks for bearing with us. Following a thorough review of your updated pics this is the current shopping list. It may look long but I think besides the shoulder bells exchange the majority of points are rather quick fixes. The pouches may look too large when they are adjusted to the right position but let's see. - Shoulder bells need to be replaced by some larger ones with appropriate screen appearance - The pouches are spaced too narrow. They should start one inch from the last stitched chamber of the CB. - The mud flap is about 2 inches too long and needs to be shortened - The rivets on the knees should be on the side and not on the guard. This is just an observation (no change required) - The belt above and below the boxes needs to be trimmed (not the drop boxes but the belt boxes) - Bicep armor needs to be rotated to the respective sides (like they were sitting in your initial pictures) - Belt boxes should be be adjusted, also adjust the plastic clips so they are aligned - Canvas straps on shoulders should be aligned - Cummerbund closure should be completely covered (no velcro visible) Cheers -
Weathering Weathering your scout is acutally fairly easy - if you know how to do it 😉 I know I was pretty scared the first time that I would mess it up and it takes a couple of tries to get the right feel for it. But after that it's fun and it's easily and quickly done. I would suggest trying it out on some white sheets of paper before to get a feeling for the right distance and intensity. It's easy to get carried away and apply too much weathering so I would recommend to start off easy - you can always apply more. Also it doesn't hurt to have a certain pattern in mind which you want to emulate. When I weather a scout I follow three steps. The first step is to apply a base layer by just spraying a mist of black from about 2 feet away. Word to the wise when you're spraypainting outside: Don't spray against the wind 😉 The second step is to move a bit closer whith the rattle can and apply some accents. Make sure not to get to close unless of course you want to emulate a dalmatian. For the third step I'm using a fine grid sandpaper to apply some scratches (mostly on the accentuated parts). Try to follow some random pattern, best is not to give it too much thought. Again, too many scratches look unrealistic so start off easy and see how it looks. I've made a short video to convey the idea. Sorry for being out of focus sometimes but it was not easy to concentrate on spraying and filming at the same time, lol! As ususal the bright light outside "eats up" a lot of the more subtle base weathering so I've included 2 pictures below with the final results. Any questions please feel free to ask! http://www.youtube.com/watch?v=2be0cuCSoLQ&feature=youtu.be
-
Nice job, bro. My respect for hand stitiching them ;-)
-
How do you keep your faceplate open?
Strider replied to Speedy-T's topic in ROTJ Biker Scout Armor/Helmet
Yes, the original helmets had a ratchet system which would keep the facemasks up. The LW and RS lids have it as well but it pretty much depends on the skills of the assembler how good the ratchet system actually works. -
Nice - would be great to see more of your progress pics.
-
Sorry it's "Polymer Armory" not Polytec...
-
Yeah, that's the one who is booked out afaik ;-)
-
Hi Falk, the tailors I know are all booked out atm but if you're on Facebook you can join our local Bikerscout group "Wolfpack Advance Recon Team" and see if anybody else has some tipps for you. Cheers
-
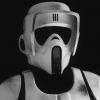
Since I was re-doing my pouches anyway based on the new measurements Mickey (Bikerscout007) got from Gino's scout at the SWCO exhibition I thought I quickly show the process of dying them. No big magic to it just a couple of guidelines/ rules of thumb: - You can basically use any kind of black tea for it - The degree and speed of dying them depends on three variables: Amount of tea bags (I use quite a bit more as I would if I made a regular tea), water heat (not above 90 degree celsius, 194 Fahrenheit), the time you leave them in the dying pot (usually something between 5-30minutes) - The larger the pot the better as you want to avoid tea stains. Also regular stirring helps. - Less is more. If you look at the references (below) the color difference is very subtle. Btw, if you want to give it a try yourself here's a link to the template I made >>> https://bit.ly/2KQSl4t Reference shot from SW blu ray:
-
Hey bro, welcome to the BSN ;-)
-
The next parts are the upper and lower arm armor and the knee guards. I guess the pictures speak pretty much for themselves but if you have any questions just let me know Elastic sizes: Knee guards: 12mm-20mm (1/2-3/4 inch) lower strap, 12mm (1/2 inch) upper strap which is riveted to the knee. Upper arm armor: 50mm (2 inch). This will be updated in the Lancer specs soon. Lower arm armor: 25mm (1 inch)
