


Strider
-
Posts
769 -
Joined
-
Last visited
-
Days Won
47
Everything posted by Strider
-
The chest and back armor is probably the part that needs the most attention of a scout build so let's start here First off, you should put the armor on and make sure it sits correctly, i.e. cutting off any excess of the bridge that connects the back and front armor: To connect the bridges my personal choice is the self-adhesive Tesa extra strong. First I glue in the zip tie anchor (doesn't really matter if you glue it on the chest or back part) and then I attach the hook velcro. After that I cut the hook part in shape (see pictures) and stick 2 pieces to each other so that the hooks are on both sides. Then I connect the chest and back armor. After that I glue in another zip tie anchor in the shoulder bell and pull a (detachable) zip tie through both anchors so that they form a loop. The advantage of using a detachable zip tie is that you can more easily adjust the distance to the armor later on. A bit lower in the shoulder bell I've just used a heat gun to form a piece of scrap plastic in the appropriate shape, glued it in and attached a loop strap of 1/2 inch elastic (actually you have to put that in before you glue it ;-). Make sure before that the elastic strap has the correct lenght to hold your shoulder bell in place so it should be neither too tight nor too loose (casual 😉 The shoulder bridge straps don't form a loop but have the loop part of the velco sewn to each side so that I can just stretch them around (the shoulder bridge material is elastic). Comparison to screenshot: The top of the tank is attached by a 1/2 inch elastic strap that is riveted from the inside of the tank and using a washer on the top of the tank top greeblie. The elastic goes around and inside the armor and is attached to the inside with velcro e.g. Here is a quick comparison of the tank topper with the one from the screen used scout in the MoM exhibition: On the bottom of the tank I've just used a screw and a nut to fix the tank from below and give it more stability. This is a personal choice. If you want to go all the way and do it prop accurate you can pull the elastic underneath the back armor and rivet it to the tank (where the scre is instead). As you may have noticed the black stripe and rank bars are a bit different to the other scouts. I've tried to emulate the "Hero" scout here who (almost) captured Leia: Last but not least the strapping that connects the back and chest armor. It's a 38 (1,5 inch) cotton webbing: Magic of Myths exhibition reference:
-
EFX vs RS Props Showdown!!
Strider replied to BikerScout007's topic in ROTJ Biker Scout Armor/Helmet
Gino mentioned to me that quite a few of them were purchased by retailers and might pop up on ebay and the like once released. In any event I have the funds ready, haha ;-) -
Uh, rather bad helmet, general form as well as assembly.
-
That looks pretty good, bro - nice find. Another possibility is that they used a blend of polyester and cotton (say 50/50) which would also make it a bit shiny and stretchy as well.
-
Welcome to the ranks
-
TB-25415 Requesting Lancer Status (APPROVED)
Strider replied to ShaunPug's topic in Lancer Deployment Request
Thanks, bro. Please stand by for final review. -
Great job, Boris - congratulations!
-
TB-25415 Requesting Lancer Status (APPROVED)
Strider replied to ShaunPug's topic in Lancer Deployment Request
Hey Shaun, for L1 it's okay but Lancer standards require cotton webbing just like the originals. Cheers -
That's the true spirit!
-
This time I'm tackling the large TD greeblie. Most people use the greeblie from DJDesigns which was entirely build from scratch. It's not too bad but I always wondered if the proportions were really correct as it looked a bit too small compared to the one from the Blu Ray screenshot. The major piece of this greeblie has been identified and it comes from a Tamiya Ferrari 312 T4 Model Kit: Now, I don't have the Kit but our very own Spike was so nice as to send me a cast from his piece (Thanks Buddy!!) so I could take a shot at building the greeblie: 1. Sketching the dimensions 2. Building the large part of the greeblie using a 1,5mm ABS sheet 3. Making a mold of the greeblie 4. Casting the greeblie in black resin (compared to a reference pic) If anybody wonders how this greeblie compares to the one from DJDesigns (on the right) here's a comparison: Hope you like it
-
TB-25415 Requesting Lancer Status (APPROVED)
Strider replied to ShaunPug's topic in Lancer Deployment Request
Hey Shaun, it was a pleasure following your build thread and seeing the time and effort you've invested in your gear. We do have a shopping list for you though - it may look long but most of them are really small fixes: - Shoulders should have the same distance to the bridge respectively - Upper arm armor should face to the side (it's facing a bit backwards). - Pouches could be straighened out a bit and filled with "something". - Chest/Back side straps should be cotton webbing. - Tidy up the paint on the red stripe on the tank topper. - Drop boxes need levelling off a bit more (back and sides as well). - TD needs to be turned; it's upside down. Further points not relevant for the app: - The back armor needs to be trimmed back more to sit flush with the lower end of the tank - I would suggest wearing a neck seal under the balacava to make the neck appear thicker On a personal note, sometimes I wish we would have more levels or recognitions than just "Lancer" because your scout definitively has the potential to be among the finest and most authentic ones. Good job! -
Dauitsch´s Lancer Deployment Request (APPROVED)
Strider replied to Dauitsch's topic in Lancer Deployment Request
Very nice, bro! Thanks for confirming on the bolts. Please stand by for final review. -
Dauitsch´s Lancer Deployment Request (APPROVED)
Strider replied to Dauitsch's topic in Lancer Deployment Request
Hey Boris, thanks for your application. Your scout looks great and I can tell the amount of research and dedication you put in there. Just a few tweaks and you're well on your way to Lancer: - Could you confirm on the bolts used for your helmet? They should be original grey 3M bolts or replicas thereof. - The drop boxes sit a little uneven, particularly when viewed from the sides. Just straighten them out a bit and it'll be fine. - The chevron of the cod piece looks a little low. I would first try to pull up the cod piece a bit to see if it does the trick. So, alltogether just a few quick points - good job! Cheers -
Wow, absolutely stunning! This is one hell of a build, buddy!
-
TB 13016 Requesting Lancer Status (WITHDRAWN)
Strider replied to PhinScout's topic in Lancer Deployment Request
Hey Robert, thanks for bearing with us. We did have some discussions about different options to get the relations between pouches, belt and cod piece right. Our suggestions are as follows: - Shorten the shoulder strap of the back (about an inch for starters) and the chest (~0.5 inch) - Exchange the pouches for smaller ones (I understand your currently in touch with Chef in this regard) - Move up the belt by about an inch - Straighten out the cod piece to avoid the dreaded "camel toe" ;-) -
Usually is but it's not a requirement.
-
Hi Marc, welcome to the BSN! we also have a German BSN outpost on Facebook called "Wolfpack Advance Recon Team" where you can find help from fellow scouts. Cheers
-
2. Making the pouches First off, I have to apologize if some of my descriptions below are a bit dodgy but explaining sewing wasn't really what I majored in, lol. Well, here we go: First fold the cotton fabric and use the templates (found on the bottom) to draw the cutting lines: After the templates have been cut out you should first sew on the velcro for the closure. Then the flap is sewed together and ironed afterwards. Remember that the outside of the flap are facing each other when they are sewed together. Next thing to be sewn are the hangers of the pouch (which will be sewn or velcroed to the cummerbund later on). Again the outsides are facing each other when sewn together and the top end is left open. The markings on the picture above show where the flap and the hanger are attached (by pins) and sewed. It’s approximately 5,6cm from the front sewing edge and 2cm from the upper edge. Please note that the flaps on the two pouches are inverted towards each other (see picture below). Subsequently the hangers are attatched (with the closed side) to the pouch and sewed to the back side of it. The back of the closing flap should overlap with the hanger by about 2 - 2,3cm. Last but not least the templates. The dimensions were modelled of from Gino's scout on the SWOC (which in turn were derived from the original templates). However, depending on your height and your armor you might want to adjust these measures. Link to Pouch template: https://bit.ly/2KQSl4t
-
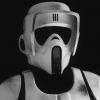
1. Making the Cummerbund The first thing was sourcing the right materials. I've tried out a variety of webbing and fleece materials and found the ones below most suitable (the actual fabric/type is unknown): - 100% white cotton with a mercerized satin finsh ("polished cotton"). The weight is about 350g per meter or 115g per m2 - Volume fleece 200g/m (I used it for both although I think the cod piece had actual more "volume" than the CB) - White foam rubber for the lower section of the cod piece - 2 inch black elastic - 2 inch white velcro (male/female) To achieve screen accuracy I did the CB and the cod piece seperately (since it took me about 5 iterations of the cod piece to get it right it also saved me quite a bit of work 😉 As this is something that has to be fitted individually there's really no use in creating a template. To get the measurements you basically measure your chest width and your waist and then add some lenght for the seam overlap. The original CB's had a width of about 8.5-9 inches and go from the top of your belt to the middle of the chest/back strap. However, since different armorers make different size chest pieces I would advise tailoring this to your individual measurements. Reference pics: I've scaled up a picture of the cod piece from the Star Wars costumes book as a rough guide for a template (including seam overlap). Altough in the picture you can see the black 2 inch elastic is attached to the front of the CB I've decided to attach it to the back as it is not seen in the film. However, presumably the cod piece attatches to the vest so that would be another option. Completed CB an cod piece; there are 6 seam lines (or 5 chambers on the CB spaced out by an inch each): And here's how it looks on the mannequin: Here is a template that may serve as a rough guidline for the dimensions (lower part) of the cod piece. Please note that this would need to be printed in DIN A3 or divided into some A4 sheets: https://bit.ly/2HdgaCq
-
Are any of these 3d Printed blasters worth it?
Strider replied to TB-1599's topic in ROTJ Biker Scout Weapons
Basically what DV said. I have an extra 3D blaster for trooping because it's super lightweight (less boot sagging) and I don't have to worry about it much if it gets damaged or lost. Otherwise the 3D printed ones are no match for a good resin blaster in terms of details, finish and feel. -
I was asked recently if I could provide a tutorial which could serve as guideline for Lancer builds reflecting the latest updates to the standards. Of course I can I'm planning to cover the hard- as well as the soft parts in the build plus tools used and tipps and tricks I've learned on my personal journey. First things first, the armor kit. The following pictures show the trim lines of the armor: This is the Dremel tool which I'm using to cut the slits: Strapping kit needed for the build: UPDATE for Point 11: The elastics for the upper arm armor are 50mm / 2inches.
- 14 replies
-
- 20
-

-
Yeah, I remember someone asking a couple of months ago on this forum if this armor is any good. In a nutshell: No, it ain't. At least not if you want to build a bikerscout ;-) Cheers
-
Great job, man. Keep up the good work!
-
That'll be great. Maybe it just looked different from the photography angle.
-
Well, I don't want you to feel bad about the purchase because they're still pretty close and look great. The main differences I spotted were - the shape of the thumb leather. Also it's missing the stitched 'V' on the thumb - the 4 ribs are a bit further apart from each other than on the originals - the fabric inside is black instead of red IMO they're definitively legit just differ in a few details.