KOtrooper
-
Posts
771 -
Joined
-
Last visited
-
Days Won
32
Everything posted by KOtrooper
-
Nice! I used about an entire can just on the bucket.
-
Yeah, for the entire build you want to use brown as the basecoat and then beige. Any colored sections then go on top of those two colors.
-
You'll need another can or two of the Beige, FYI. Depending on the size of the Nordic Blue can, you might have an excess (which will make all of us in the states jealous).
-
CRL states 3cm in diameter. Sent from my Pixel 3a using Tapatalk
-
I couldn't find a version 2 back either. His version one is missing a lot of key details. If you stick with Sean Fields' files, you should follow FarEast's mods post printing like @ScaryGuy pointed out. Starts on page 3.
-
You're almost at the finish line! Looks great so far. Sent from my Pixel 3a using Tapatalk
-

Attention: New Vanguard Approved ST-41814
KOtrooper replied to BikerScout007's topic in Announcements
Congrats Joe! Excellent build and build log. I know it will help others looking to work their way to Vanguard. -
New Patrol Trooper Helmet Maker
KOtrooper replied to MrPoopie's topic in Patrol Trooper Armor/Helmet
Burn! -
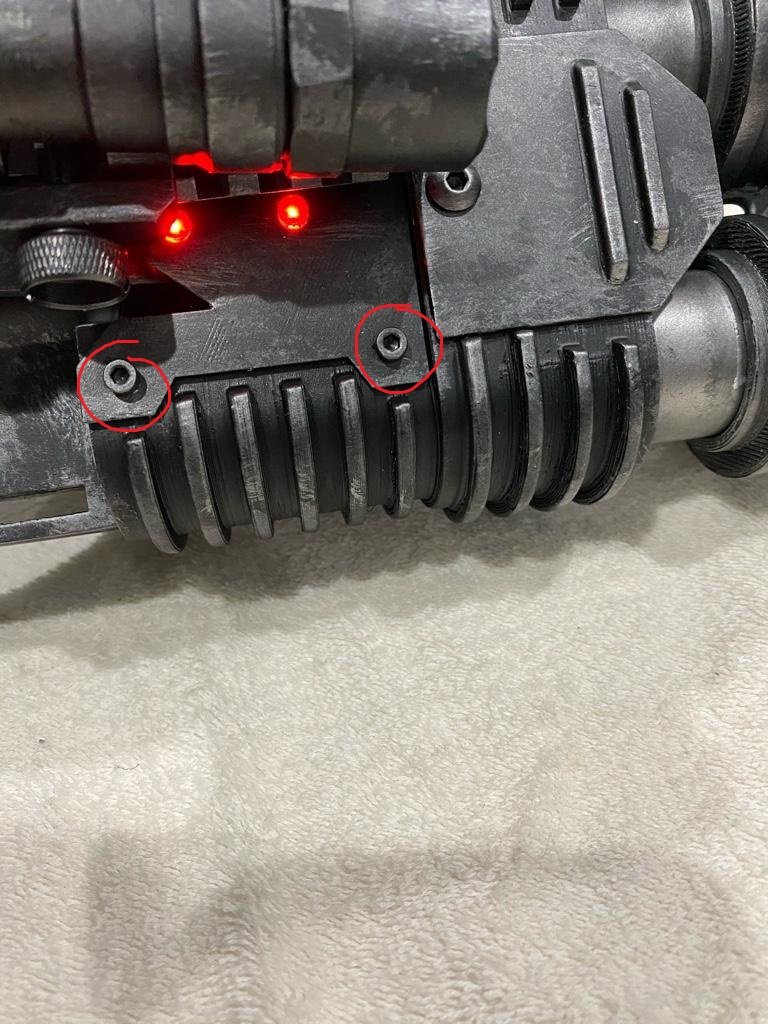
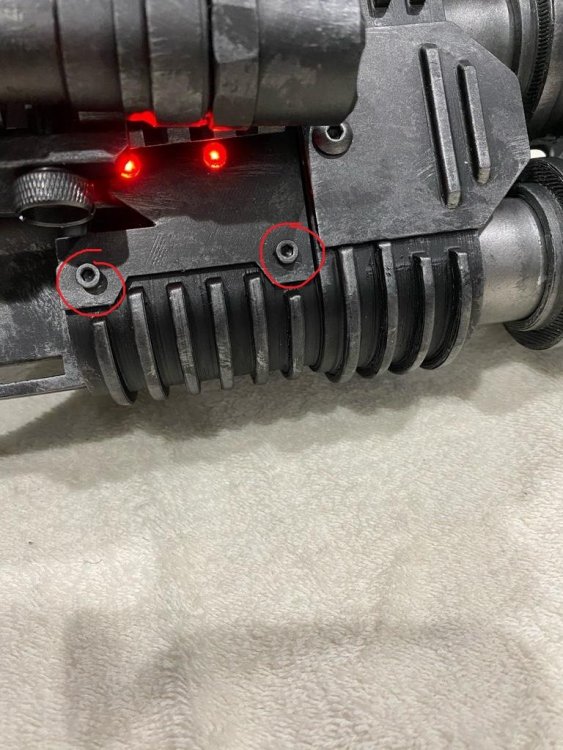
Joe - this is a great start! Fantastic job. Just a few items... Please post photos of: A) the palm side of the gloves so we can see the padding detail B ) closeup of the top shin buckle\ Your blaster needs some tweaks. You have the wrong screws in a few spots (circled in red). Those should be the same rounded hex screws used elsewhere. You need to remove the black buckle from the strap and sew the ends. Mickey wrote up a strap tutorial if needed. You're almost there, Trooper!
-
Hi Joe - thanks for your application. We will look it over and get back to you!
-
Hi! I made my own hip plates too in order to get a better fit. I used a neoprene backer and used styrene for the hard "armor" part. If you're having issues painting the hip armor, hit it with some plasti dip first. Sent from my Pixel 3a using Tapatalk
-
Congrats Mickey! Fantastic work on your kit. Sent from my Pixel 3a using Tapatalk
-
Good to see your application. Could we get some closeups of: Chest Plate shoulder buckles Back Plate shoulder strap slots Undershirt mesh Can you also post photos of just the pants and just the boots? Thanks!
-
Buckets off. Sent from my Pixel 3a using Tapatalk
-
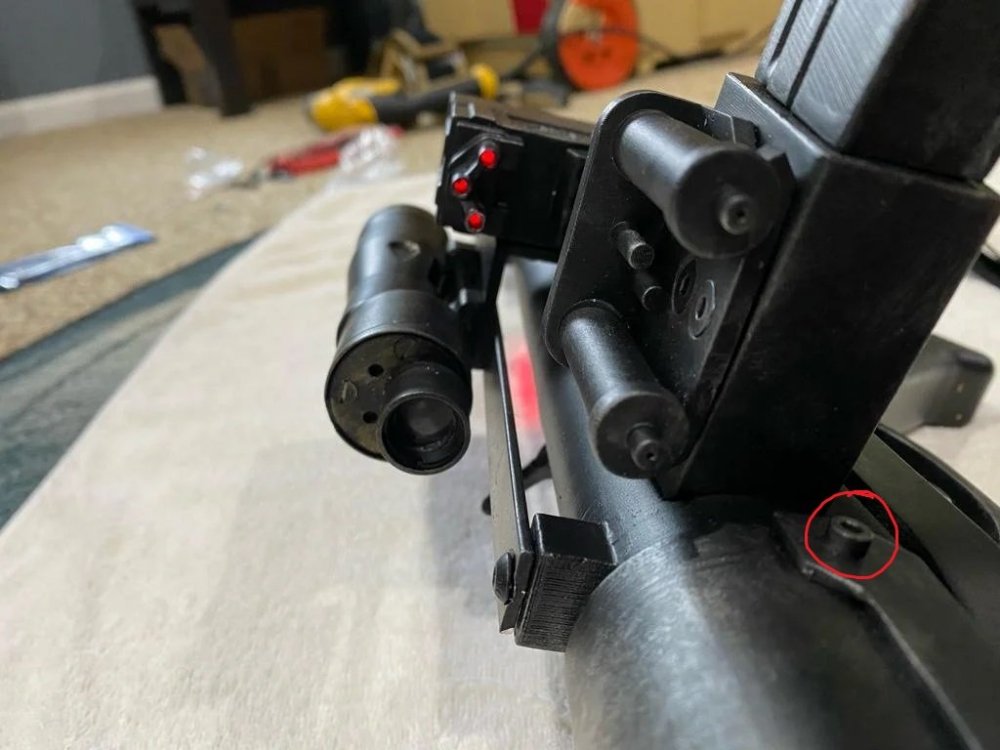
The blaster is optional to be approved so if I was your GML, I'd give it a thumbs up for basic. If you're going for level 2 though, I'd use the correct screws from the start and swap out the scope rail. It should be flat and not bent like this one is. I also used Sean Fields' files for my E-22 and it'll get you to Vanguard.
-
Thanks everyone! I'm honored to be given this role and will do my best in serving the detachment. Sent from my Pixel 3a using Tapatalk
-
Glad that worked out. I also put some scrap ABS on the back of mine with a snap on it. I initially thought of using velcro but the snap is stronger so twerps behind me can't easily swipe it during a troop.
-
They need to be perfectly straight. You might want to insert a rod into each end of the three casings before adding resin to ensure they are aligned properly.
-
The middle cylinder is about 1.5". Are you able to cut the caps off of what you have and use wood dowels? If not, this is a very simple item to 3D print if you have access.
-
Weathering the brand new boots was the worst part of my build. They look great though! Sent from my Pixel 3a using Tapatalk
-
I added mine after the fact. Made out of 2mm craft foam coated in plastidip. Glued it on the lens with some e6000. Sent from my Pixel 3a using Tapatalk
-
I widened my torso armor via corset in the back (hidden by the backplate) so it flares out at the hips. I have that resting on my hips and the belt starts there. I'm giving the illusion that I have a longer torso. My forearm armor was HUGE (from BSP). I cut both sides of the recessed strip, curved them in, and glued in place. Nerve wracking for sure but it helped tons. If it's just too long though - go with the 3d printed route for the recesses.
-
Yeah, I'd stick some sludge behind the gap on the left and sand it down flat.
-
I can't remember where I read about it. I put ABS scraps in a glass Mason jar and poured in acetone. It melts the plastic into a paste. I had some thin spots on my armor so I make a very thick paste and spread it on the inside. Worked great. Use it for cracks or filling in seams. It's basically your ABS in liquid form. Smear it on and sand it smooth. Sent from my Pixel 3a using Tapatalk
-
You can totally do this! I had to expand my torso armor to fit my lady hips. I bought a plastic handicap sign at the hardware store to shim it out. Have you made ABS slurry/sludge with your scraps yet? Sent from my Pixel 3a using Tapatalk