Chopper
-
Posts
4,889 -
Joined
-
Last visited
-
Days Won
272
Everything posted by Chopper
-

WIP: New Build - Long-Time Dream - ROTJ: Scout Trooper
Chopper replied to PatLFree's topic in ROTJ Biker Scout WIP
Position looks good. -
Where to purchase this or have one made?
Chopper replied to BikerScout98's topic in ROTJ Biker Scout HQ
As Mickey said, it's not needed for the ROTJ scout. If you're still looking to pick one up, Darman Props makes a very comfortable custom sized fabric neck seal. -
WIP: New Build - Long-Time Dream - ROTJ: Scout Trooper
Chopper replied to PatLFree's topic in ROTJ Biker Scout WIP
Going off the CRL image, about a 1/2" looks to be in the right ballpark. -
I don't know if Rob has changed anything on his detonator, and there'd be no reason for him to, but these photos are from a 2018 Lancer app.
-
WIP: New Build - Long-Time Dream - ROTJ: Scout Trooper
Chopper replied to PatLFree's topic in ROTJ Biker Scout WIP
Looks much better. Nice work. -
The first of a thousand questions about my build...
Chopper replied to RZill's topic in ROTJ Biker Scout Armor/Helmet
Build threads are a great help for armor construction and are generally current, but some criteria can change over time if new evidence is uncovered. Always double check against the CRL as it is the most current place for specifications. 20mm // 3/4" strapping is fine for the lower strap on the knee armor. Knee armor has two elastic straps: The upper strap is 12mm (1/2 inch) wide and is riveted to the top sides of the knee armor with two (2) 1/8th (3mm) silver-colored rivets. The lower strap may be 12mm (1/2 inch) or 20mm (3/4 inch) wide and passes through the lower sides of the knee armor. -
FYI Cass, you do not need a one-piece undersuit for Level 2/Lancer. It only needs to have the appearance of one. If you're good with a one-piece, go for it. Yes, the suede in the link looks good.
- 19 replies
-
- 1
-

-
- meowied_cass
- buildthread
- (and 1 more)
-
No problem at all. Glad to help.
-
Have you seen Strider's post from May 18 2017? http://forum.501stpathfinders.com/index.php?/topic/17305-lancer-build-tutorial/page/2/#comments
-
Just out of curiosity, what's the selection of synthetic fabric dyes out in Australia? We have RIT Dyemore, which would work well for any future scouts who can't find a black set of coveralls and want to dye a set. What's the selection like for that where you are? EDIT: Google to the rescue -- https://ritdye.com.au/shop/ols/products/rit-dyemore-graphite
- 19 replies
-
- 1
-
-
- meowied_cass
- buildthread
- (and 1 more)
-
The first of a thousand questions about my build...
Chopper replied to RZill's topic in ROTJ Biker Scout Armor/Helmet
Most people either glue the elastic or use velcro on the knee armor, but it really doesn't matter how you rig things that we can't see. Many of these posts about methods to rig up the armor/strapping etc are more about best practices and personal preference as opposed to any sort of requirement for basic or lancer requirements. -
The first of a thousand questions about my build...
Chopper replied to RZill's topic in ROTJ Biker Scout Armor/Helmet
The original tanks came down to the very end of the back armor, but I also don't think it's a necessarily a deal-breaker for basic clearance. You can check and see what your GML says. I'm not sure there's a ton more you can do to get it sit further down that wouldn't affect the rest of how the tank sits. Maybe Pete @Retrofire has some ideas. If it came trimmed short out of the box, you might try and see what Jeff at SC says. -
WIP: New Build - Long-Time Dream - ROTJ: Scout Trooper
Chopper replied to PatLFree's topic in ROTJ Biker Scout WIP
No problem Pat. Glad that you could get that clarified at the local level as well. -
WIP: New Build - Long-Time Dream - ROTJ: Scout Trooper
Chopper replied to PatLFree's topic in ROTJ Biker Scout WIP
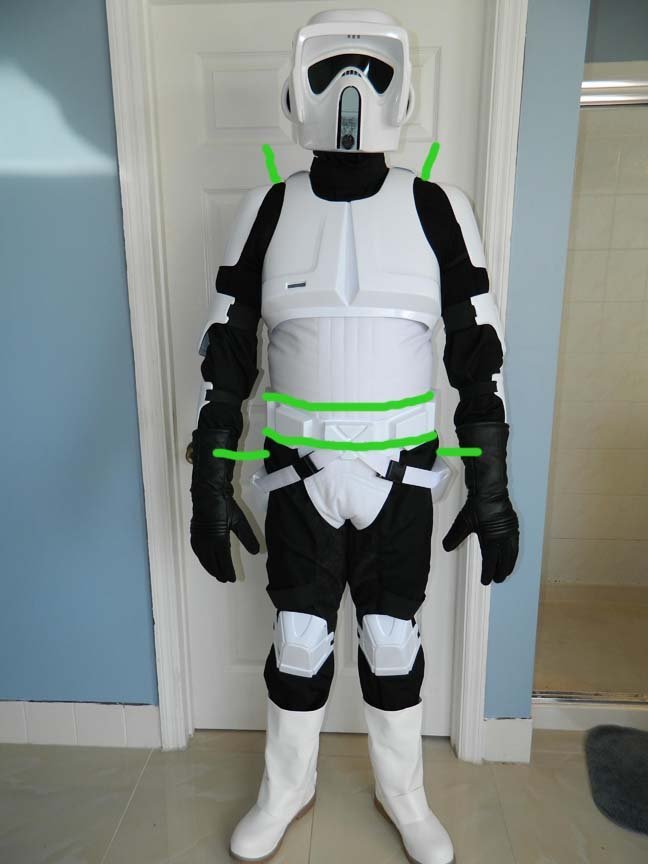
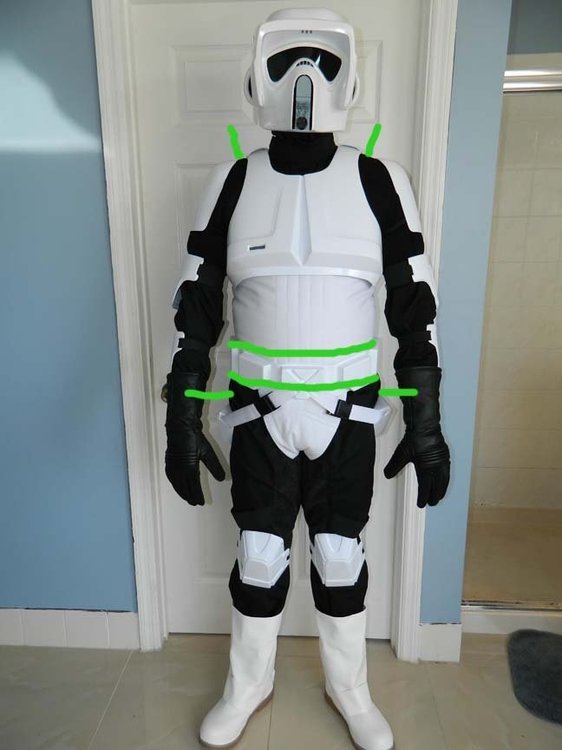
Hey Pat, you're pretty close with your build. I have just a few refinement comments after looking at your photos, see below. Try and bring your shoulder bells in slightly. Also, they're rotated backwards a bit. They should sit about evenly on the side. Your belt is dropping in the front. Consider putting some velcro inside the belt and sewing some velcro onto your cod or bund to help keep it in place. If you can, I'd let out some of the tension on the crotch strap for your codpiece -- that's part of what's causing the "cod crunchies" in your photo. As Retrofire said, your dropboxes are quite low. I'd bring them up so that they're about 2" from the sides of your belt if you can. I don't see a detonator on the back of your belt. Are you still working on that part? Once you get the detonator fitted, try and move the back attachment straps outwards slightly, if you can. I do want to note that those are some really large shoulder bridge covers. The specifications for how wide they should be is under Level 2, but I do recommend trying for something a littler narrower than what you have -- typically the bridges are about 1" wide. I am not familiar with Tye Rocks as a boot maker. I recommend that you check and see how your GML feels about your boot height. To me they look short, but check with your GML first to see where they're at with them. That's all I have for now. Keep working on it and we'll get you feedback as soon as we are able.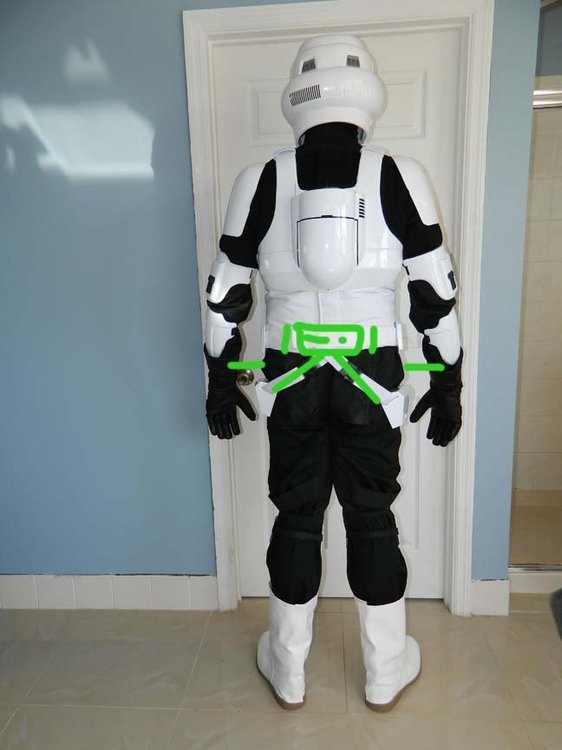
-
The first of a thousand questions about my build...
Chopper replied to RZill's topic in ROTJ Biker Scout Armor/Helmet
Unfortunately, this is sorta a dry spell for blasters. of the top of my head, DVH sold his molds and, as far as I know, the person who bought them isn't producing anything right now. There was some sort of natural disaster with Praetorian, I think. Hyperfirm is long gone, but their blaster wasn't very accurate anyhow. There's 3D printing options, which can be decent and lightweight, depending on the model, but there's a lot of sanding and finishing involved. Hole in the ground Productions has a resin blaster, but as with anything resin, it'll be heavy. -
The first of a thousand questions about my build...
Chopper replied to RZill's topic in ROTJ Biker Scout Armor/Helmet
Don't drill it. You can use some cheap white acrylic paint from Michaels to paint it, or if you can cut the decal material exactly to fit, that would work too. It'd just need to look like it was painted white. -
WIP: New Build - Long-Time Dream - ROTJ: Scout Trooper
Chopper replied to PatLFree's topic in ROTJ Biker Scout WIP
Hey Pat, you want to use the BBCode link option on imgur for linking images. -
[woobiee] 1st and New build! (Lancer probably)
Chopper replied to woobiee's topic in ROTJ Biker Scout WIP
For Level 2, no. The rear closure should look like this: -
TreeHuggerMatt Scout Trooper ( ROTJ ) WIP
Chopper replied to TreeHuggerMatt's topic in ROTJ Biker Scout WIP
Sounds like you're off to a good start, Matt. I look forward to seeing your build progress. -
WIP: New Build - Long-Time Dream - ROTJ: Scout Trooper
Chopper replied to PatLFree's topic in ROTJ Biker Scout WIP
Welcome Patrick. Please let us know how we can help. -
There can be some overlap between the suede and the knee armor and from the images you've shown the patch doesn't look too long. Strict measurements like 2-3" from the knee aren't in the CRL b/c that'd look pretty different for different people, depending on their height.
-
Overall, for a front side riding patch, it looks good. Have you checked to see how it looks when you're wearing it? Have you made a pattern for the rear side patch yet? The patch doesn't need to go up to the waistline, but you just generally want to avoid having the squared edges peaking out from the sides of the codpiece.
-
Cummerbund to Chest Plate Connection
Chopper replied to mickeymark34's topic in ROTJ Biker Scout Armor/Helmet
My bund is attached to my flak vest, same as Jake. I also keep my chest armor from sliding back and forth by velcroing it to my flak vest, up near the shoulders. -
First Time ROTJ Scout Trooper Build (3D Printed)
Chopper replied to Cpt_Chops's topic in ROTJ Biker Scout WIP
There can be some overlap between the knee armor and the thigh patch, yes. This photo is from one of the screen scouts, so if you're trying to figure how long the patch should be for your set up, you can emulate this image: -
First Time ROTJ Scout Trooper Build (3D Printed)
Chopper replied to Cpt_Chops's topic in ROTJ Biker Scout WIP
Looks good so far dude!