Chopper
-
Posts
4,886 -
Joined
-
Last visited
-
Days Won
271
Everything posted by Chopper
-
Try sending her a PM. Her sale thread is here:
-

Studio Creations Armor question.
Chopper replied to CodyShada's topic in ROTJ Biker Scout Armor/Helmet
Yes indeed, absolutely. -
Hey there, good work on your progress so far.
-
Here's the redkap suit: Red Kap Men's Long Sleeve Twill Action Back Coverall, Black, 54 https://www.amazon.com/dp/B007EZ1LVQ/ref=cm_sw_r_cp_apa_i_fLmwDbW5HFMK8
-
You don't necessarily need drop cloth. I went to jo-ann's and used white duck canvas.
-
Kripton Top Etsy Shop Questions
Chopper replied to mickeymark34's topic in ROTJ Biker Scout Armor/Helmet
Kriptontop = Christian CucBlack While I can recommend his soft goods, which are quite excellent, his armor and helmet are constructed from thin HIPS plastic, which, as a material, is prone to cracking and breaking. -
In short, no, not without a significant amount of work. Also, in my searching there were some references to the molds being from star fortress productions. Google them if you're curious why they should be avoided at all costs!!!
-
I'm not familiar with it. Could you post a photo or a link?
-
Polymer Armory Rubber Stunt Scout Blaster Kit - Review
Chopper replied to StudioCreations's topic in ROTJ Biker Scout Weapons
Thanks Jeff. Always awesome to see more blaster reviews. I have the resin blaster from PA and it's great. -
Great work Tomas!
-
mickeymark34's Studio Creations Build Thread
Chopper replied to mickeymark34's topic in ROTJ Biker Scout WIP
In general, I think it looks fine. However, the primary test for the fit of the bund will come once you fit your chest armor and belt. The photo below should give you an idea of the proportions for both the fund and cod. -
I used shoe goo and it's held up fairly well over the years. I know that shoe repair shops use contact cement for that sort of thing, but I haven't experimented with it yet.
-
Congrats!
-
mickeymark34's Studio Creations Build Thread
Chopper replied to mickeymark34's topic in ROTJ Biker Scout WIP
Listen to Greeny. He speaks the truth! -
No problem dude! This is exactly what we're here for!
-
GREAT job Greeny! You should have zero issues with basic approval for that costume.
-
Filler For sanding And panting
Chopper replied to clockworksoldier's topic in ROTJ Biker Scout Armor/Helmet
Bondo is pretty much the standard go to choice for that sort of thing. -
Congrats and welcome!
-
TB-89007 Lancer Deployment Request (APPROVED)
Chopper replied to Everon's topic in Lancer Deployment Request
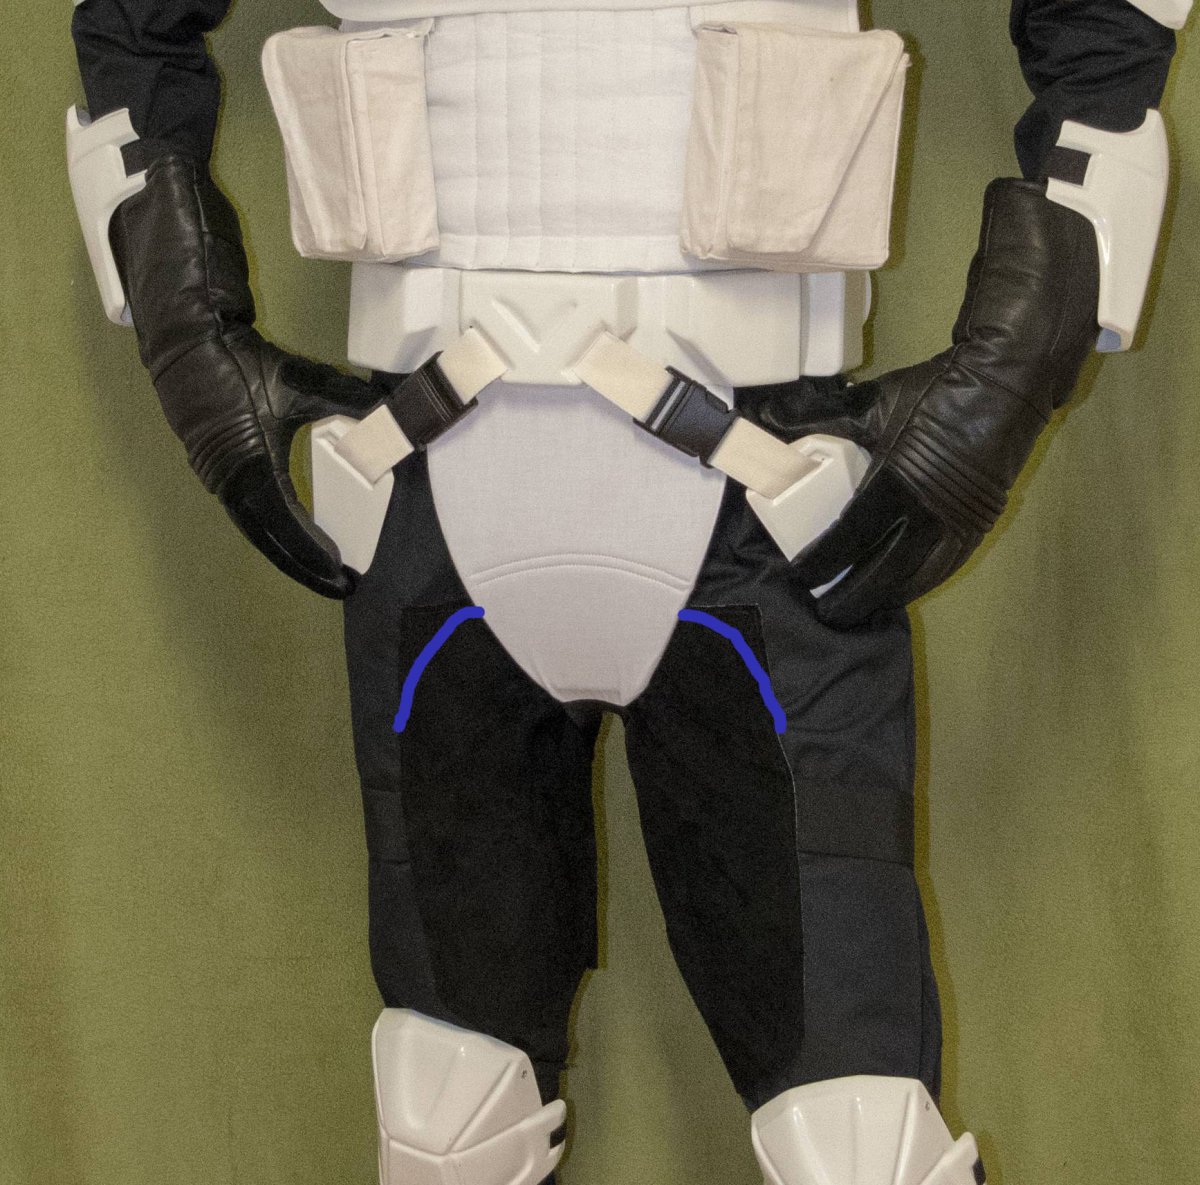
Hello Tomas, and thank you very much for your Lancer application. The review team has consulted with one another and we have a few items for your attention. Overall, you've done an excellent job, just a few small adjustments. Please let us know if you need additional guidance or have questions! Additional Photos: Please provide additional photos for the following costume parts: Flak vest: We need a photo of the measurement of the back closure velcro Holdout Blaster: Please provide detail photos of your DVH blaster, including front and back of the blaster Back Armor: Can you please provide additional detail photos of the rivet at the base of your tank? Costume Adjustments: Flight Suit Your butt flap appears to be approximately 1" too long, vertically. Please adjust your suede patches so they better match the photo in the Star Wars Costume book (see photo below). The squared off tops on suede patches should be more rounded. Cummerbund Overall, it appears that your bund is about 1" too long. Also please work on centering it once the adjustments are made. Additionally, It appears that there's a lot of excess bund material extended on your lower back right in the back-side photo. You don't necessarily need to trim it down, just try and keep it tucked in. Photo Examples:
-
Filler For sanding And panting
Chopper replied to clockworksoldier's topic in ROTJ Biker Scout Armor/Helmet
Ah ok, sorry. Walt's is made from thick HIPS, if I recall correctly. It should be a-ok. -
Filler For sanding And panting
Chopper replied to clockworksoldier's topic in ROTJ Biker Scout Armor/Helmet
I've used it on abs before and it's fine. You've got the RS helmet right? If you're concerned you can always spray some on the extra abs scrap they included for reinforcements, but like I said, it should be fine. -
Filler For sanding And panting
Chopper replied to clockworksoldier's topic in ROTJ Biker Scout Armor/Helmet
I've had good luck with Rustoleum High Build Primer. Dries relatively fast and sands pretty easy. https://www.homedepot.com/p/Rust-Oleum-Automotive-11-oz-Gray-Filler-Primer-Spray-249279/202097276 -
Not at all. A clean scout is 100% acceptable for lancer review.
-
I’m having trouble with my biker scout helmet
Chopper replied to Commodore212's topic in ROTJ Biker Scout Armor/Helmet
Based on the second photo, you still have some of a lip, though it's a bit uneven. You could glue a splint underneath, then make a paste from your scrap HIPS plastic to fill in the surface gap. Most folks will repair cracks, overtrimming, etc, by making ABS paste, but your helmet is made of HIPS plastic, so you'd need to use the leftover scrap from the helmet trimmings. Overall though, and I hate to say it, but I think that the fact you used spackle is working against you. Spackle is plaster based and, while it's fine for fixing cosmetic surface defects and drywall, is absolutely going to crack when it's flexed. The only other thing I can think of is that the thin HIPS plastic used in the helmet is flexing more than the typical ABS Chef/RS/WTF 5 piece helmet, which would also contribute to more cracking. Take a look at Sibbel's helmet build here, it has a lot of photos and should be a pretty good reference guide for best practices: http://forum.501stpathfinders.com/index.php?/topic/18869-my-first-helmet-built-rs/ -
I’m having trouble with my biker scout helmet
Chopper replied to Commodore212's topic in ROTJ Biker Scout Armor/Helmet
Oh no definitely keep it. It adds strength. Plus as in the photos I linked earlier, it was on the original helmets as well.