


Chopper
-
Posts
4,888 -
Joined
-
Last visited
-
Days Won
272
Everything posted by Chopper
-
Hi Samantha, your fellow troopers are correct in that the RS armor is pretty awesome. That said, RS is only offering it as a completed set at the moment, which, as you said, means you'd likely have to undo a lot of the strapping and assembly in order to better fit it to your body. Given the cost of the assembled RS armor, this may not be the best option for you. The primary question there is how important is screen cast armor to you? That's the biggest draw of the RS set. If that's important to you, then it may be worth the cost and work to trim and re-rig everything so it fits. I do know that SC recently updated their molds and they make a nice kit -- we very recently had someone get approved for Lancer here: http://forum.501stpathfinders.com/index.php?/topic/20378-tb-21129-lancer-deployment-request-approved/ Also, i'm not sure when Mon Cal is doing another scout run, but his armor kit comes pre trimmed, but unassembled. That would also be a good option as well. As for helmets, the RS is fairly standard sized, meaning that it's neither the largest, nor the smallest scout helmet out there. The SC runs small, and many male troopers tend not to use it for that reason, but it's fairly popular with the female scouts (including the lancer app I linked above). A lot of folks mod the visor slot on the SC, since that's the biggest issue in terms of accuracy, but the rest should be ok for someone of your size. Let us know if you have further questions.
-
Fabric type, time, and anything the fabric was treated with or exposed to, will all affect how it looks years to decades down the line.
-

TB-23181 Lancer deployment request (APPROVED)
Chopper replied to TK-23181's topic in Lancer Deployment Request
Hi Mathijs, thank you very much for your application. The Level 2 team has reviewed your application. Overall, very good job! The RS screen used armor really looks great. After looking at your photos, we have the following adjustments for you: Shoulder Armor Your right shoulder is extended out a bit too far. The left one looks good. Please bring in the right shoulder so it's the same distance as the left one.. Upper Arm Armor Your bicep armor appears to be riding low. Please bring your bicep armor up about 2". Also, when you take new photos, please rotate your bicep armor to 90 deg position on the left and right. Optional note -- if you're having trouble keeping the bicep armor in place, you may want to consider putting some velcro on your flight suit and bicep armor to keep it in place. Forearm Armor When you take new photos, please rotate your forearm armor to 90 deg position on the left and right. Otherwise, looks ok. Gloves Please trim the connector tab from both gloves Cummerbund The sewn curve on your cod appears to be too high. You should be able to unpick it and remove the stitch marks using an iron. You should aim to replicate the position of the screen used cod. (See below) Knee Armor Your knee armor looks somewhat oversized when they're on your legs. Please look at using some heat molding to fit them to your body a bit better. If you look at the screen scouts, their knee armor fit much more flush to their legs. (See below) Again, great work overall -- just a few adjustments. You're mostly there. Please let us know if you have any questions or need any clarification. We will do whatever we can to assist. -
Yeah, while it can be done, you'll likely spend more time and energy on it than it's really worth. That, and the fact that you'll need a LOT of coats of white to cover up the black, and even then, you'll have to deal with the possibility of the paint cracking when the armor flexes. If you reg on the spec ops board you can likely sell it, then use the funds to buy a biker scout kit.
-
Chopper's Kashyyyk Trooper Build (aka Chopper goes back to school)
Chopper replied to Chopper's topic in Kashyyyk Trooper HQ
Progress continues: Working on fit and positioning of the bund. I think my bund is too long. My guess is that I need to take maybe an inch or an inch and a half off the bottom. Does that assessment sound correct, Kashyyyk armorers? I also finished up my trouser pockets. They're just pinned in position right now. I'll sew them in later. And finally, I'm used to the snug fit of the scout coveralls. I keep feeling like I need to take in the legs and arms of my DPM fatigues. I'll need to open up the legs anyhow to sew the riding patch. Should the trousers fit more relaxed than the scout coveralls, or about the same? -
Great job dude!
-
TB-83107 Lancer deployment request (APPROVED)
Chopper replied to jadloc's topic in Lancer Deployment Request
I understand. We'll do our best to clarify whatever questions you have. -
TB-83107 Lancer deployment request (APPROVED)
Chopper replied to jadloc's topic in Lancer Deployment Request
Hi Loïc and thank you very much for your application! The Level 2 review team has reviewed your photos and we have some feedback that we'd like you to address: Helmet -The close up detail of the MLC helmet shows that the upper snout detail is painted grey with vent holes cut into the plastic. For level 2, the grey and black detail should use a decal, with no holes, as per the film helmets. Example below: Flight Suit -The leg elastic on your flight suit is quite tight. You should loosen it slightly. -You will need to add a collar closure to your flight suit -Your back flap appears to be too narrow. Ideally, it should extend approximately 1.5" (38mm) further on each side for proper fitment Shoulder Armor, Chest Armor, Back Armor -Your back armor is pulling your chest armor up, which is then pulling back your shoulder bells. You should look at affixing your chest armor onto your front, so it doesn't slide back. Also, you might need to trim a very small amount of the back armor shoulder bridge, so everything aligns and sits properly. -Your should bridge covers appear to be 1.5" (40mm), they should be between 0.5" (12mm) and 1" (25mm) wide as per the CRL. -Your side straps appear to use 1.5" (40mm) cotton twill tape. As per the CRL, they should be white cotton webbing. Upper Arm Armor -Bicep armor strapping appears to be 35mm. As per the CRL, it should be 50mm. Forearm Armor and Gloves -When you re-take your photos, please reposition your forearm armor lower, so they overlap the gloves. Cummerbund -Please move your pouches outwards, so they sit approximately 1 inch from the outermost cummerbund rib on each side. Belt and Detonator -Your detonator tubing appears to be silver. It should be medium to light grey. -Can you please provide detail shots on the drop box webbing? From your overalls shots it looks like the same twill tape that was used for the side webbing? If so, the strapping there should also be 1.5 inches (38mm) wide and made of white cotton webbing. Knee Armor -The rivets securing the upper elastic strap are painted white. As per the CRL, the rivets should be silver in color. I realize this seems like a lengthy list, but a great deal of it is strapping and fitment adjustments. The entire Level 2 team is here if you need any assistance, advice, or guidance. Please let us know. Thank you again. You can do this! -
Matching soft tones to hard armour
Chopper replied to theenglishdjentleman's topic in ROTJ Biker Scout Soft Parts
Congrats dude! -
Matching soft tones to hard armour
Chopper replied to theenglishdjentleman's topic in ROTJ Biker Scout Soft Parts
Studio lighting, ambient lighting, and camera settings can all influence the way these costumes appear on screen, as opposed to in real life. The pouches and webbing are ok to dye off-white, as per the crl. The bund and cod should not be dyed. The best example I can find of the contrasting colors on screen is here: In other words, I think you're good -
Both MC and SC are good choices. Jeff recently updated his molds, so I don't think you'll be disappointed in the route you took. Looking forward to seeing the rest of your build.
-
Great work on your application!
-
TB-21129 Lancer deployment request... (APPROVED)
Chopper replied to TK-Teri's topic in Lancer Deployment Request
Teri, The Level 2 review team has reviewed your submission and we're happy to report that we approve your application as Lancer! Congratulations! You did a great job! -
You can rivet them. I chose to use snaps in case they got twisted in my bin for whatever reason. Ideally, the straps should meet in the middle of the back of the belt. A photo is worth 1000 words, so here's what my setup looks like:
-
Yeah @TwistedZen there's not a whole lot of 19X vendors at the moment. You could try contacting diamond state props via facebook to see if they're planning on doing any upcoming runs, but I know they've scaled back quite a bit since 2018.
-
Hey man, yeah, with the exception of that outdoors ellicott city troop last July, I can't recall normally sweating that much. Though normally my set up is just coveralls, flak vest, and bund. I wonder if the under armor is one layer too many?
-
Looks pretty good, dude.
-
RS Prop Masters Armor -- My First Impressions of the Kit
Chopper replied to Chopper's topic in ROTJ Biker Scout Armor/Helmet
Thanks Rob. I'll be really curious to see how both the RS blaster and the DVH v3 compare to the Praetorian holdout blaster that's in production as well. This is a great time to be a scout! -
TB-21129 Lancer deployment request... (APPROVED)
Chopper replied to TK-Teri's topic in Lancer Deployment Request
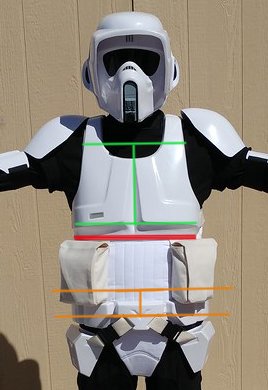
Hi Teri, thank you very much for your Lancer deployment request! Overall, we think you did an excellent job. I'm really impressed with your soft goods, as well as how you modified the SC helmet eye slot to look more screen accurate. We do have some corrections below that we'd like you to make for your application: Chest/Back Armor and Belt It looks like your chest and back armor is riding quite low, which is pushing down your belt positioning. I recommend that you look at repositioning your chest and back armor higher on your body. This will entail trimming the front and rear shoulder bridges a bit more, and you might want to look a small amount off of the bottom ridge of the chest armor as well. The image below is a guideline for a better armor and belt position. Bicep Armor Once you get your chest armor re-adjusted, you will likely need to bring your bicep armor up about an inch bit as well. Shoulder Armor Please sand the vertical edge where you cut in on both bells a bit smoother. Right now it looks like a hard angle and it should be rounded. Tank and Pistol Please refinish your tank topper and pistol so the 3D printed ridges are no longer visible. I recommend using Rustoleum high build primer to help eliminate the print lines. https://www.homedepot.com/p/Rust-Oleum-Automotive-12-oz-Gray-2-in-1-Filler-Sandable-Primer-Spray-260510/205751603?MERCH=REC-_-PIPHorizontal2_rr-_-202097276-_-204707457-_-N OPTIONAL UPDATES: Belt The nylon webbing at the back of the belt should be 2", though it's not currently listed in the CRL, which is 100% on us. The webbing in your photos looks a bit narrower than 2", so if this is the case, you might want to consider upgrading it in the future.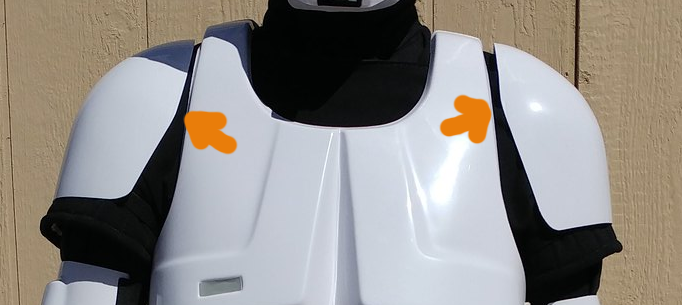
-
RS Prop Masters Armor -- My First Impressions of the Kit
Chopper replied to Chopper's topic in ROTJ Biker Scout Armor/Helmet
Wow that looks really close. Great job on Lou's part! -
RS Prop Masters Armor -- My First Impressions of the Kit
Chopper replied to Chopper's topic in ROTJ Biker Scout Armor/Helmet
I didn't purchase the scout blaster from RS, but I did test out the holster with my DVH v3 blaster. Fits pretty well. If anyone has the RS blaster, I'd be curious to see the comparison with how it fits in the holster. -
Hi Kevin, If you look at the image in the CRL for the 19X, there's no bipod.
-
RS Prop Masters Armor -- My First Impressions of the Kit
Chopper replied to Chopper's topic in ROTJ Biker Scout Armor/Helmet
Yeah exactly, I built one using the wrap method myself and it was just too heavy, so I went back to the ribbed hose for trooping practicality. -
Greeblies wampawear vs bikerchick
Chopper replied to Jakeputt's topic in Kashyyyk Trooper Soft Parts
I'm glad that WW is working towards a better glove. @ferra, you're one of the senior kashy's. What do you think? -
RS Prop Masters Armor -- My First Impressions of the Kit
Chopper replied to Chopper's topic in ROTJ Biker Scout Armor/Helmet
Ah ok, I wasn't sure if he was the same RS props Rob. Thanks Mickey.

