M.J
-
Posts
1,246 -
Joined
-
Last visited
-
Days Won
29
Everything posted by M.J
-
You're doing an incredible job!! Ok just a couple of things.. Your knees are upside down. (you were just testing me hey) I would lower the drop boxes a little more not by much though Your belt just make sure its not hitched up at the back keep it the same level as the front. Here is a photo from ROTJ, just shows those pesky knees and drop boxes I agree with ya pouches..mine do stupid things too, I've written Left and right on mine .. they do find a way to be the be mixed up. Follow the ribs on your bun that will help you where to place your pouches, they should just sit right on the edge.
-
looking so much better.
-
Delta looking good. I love the before and after well done! The shape of your code piece is a little wide you don't need to have it as wide .. take a look at this photo as you can see the just over the belt where the code piece comes up, it doesn't fan out, and being so thick across you may find it uncomfortable.
-
Hi ya Cat, I'm under 5 foot so it was a challenge to make the armour look like its my size not me looking at needing to growing into it I spoke to my GML at the time and we did a guild line on how much I could take off before the CRL becomes void, I do agree with Corey with the green line, dont make the bell that small, remember you can always take off but cant add. I also added foam under the shoulder pieces, my arms are small and skinny so placing a little foam helped them sit better under the bell. Which included adding foam under. the bell too.
-
That is awesome... it also makes you feel confident when everything fits nicely. Well done Sabrina!
-
Love this, fantastic work pathfinders
-
OH I'm soo glad. my fingers are crossed for you
-
ok the second last photo I can see, you don't have to have both connecting at the top as you will may need a joiner, I'll show that later. You can bring the back down a little it might be up a little high, and dont be afraid to reshape the plastic, either with a heat gun or hot water. Here is a photo of how far down it can be. Keep on fiddling at it, if I had dollar on how many times I did mine, and you don't have anyone to help you fit it. If there is a armour party or a get together with any other member that would also help you, a second set of hands to see and guide would be a wonder. you may need to extend the front down a little so when you join the back plate to the front you can use what I call a joiner this will help pull down over the chest (points down to the photo).This photo is around 8 years old, we know there is tape used in the films to cover the joining of back and front plates, if pull the front down a little and the back this may give you a little more to help, its just a suggestion. You will need to bring the back plate back a little. Oh I might be repeating myself sorry Does this make any sense?
-
Sometimes depending on how the back is sitting it, if we can adjust a little better the front will come in line, I did this with my daughters. I should say she wasn't sure what do with her "boobs" either..lol
-
Hi Sabrina, I'm trying to look to see properly, are you able to get someone else to take the photos and we can see what might need trimming or shaping. Kits come in one size so we have to shape to for us to fit into it. Where does the back sit? we might be able to fiddle with that as well.
-
Congratulations Mickey
-
Hi Stanley, Chopper is correct, the confusion of the colour boils down to age and the cleaning of the display scouts, everyone uses as a good reference. if you watch ROTJ you will struggle to see the actual patches. Pig skin is cheap and easy to obtain though please bare in mind it’s still a leather, once sewn you cannot unpick, also pigskin does rip quite easy, you will need a sewing needle designed for leather on your machine. if you’re not aiming for lancer, a fabric that has the suede look is more forgiving and easy to work with, though note you must fold the hem in or iron down the seem before sewing on so it won’t fray and give the illusion of suede.
-
Hi ya Brent, I agree with Chopper, see how much the cod piece covers also looking at fitting the knees may help as well to positioning the patches. You may also find the patch fabric is more prominent in the front than the back. Here is a photo from ROTJ giving you an idea on the mud flap, it does look like its ridden up a little but should get the idea.
-
Matt thats a bugger.
-
HI ya Jack there are some great threads Dennis has placed up for you to follow. Start a build thread and if you're not sure we are here to help. There are also a number of ways to attach the cod piece, find which one suits you. Just a small suggestion if your new to sewing, start by making a mock up, getting the measurements and comfortable with sewing down a straight line, always better to use very cheap fabric, even an old sheet about to throw to play with, when your comfortable then tackle it with the fabric you've brought to use. Good luck
-
Aurel, Understand when parts drop when you're taking photos, been there, if they do tend to drop more so, and the elastic isn't working, I added foam on the inside, being a small lady it helps. With your next lot of photos, make sure the lighting is clearer, the black parts of your armour aka pants patches and sleeves are hard to make out. See how you go with the pulling down the belt after adjusting the size of the cod, it may make a big difference and the bun can still sit where it is. I have noticed the elastic is quite tight around the leg, its making your pants bunch up, you may want to unpick and add a longer piece?. Your belt at the back the cross over of the drop boxes belts? Other Armours might chime in on that one. You're looking great, is just those small items that will later drive you nuts.
-
Hi Aurel..well done. i agree with both Peter and Nathan. A couple more photos without the rifle so we can assist and give you the correct advice. Your belt needs to be lowered, though once lowered you will have to adjust your pouches. The COD is also too large, it takes up more than have the leg area. once you’ve adjusted your armour correctly, this will give you a better picture on what needs to fixed.
-
Looking much better James.. well done
-
Hello James, Your build of the kit looks good I understand sewing the soft parts can be a challenge. Though your cummberbun does concern me. You've made upper part into a curve, sorry the buns are not curved, the below picture shows you. Also your sewn line attaching the cod to the bun, its a little messy you will have to neaten it up, I do understand at times it may not be seen but there will be a time your arms are up or your belt flops down, again photo showing you the were the cummberbun mets the cod piece. Just a small note as well, your pouches flap over, should be half , it looks a little more. Otherwise I love your build your doing a good job! Here are some photos from the movie to help you out. I also believe in the forums we have patterns to which I copied showing the measurements.
-
That’s happened to me the hook side isn’t very friendly, good idea to rethread, go slow not fast, look at tension as well. There are some hook Velcro’s worse than others.
-
Mark mine came out fine, I use business shirts, did quite a number of them . Is it cotton getting stuck in the lop? sometimes it can be the foot, if the thickness of the flight suit is fine the layer of the shirt. ok I may of just got it, is that tshirt fabric? let me know which fabric. Before I go into more detail, when sewing does it pucker up ? or the thread isn't knotting up? I really hate Velcro its a bugger
-
Mark Good on you getting a sewing machine. I can't stress enough, practice and experimenting, Youtube is also full of helpful videos I just set up my new overlocker that threads its self.. took me some time to check out all the features and did quite a bit of practice sewing. Soon you'll have list of costumes to make! Have fun and if you get stuck ask.
-
HI ya Frederick. Not too bad a job if I do say so myself. So your looking at doing the other adds on yourself as well? Neck seal you may not need as you have the Balaclava and your collars is quite high.
-
Looking good Phil!
-
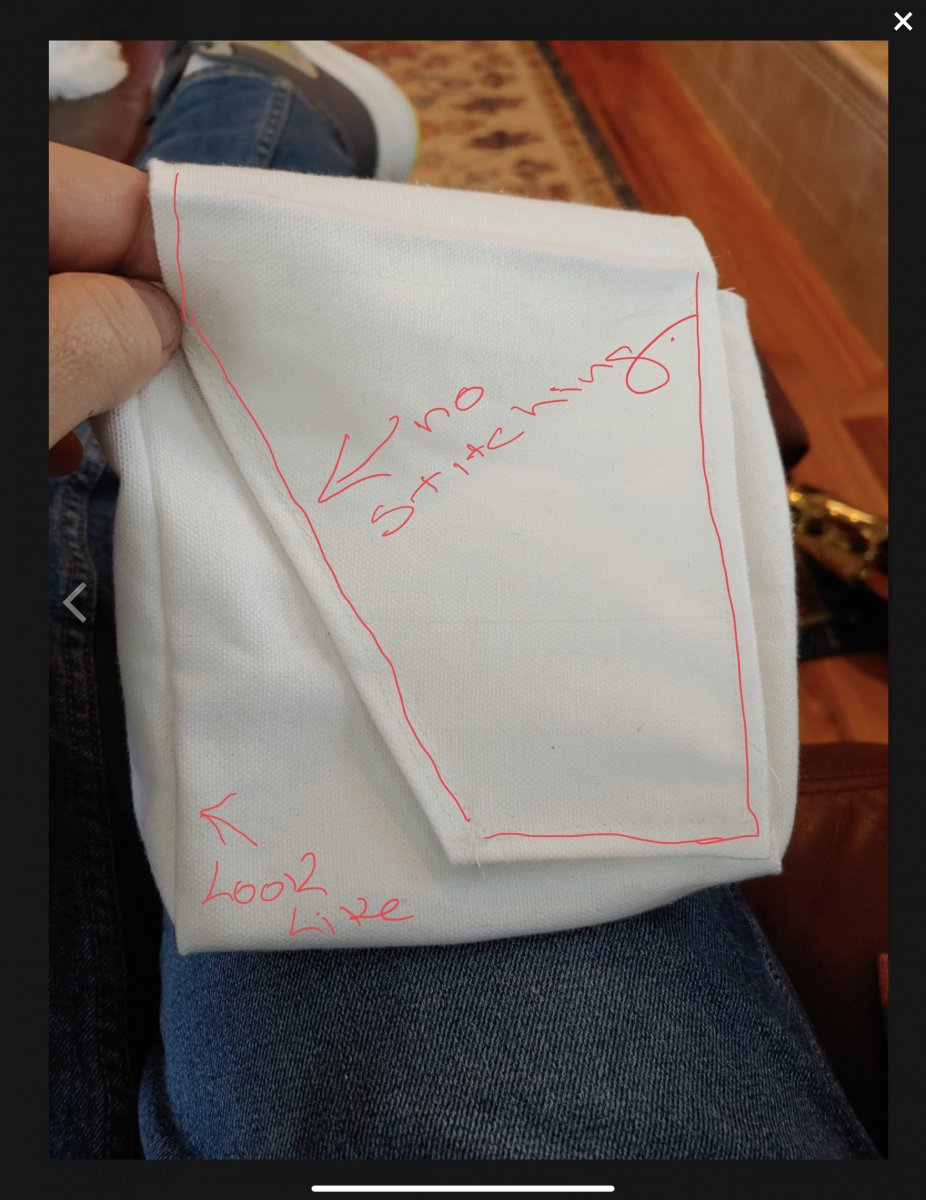
Sorry this is what I meant... no stitching to be seen on the front panel of the pouches. i know it doesn’t point this out in the CRL. the original pouches do not have it