

Grumpy
-
Posts
821 -
Joined
-
Last visited
-
Days Won
6
Everything posted by Grumpy
-
HOORAY !!! The first bottle of Kashyyyk Camo Beer is on me! (Wood fire brewed using real Wroshyr Trees. )
-
That would be the left side of the visor, Nate. And the last picture is funny. The poor critter is surrendering, though. Welcome to "The Swamp." That puts us up to three Fem-Kashyyyks now.
-
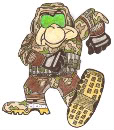
"Grumpy" / CB-4312 / Ohio Garrison / July 15, 2009
-
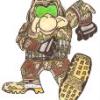
Kashyyyk Trooper Gallery "The Swamp" discussions
Grumpy replied to Heatshock's topic in Kashyyyk Trooper HQ
............................................"SHOW-CASE!!!..........SHOW-CASE!!!"................................................... -
PM sent.
-
Those are correct.
-
Or something like this... It was already the 3.5" patch. This is the one that I was curious if there could be an interest list started for an 11" patch. (Open to anyone! The Pathfinders Detachment, the whole 501st Legion, or even your local Squad.) Just asking... END OF LINE
-
Well done!!! It's "Swamp Time"
-
PM sent to Comm Tech PM sent to Heatshock. -------------------------------------------------- I'm still around, but it will take some time to get rolling again. My family and job always come first. I make the gloves in my spare time. Please be patient. Darth "Real Life" has been calling on me many times, lately. I have to answer. When I am good to go, I will post an interest listing. I will post it in the proper For Trade/ For Sale forums. I already have four or five names that spoke interest from late last year. I will send out a pm at a later date to those that asked about the CB gloves. I hope to be able to make a complete glove. (Ready to wear.) Plus, I need to modify a few things on it. Again, just please be patient. Matt (grumpy) (Sorry about hi-jacking the thread.) END OF LINE.
-
The front of the shirt with the hidden zipper and the collar flap are just fine. The two shoulder straps with the buttons are not necessary. They can be removed. They could possibly mess with the chest and back armor where it sits on your shoulders. Looks good so far. Keep it up.
-
Kashyyyk Trooper CRL discussion - consultation close Mar 2012
Grumpy replied to mrbungle's topic in Kashyyyk Trooper HQ
Here's a couple of pics I found for the tank stripe. The first is artwork, the next two are screen shots from the movie. I know there was a better pic of the last one, but this was all I could find. It's there. Subtle, but there. Can the CB gallery be called......"The Swamp"? ....just curious. -
Kashyyyk Trooper CRL discussion - consultation close Mar 2012
Grumpy replied to mrbungle's topic in Kashyyyk Trooper HQ
Okay, I'll stick this in real quick for Jason. Here are a couple of pics of the tanks with the black stripe. (Two different makes of armor.) I just used 1/8" black automotive pin stripe tape. After the base coat and camo colors have completely dried, add the stripe, and the give a coat of flat clear, to hold it on. Mine: (Older First Generation style tank) ...... My wife's: (Newer Second Generation MrB style tank) ... Sorry to interupt.....back to the CRL discussion. -
Kashyyyk Trooper CRL discussion - consultation close Mar 2012
Grumpy replied to mrbungle's topic in Kashyyyk Trooper HQ
I agree with Junglie Scout. The black tank stripe should be required. This thread is going in a very good direction. Nate, pm sent to you. -
Kashyyyk Trooper CRL discussion - consultation close Mar 2012
Grumpy replied to mrbungle's topic in Kashyyyk Trooper HQ
Unique, but as close to screen accurate, and possibly similar to the other Kashyyyk Troopers. (Remember, we're dealing with CGI characters here, not some tangible actors costume.) Agreed that not everybody's painting skills will be the same. Some use sponges, others have air-brushes, and some use small craft brushes (me) to put on the camo. This is a costume that stands apart form the rest. Camo is difficult to replicate on the same style troopers, which are from different parts of the world. I also agree on the gallery of the cleared CB's, so future troopers can have an example, and maybe "blend" the ideas of others into their own. And I like the option of either the multi-cam fabric on the pouches, or a plain fabric and then add the camo colors. Not everyone will have access to the multi-cam. Not all the fabric stores will carry it. And, to the future CB's, when in doubt on the camo style, try a small part of the armor and give it some camo. Take a pic and ask opinions. We're always here to help answer questions and to promote the Kashyyyk Trooper. -
Looks good Jason.
-
On both my wife's build and Tunnel Rat's build: 1. I used a spray can and had to blend a little to get the base coat to match the samples. I don't trust a brush in my hand on that large of a surface for something such as this. A tiny brush for the camo and small details, yes, but no big brushes for me. Each person will find a way to make it work. And, like Heatshock said, you'll want to get that slight green tint to it. A green wash might work, but too much will make it too green. 2. I used E-6000 to glue the rubber greeblies onto the left bicep. Completely paint and camo the armor before attaching the greeblies. I attached the belt directly to the cummerbund. 3. I used a grey primer spray for the rubber greeblies. (So they would all match.) I didn't paint the belt. (It didn't like me.) And I used a black permanent marker to fill in the squares on the belt. And the tank topper, even though it's resin, will be painted black, of course. 4. E-6000 for the resin pieces also. 5. Do what Heatshock said with the camo fabric and spray misting for the weathering. You will get through this!
-
Hey Pyro, welcome back! We're here for ya!
-
Hey "Grimlock" You're gonna have lots of fun with all of that stuff!! We're all here to help you with any questions on your Kashyyyk. Yeah, more pics. We like pics!!
-
Gloves, gloves, gloves...Kashyyyk, that is.
Grumpy replied to Grumpy's topic in Kashyyyk Trooper Soft Parts
**SALE PENDING ON LAST PAIR** -
Gloves, gloves, gloves...Kashyyyk, that is.
Grumpy replied to Grumpy's topic in Kashyyyk Trooper Soft Parts
Well, I'm out of the glove greeblies right now. (And taking a break from the gloves. ) But, when I get some more and start making some more gloves, I'll work up a set of medium gloves, and send you a pm. -
Yeah, you want to cut out the ear vents. And then add the mesh screen after you paint the helmet. Here's a couple of pictures of Tunnel Rat's helmet, that I worked on. In base color: And with paint, before adding the mesh screens: And yep, I painted the inside of the helmet black. It seems to help give a dark appearance inside the helmet. And for the pouches, the camo cloth can be used. MrBungle has camo cloth on his pouches, so he says it's okay. Just add some black and white spray paint to it to give it the battle-worn look. Not all of the pouches will look the same. Use the misting effect to give them some good weathering. Hope this helps with your build. Cheers!
-
Awww, sheesh....you guys. It was nothing. I figured it would take awhile to get over to you guys. I'm glad they finally made it. Cheers!
-
Looks good Justin. Good to see you back on the boards. Almost there....
-
Got the cummerbund done. Finally!! I was really dreading to make another. Kept putting it off. Arrrrrrrggghhh!! Done with it!!!!!!! Not perfect, but it will do. Without pouches With pouches just sitting on the cummerbund He's a lot skinnier than me, so I hope the big pouches will fit in between the two tall pouches on the back. I also found some boots for him. Soft parts are complete. Cheers! Bah, humbug!!
-
The bottom one is correct. We were talking about the face measurements. 7" tall x 5" wide. And then the 1" depth. You're not really over thinking it. Just don't forget to still have a little bit of fabric on the two tall sides and the bottom to use to sew the pouches onto the legs. Maybe about 1/4" to fold under the 1" depth and sew on the legs. And I'm all about functionality, too. The thigh pouches work well to hold things while you're trooping. Not including the drop pouches, all of my other pouches are functional. I ususally have super glue (Just in case something pops off), batteries (For helmet fans, and for other troopers that might need a fresh battery), and other things in them. Keep up the good work.