


Chopper
-
Posts
4,888 -
Joined
-
Last visited
-
Days Won
272
Everything posted by Chopper
-
Ab armor back zipper -- DONE!
-

Dropbox strap-to-belt connection
Chopper replied to Harbinger's topic in ROTJ Biker Scout Soft Parts
I used snaps for mine. Helps when your straps get horribly twisted in your bin and you need to sort it out quickly. -
Who makes wire-wrapped tubes?
Chopper replied to FoxTrooper's topic in ROTJ Biker Scout Armor/Helmet
Flat or matte will work just fine. -
Those shoulders were irking me, so I brought them in a half inch and I dropped the ab armor a half inch as well. Funny how such small adjustments can make the whole costume look better...at least it does to my eyes. (Sorry about the mirror shot. Not great for details, but it should show the better positioning) Another thing I did this past week was to reduce the width of my undershirt sleeves, as well as to hem the cuffs. Looks and fits a lot better. I also heated up the shoulder straps and set them up for gluing once they cool down in place.
-
Are those the same straps you're using to connect your chest and back armor? If so, I don't think you need to dye them, unless you wanted to do so anyhow.
-
Chef is a former Pathfinders Detachment Leader and many scouts have used his armor for Level 2 (Lancer). Even though the following Lancer app isn't complete yet, you can see some example photos of the armor in the recent application, here: http://forum.501stpathfinders.com/index.php?/topic/21228-tb-64287-lancer-deployment-request/&tab=comments#comment-194224
-
Not necessarily. Depends on how much of a shade difference you're talking about. Can you post a photo?
-
This was changed maybe 2+ years ago, if I recall correctly. While a lot of details were revealed with the hi-def blu-ray footage, we weren't able to determine a consistent measurement on the strapping. Lacking access to the original armor strapping, it was decided at the time that either measurement was acceptable.
-
mickeymark34's Studio Creations Build Thread
Chopper replied to mickeymark34's topic in ROTJ Biker Scout WIP
Great job! -
mickeymark34's Studio Creations Build Thread
Chopper replied to mickeymark34's topic in ROTJ Biker Scout WIP
Ok that type should be enamel. You should be able to clean it up with a thin, stiff paint brush, a q-tip, and some testors enamel paint thinner. I've also taken a wooden toothpick, dipped it in the thinner, and rubbed the excess paint off that way. The wood is generally soft enough to not damage the plastic. Be very careful and go slowly, but you should be able to work the edges to remove the drips. -
mickeymark34's Studio Creations Build Thread
Chopper replied to mickeymark34's topic in ROTJ Biker Scout WIP
What kind of paint did you use? Acrylic? Enamel? -
Those should work just fine.
-
Best Holdout Blaster for SC armor?
Chopper replied to clayorrnot's topic in ROTJ Biker Scout Weapons
The SC holster is sized for the hyperfirm scout blaster, which is oversized, compared to the others out there. http://forum.501stpathfinders.com/index.php?/topic/18225-ultimate-scout-pistol-comparison-thread/ I use a darth voorhees (DVH) blaster with my SC kit, and using the integrated magnets, it holds in just fine. -
There's also no bipod on the dlt19x DLT19 DLT19X
-
Will self made armor get approved? Go WTF/RS/MonCal?
Chopper replied to troygordon2's topic in Getting Started
I stand corrected! Congrats @MrsPoopie! -
Will self made armor get approved? Go WTF/RS/MonCal?
Chopper replied to troygordon2's topic in Getting Started
There have been a number of folks start 3d printed scouts, though, at least as far as I've seen, I haven't seen one submit for approval yet. There's a lot more on the shoretrooper side of the house. As my colleagues said, if you're up for it, and it looks correct, then there's no reason you can't get approved in a self designed set of armor. -
Congrats Chris!
-
It should be 1.5" cotton webbing for level 2, so that looks about right.
- 1 reply
-
- 2
-

-
The boot on the right is the same type I used. Another thing ive found that really helps is to use a chisel-style xacto blade to cut the soles.
-
Assembly progress continues. Lots of snap gluing and elastic rigging. Also a lot of sanding and seam filling. SO MUCH SEAM FILLING. Here's what I see, so far -- Bring in the shoulder bells more. They're out too far and it's making me look like a tank. Slightly trim down the return edge on the bottom of the chest armor. I don't have a lot of leeway here, due to the collar size, but it's pushing off the center chest greeb a bit. Back plate needs to sit more flush against my back. This should be fixed once I put some velcro on the side connectors and I'll worry about that after painting. Also, yes one does look shorter than the other -- they're actually the same length! The back plate is sitting unevenly. Again, this will be fixed once the connections are rigged. Anything else I missed? Thanks everyone.
-
Love it
-
That fit looks great for both level 1 and 2 clearance.
-
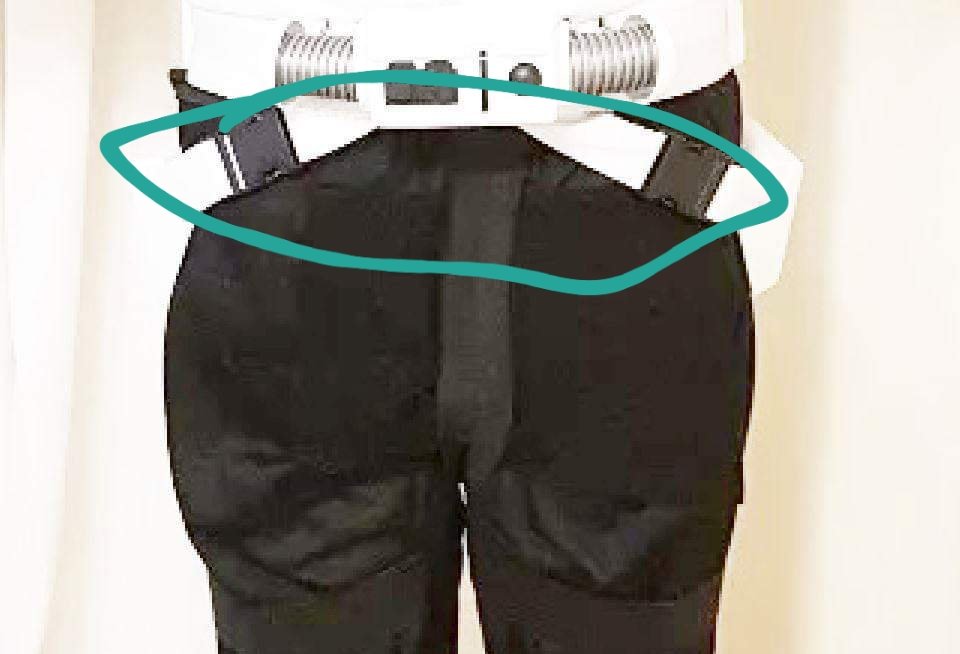
No worries, Chris. Just for clarity, the circled green area was what I was looking at. If the top edge of the butt flap is attached below the belt and bund, (and it looks like there's a gap?) then it should be adjusted prior to sending photos to your gml.
-
Hey Chris, great work keeping on it! For level 1/basic clearance, the only thing that I really see is that the top edge of your suede butt flap appears to be attached below the bottom of your bund? It's always super hard to tell with black on black, but it looks that way in the rear photo? Can you confirm? As per the CRL: "A suede or faux suede butt flap attaches above the waist hidden by the cummerbund, rectangular in shape."
-
Excellent! Welcome aboard!

