Chopper
-
Posts
4,844 -
Joined
-
Last visited
-
Days Won
269
Everything posted by Chopper
-
Absolutely. Please do. And when you're finished, if you've got a head on shot, we can add it to this thread here:
-
Nice. I'd been following his mould building process on his facebook group. Interested in seeing how the final RWA kit looks.
-

TB-42134 Lancer Deployment Request (APPROVED)
Chopper replied to mickeymark34's topic in Lancer Deployment Request
Hi Mark, thank you so much for your Lancer application. I know how long you worked on your Scout armor and you've really done a great job. Our team has reviewed your photos and we have the following notes for you: Flight Suit Your butt flap is about the proper length, vertically, but as best we can tell it looks extremely narrow. If you have some additional photos, where we can see the suede flap and suit better, that would help. Based on what we can see, you should add approximately an inch on each side. (See markup photo) The legs of your flight suit need to be taken in a bit, as they appear baggy. However, before you start doing any tailoring, you might want to try putting some stirrups on the bottoms of the pant legs -- that might help take care of the bagginess and is less invasive. Your call if you want to try that option first. Also, your thigh straps are positioned low on your flight suit. Ideally, they should be positioned approximately halfway between your leg and belt, so they will need to come up. Vest The sleeves on your flak vest appear to extend more than 1.5 inches past edge of shoulder bell. You'll need to hem the ends of your flak vest. Also, there's some flare as your sleeves extend beyond the shoulder bell -- this usually occurs when the sleeve is getting pinched by the elastic. You may want to taper the sleeve a bit when you hem the ends to get rid of the flaring. (See markup photo) Also -- there's something black sticking up between your left shoulder bell and bridge? I'm guessing this is just a kitting up issue. Bicep Armor Your bicep armor is riding low, is positioned slightly backwards, and is overlapping your bicep armor. Once you get your vest sleeves hemmed, you should bring your bicep armor up approximately an inch and a half and rotate them so they're at more of a right/90 degree angle. You can sew some velcro on your flight suit to help keep them in place. (See markup photo) Back Armor Can you please take a top down photo of your tank topper? It looks slightly crooked, but it's difficult to tell from the photos. Cummerbund In comparison to the CRL and screen photos, it really looks like your cod is too narrow for your build. The sides should be tapered, as per the CRL image, and not straight. We also recommend that you add some stiffener to the cod (1/8" foam or buckram) and loosen the strap a bit, to get rid of the cod crunchies. Knee Armor Once you get your pant legs better fitted, you should bring your knees up about an inch, so they're not dipping into your boots. Again, sewing some velcro to the knees of your flight suit will help keep your knee armor in place. (See markup photo) Belt Just a fitment issue, but from the side it looks like your belt is riding high and the back of your belt is dropping low. This also throws off your drop box placement, which is slightly canted forward in your photos. Just try to keep the belt relatively level, horizontally, when suiting up next time and you should be good. (See markup photo). Alright, so I know it's a lot about the soft goods, but I want to emphasize that this is all doable and, in the end you'll end up looking that much better. Take heart in the fact that you did an excellent job with the hard armor. Again, I know how long you've been working on this, you should be proud! Please let us know if you have any questions, need guidance, or want additional clarification. Markup Photos attached.
-
I've been watching some of the builds in his facebook group, but I haven't seen anyone post a formal review or comparison.
-
Ryi'nocks Biker Scout WIP [Approval Ready?]
Chopper replied to Ryi'nock's topic in ROTJ Biker Scout WIP
Why don't you think you can go level 2 with Chef's kit? There have certainly been many other Lancers who have done so with Chef's gear? You can absolutely have the 4x thicker rank stripes and the center bar at Level 1. I can't imagine any GML would have any issue with it, but if they do, you have that screen cap I posted earlier. For the bicep armor, the armor itself is identical, however, you want the two vertical screws on the bicep greeblies to be facing forwards when worn. The screen used holsters had some curve to them as well, so your holster looks to fit ok on your boot. -
Ryi'nocks Biker Scout WIP [Approval Ready?]
Chopper replied to Ryi'nock's topic in ROTJ Biker Scout WIP
If you're shooting for Level 2/Lancer then the thicker 1/4" horizontal rank bars are for the 4 stripe version, which is the scout that captures Leia. The other variants (1, 6) use the thinner 1/8" horizontal rank bars. The center bar in the middle of the pinstriping was on the 4 stripe version. See example below. If you're only going for basic clearance, then you can have between 0 to 6 stripes. -
Just remember, the 19X has no bipod.
-
Hip armor attachment question
Chopper replied to Thrawndike Bar's topic in Shoretrooper Armor/Helmet
As I've discovered while working on my own ST Captain, this is why most people choose the squad leader... -
Ryi'nocks Biker Scout WIP [Approval Ready?]
Chopper replied to Ryi'nock's topic in ROTJ Biker Scout WIP
That looks like one of Chef's older kits. He used to have indents moulded in for the rank and pinstriping, though I believe newer kits have been updated. -
As stated the caption, that images is reversed, so it can cause some confusion. The "dot" on the detonator, should be on the right side, as per the CRL.
-
Pro tip -- if you can get a can of tamiya matte black spray paint, you'll be able to get a far better controlled spray effect than the krylon can.
-
Remnant scout questions
Chopper replied to Vmax1974's topic in Scout Trooper: "The Mandalorian" Armor/Helmet
Fullers earth is just a type of clay, so it's pretty common in everything from beauty products to cat litter. Honestly, it'd probably be easier to do some sponge weathering with burnt umber acrylic paint thinned with some water, but if you're looking to buy some fullers earth online, I'd try and find one with a red/brown color. You don't need a lot, so no need to get the 1 pound bag or anything like that. -
Hey Dot, the image hosting isn't working for your last post.
-
Hey chief, great work and you look a ton better! The only final note I have is to try and center your buckles on the parachute straps and you should carefully cut the linking clips off of your gloves. Neither should prevent you from clearing basic though.
-
As a general guideline, I'd say that the butt flap should extend from just inside the edges of of where the plastic on the belt ends and the webbing begins -- maybe 1/2" to 1" inwards on each side. You can see it in the back side CRL photo below. There's some leeway, depending on body time and size, but you can start there and see how it looks. You can also take a template out of paper and give us a look to double check, before you cut and sew anything.
-
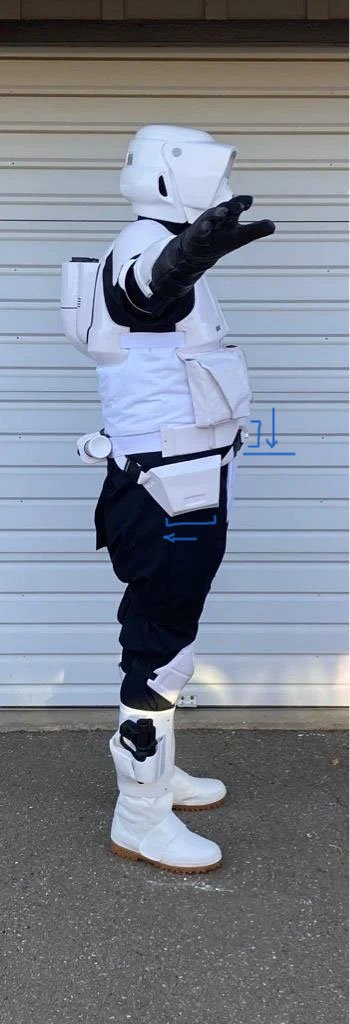
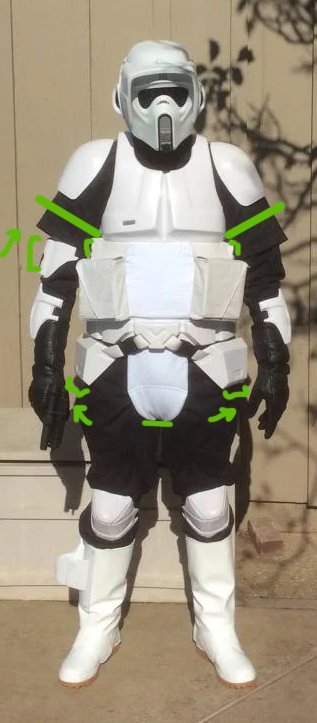
Just remember that the straps in the back meet towards the centerline of the back of the belt webbing, as per the reverse side CRL image below. Also, looks like your parachute clips are looped on the opposite side on both the front and back. The black portion of the clip should be visible when the belt is worn. Your shoulder bells actually look ok. The only issue is that your right one looks closer in than the left, so you should try and even them out. You should not totally close the gap between the shoulder bell and the bridge, so leave some gap visible. From your photos, your bicep armor can come down maybe an inch or so. It just be just slightly under the bottom edge of your flak vest, but we can make adjustments based on your specific body build. Dropboxes should be about centered on the sides of your thighs. It looks like yours are canted a bit forward. I think that'll get cleaned up if you align your drop straps in the back closer to the centerline of the back of the belt webbing though. You're getting there! Good work.
-
Most folks use either Rustoleum or Krylon gloss or semi-gloss white. On my helmet I used the rusto painters 2x touch white primer and then gloss white. It seems to work well with plastics. The primary thing to remember is to use a paint and primer from the same brand. Once you start mixing brands, you run the risk of the solvents attacking each other. If that happens and you get the dreaded crackles, all you can do is let it all dry, sand it back down, and start over.
-
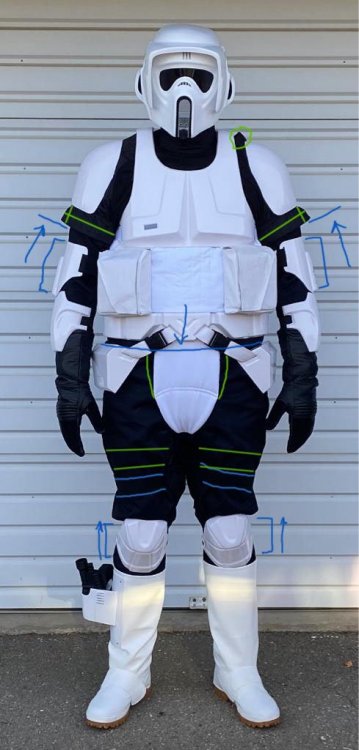
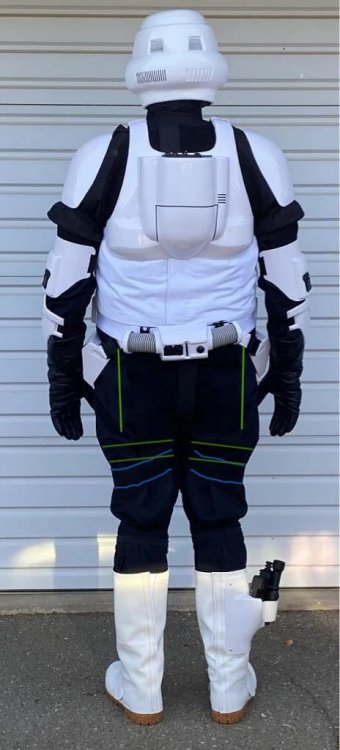
For your reverse shot, I don't see anything else that's outstanding. Looks like we've covered most of it with your initial front side shot. Keep it up.
-
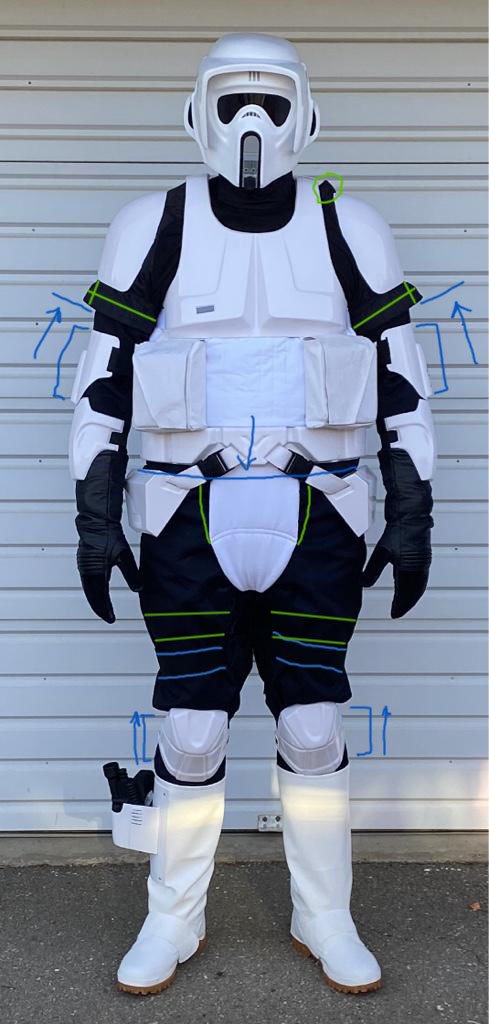
Hi Mark, Jason got a lot of I was about to mention -- In addition to bringing your vest sleeves up to about where I've marked on the attached image, you might also want to move your drop boxes back a bit, so they're resting more evenly on your sides. In the photo the appear to be forward a bit. This will also help them sit in a better position. Once your sleeves are moved up, you can bring your biceps up a bit as well. If you have additional elastic slack on the cod, loosen it up a bit, so you can avoid the cod crunchies. Good work dude.
-
Using smooth on would mean that it's rotocast resin, most likely. There are better and more accurate helmets available. I'd look at some of the other vendors listed here and in the ultimate armor comparison thread.
-
The way the faceplate connects to the sides of the dome portion, near the lower jaw is quite different from most of the other helmets out there, including the screen used ones. I haven't seen anyone do it like that before, especially with all the reference shots we have now. I also can't tell in the indents on the back right are actually intents, or just gray stickers placed on the surface. Same for the traps on the upper back. What is it made of? Fiberglass? Rotocast? 3D printed?
-
mickeymark34's Studio Creations Build Thread
Chopper replied to mickeymark34's topic in ROTJ Biker Scout WIP
That's some good work on the cap and dome join. Great job. -
It's hot glue, so you could carefully heat the inside a bit with a hair dryer. That might looser the glue enough to remove if it won't come off otherwise.
-
Love it. Great work James.
-
Best Holdout Blaster for SC armor?
Chopper replied to clayorrnot's topic in ROTJ Biker Scout Weapons
I glued a neodymium magnet on the inside of the plastic, but it's difficult to show without me removing my holster from my boot. You can get the general idea in pandatrooper's thread below. I didn't cut my magnets through the plastic though. I also recommend you hold off until you get your blaster before gluing anything as it'd be difficult to mount the magnets properly otherwise.