


Chopper
-
Posts
4,888 -
Joined
-
Last visited
-
Days Won
272
Everything posted by Chopper
-
The two sets of metal clips are riveted to the tubing. Then the the clips just slide over the back side of the belt webbing. I had originally had velcro on mine as well, but I removed it, because in the end I didn't need it.
-
Gaps between the visor and dome fit is a question that's come up a few times in the past -- A lot of troopers remember this photo from ROTJ and think that the helmet needs to be exactly flush: But actually, that's the stunt helmet in that frame, which had no opening face place. It was a fully sealed helmet. The helmet is actually supposed to have a bit of a gap on the sides and many of them did, due to the 5 piece construction of the helmet. Now, I know you have the red label version, which is only a 3 piece build, but my RS helmets have similar gaps too. The scout helmet was designed by hand, not with computers, so there's going to be some asymmetry in the build. Embrace it!
-
Yeah, having the velcro on the back sure did keep the TD on securely, though it made it very difficult to slide the det on when getting dressed. I eventually ended up removing the velcro from the tubing bc I didn't really need it in the end. I had also built up my own wire wrapped tube originally as well. As Pete said, it's really heavy and it weighed down my belt a lot. Nice for accuracy, but not necessarily very practical for continual trooping. You may want to keep both as a option, depending on how it feels when you wear it.
-
Nice. That looks much better.
-
Hey Dennis. Great job adding the indents on both the RS and Home Depot end caps. Regarding the modded PVC end cap from Home Depot, the overall size, shape, and indent looks good. However, for Level 2/Lancer the primary issue I see is the thickness of the plastic when viewed in profile. If you look at the original caps shown in the Magic of the Myth Exhibit, you can see that they're about the same thickness as the rest of the armor. For just basic clearance, I can't see any problem with what you've got. However, I know you're aiming for Level 2, in which case you should probably look towards finding replacement parts that have the correct plastic thickness. Trust me, every single one of us (myself included) has written the "need replacement parts" email as a part of our various builds. This sorta stuff happens, it'll be ok!
-
Back in the day you had to add the concave portions to the end caps yourself. I'm not kidding! Even a few years ago most end caps that came with scout armor kits were flat. With a hair dryer and a rubber ball or baseball you can add the indents. Put your end caps flat on a cement or wood floor and slowly heat up the top of the cap. As it heats up, use the ball to push an indent into the flat top portion. You could probably also use a soak in hot water instead, but I didn't use that method when I formed mine. It might take a little while, and you have to go slow, so you don't warp the sides, but that's the way it used to be done.
-
Right on. I'm guessing that it's raw fiberglass finish under the lining though, so one tip if you end up taking the lining out -- If you remove the lining, you'll want to put a coat of black plastidip over the fiberglass interior. You can blorp it on using those foam paintbrushes. Raw fiberglass on, or close to, your skin is not a great feeling.
-
Interesting. I have 2 RS helmets and neither have their ear holes covered. That said, I have the standard helmet, not the red label version. I imagine you could trim the lining around the ear hole and glue the edges on the inside?
-
Ah ok, you used rusto filler primer? I have had some reactions with the filler primer, even with rustoleum paint as the next layer. The idea of filler primer is that it's mixed with bondo to help even out any surface imperfections. If you want to use filler primer, you spray it, then, after it dries, you sand it smooth. After that, I'd recommend you do a coat of regular primer. If you're using rustoleum, you can use rusto painters touch grey primer, or white primer. Once the coat is dry, and any other sanding complete, then you can do additional layers in gloss or semi-gloss.
-
Hi Diego, what brand of paint and primer were you using? How much time did you give between the layers curing? Were these older cans of paint? Were they thoroughly mixed prior to painting? Spray paint can be REALLY finicky. Different paints use different types of solvent to bind the paint to the underlying material. If the paint types aren't compatible, then you can end up with reactions similar to what you encountered. You can also have reactions between the paint layers if the underlying layer is not fully cured. Generally I try to wait 48 hours between layers. You can also have issues with "pebbling" and uneven spray if the paint and solvent isn't fully mixed in the can. I try to shake my cans for a good few minutes prior to spraying, then I test the finish on some scrap fabric first, to make sure everything is coming out evenly. I think you may need to hit the 220 grit sandpaper to get some of the cracking out of the finish. Once you get the crackled paint sanded down with 220, you can re-sand it with 400 and then 600 to smooth out the finish for re-painting. Aside what I've already mentioned, you can also look at this guide for some basic spray painting tips: https://www.wikihow.com/Spray-Paint
-

Fibre-Metal helmet bolts (3M substitute?)
Chopper replied to BikerScout007's topic in ROTJ Biker Scout Armor/Helmet
I was doing an Amazon order anyway, so I grabbed a pair of these as well. I can confirm that they are EXACTLY the same as the 3M helmet bolts required for Level 2/Lancer. -
Congrats Mark and well earned!
-
I'd say that you can do a little bit more. Based on the reference, this is about where your ear hole should be: Also, they used the EFX scout helmet for the Mando Scouts, so you can get some better views of the ear holes in the review posted on StarWarsHelmets: http://www.starwarshelmets.com/EFX_Scout_Trooper_Limited_Review.htm
-
TB-74812 for lancer request (APPROVED)
Chopper replied to Infernau's topic in Lancer Deployment Request
Much better! Bravo! -
TB-74812 for lancer request (APPROVED)
Chopper replied to Infernau's topic in Lancer Deployment Request
Thank you, Sebastien. Your bund and cod shape looks much better! I know that you're still in-progress with your application updates, but one item that the team wanted to give you a heads up on is the stitched arc on your codpiece -- the arc should be at about the lower 1/3 of the cod. See image below with the CRL photo for comparison. You should be able to remove any stitch marks by steaming the fabric. As always, please let us know if you have any questions or concerns for the team.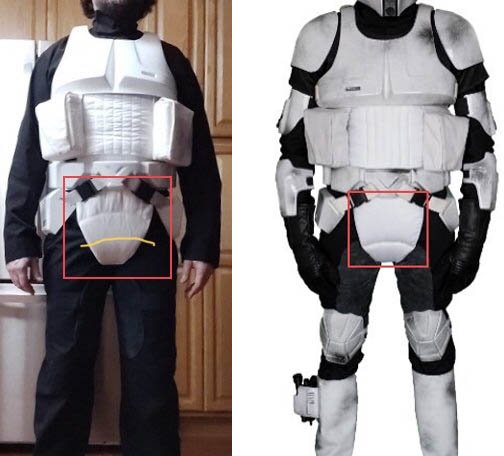
-
opinions on best ready to wear scout boot
Chopper replied to That One Scout's topic in ROTJ Biker Scout Soft Parts
Well, there is no published CRL for the mandalorian remnant scout at this time, so you wouldn't be able to get approved as a mando scout until it's ready. You can check the progress here though: http://forum.501stpathfinders.com/index.php?/topic/21087-tb-scout-trooper-the-mandalorian-crl-drafting/&tab=comments#comment-192864 -
opinions on best ready to wear scout boot
Chopper replied to That One Scout's topic in ROTJ Biker Scout Soft Parts
Are you looking to only go for basic approval, or are you aiming to keep your options open for Level 2? The first link has ok sole cuts, though the heel cuts are not cut correctly. The soles in the example also have 2 tone soles, which would need to be painted a single color for level 2. The second link has no sole cuts, so those would have to be added. In addition to the link posted above for cheesewhoopy, there's also @StephTrooper. I believe she does her boots in runs. You can check her wares here: https://www.facebook.com/groups/1517600621664236/ -
Congrats Lancer!
-
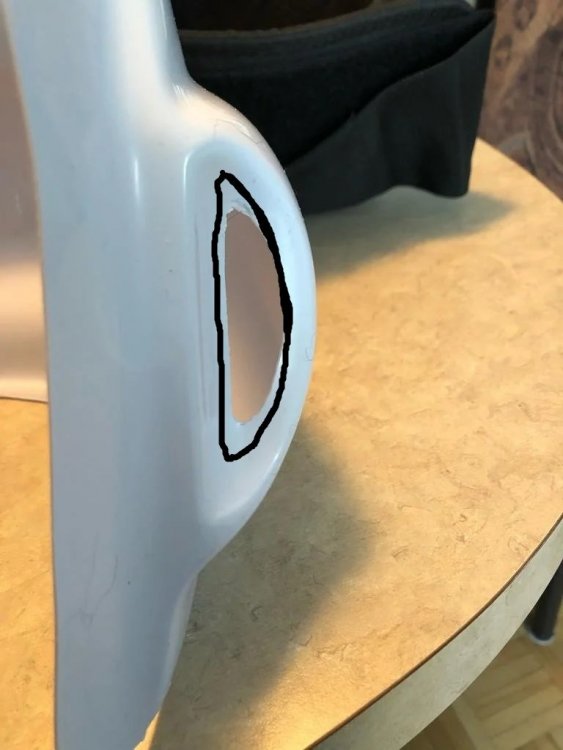
Are you talking about the half-circle cut on the very top of the visor that fits against the dome? It shouldn't be rubbing. You can adjust it by marking and cutting the circle in more, bit by bit, until it doesn't rub anymore. Here's one example of how it's trimmed on an altmann helmet:
-
TB-74812 for lancer request (APPROVED)
Chopper replied to Infernau's topic in Lancer Deployment Request
Hi Sebastien, thank you so much for your application. The Level 2 review team has reviewed your photos and have the following feedback for you: First off, we want to commend you on your excellent thermal detonator wrap job. Yours is one of the best wrapped detonator tubes that we've seen so far! Flight Suit Dressing adjustment -- Please make sure you pull down the butt flap next time you get suited up. The length/width of the flap looks ok based on the armor off shot, so just keep an eye out next time you get suited up. Shoulder Armor The shoulder bell elastic appears to be 3/8" not 1/2" as per the CRL. Can you please take a clearer photo to confirm? CRL: Armor is secured around bicep with a 1/2 inch (12mm) black elastic strap. Forearm Armor Dressing adjustment -- next time you get dressed, check that your left forearm armor is rotated forward a bit more, so it's at about a 45 degree angle. Chest Armor Can you please provide a measurement photo for the shoulder bridge coverings? CRL: Shoulder bridge covers, covering the join between the front and back of the armor, are made of white cotton webbing or elastic. Covers are between .5 inch and 1 inch wide. Cummerbund Your bund looksa bit long for your build. Can you confirm if you've tucked it under your belt? Ideally the bund length is typically around 9" and should be sitting on top of the belt. Codpiece Your cod is very narrow and triangular in shape. The sides should be more of a curve, as per the CRL photos. See photo below. CRL: Codpiece and sewn curve conforms to shape pictured in the CRL or Costumes book. Belt and Detonator As we mentioned earlier, EXCELLENT job on the detonator!!!! 😃 Blaster Please remove the clear lens from pistol scope, it was not used in the screen used versions. Boots Your boot shafts are fairly wide for your leg and your right boot has a significant droop, due to the weight of the blaster. Additionally, the stitching on your dog bones appears straight, not rounded. See reference photo below. CRL: Dog bones have double stitching along the rounded edges as seen in the film. It may be possible to reduce the boot shaft size by adjusting the position of the inner rear vinyl shaft halves on the back of the boots. You'd end up having the re-position and re-sew the velcro once you adjust to the proper size. I fully acknowledge that this is going to be tricky, as you will want to avoid a "cone look" with a large lower portion of the shaft and a smaller upper shaft. One tip for avoiding "boot droop" is to sew some elastic into the boot vinyl. It's sewn behind the holster and wraps around your calf. You can't see it, but it does keep the boot from dropping down when the blaster is carried. It's not the only way to do it, but it is one way. Overall, it may seem like a lot, but a majority of our feedback is dressing and verification questions. The three big areas to focus on are the boots, bund, and codpiece. Overall, I'd say you're about 90% of the way there, but we just need to do just a bit more to get over the finish line. Please let us know if you have any questions, need any clarification, or if there's anything we can do to help.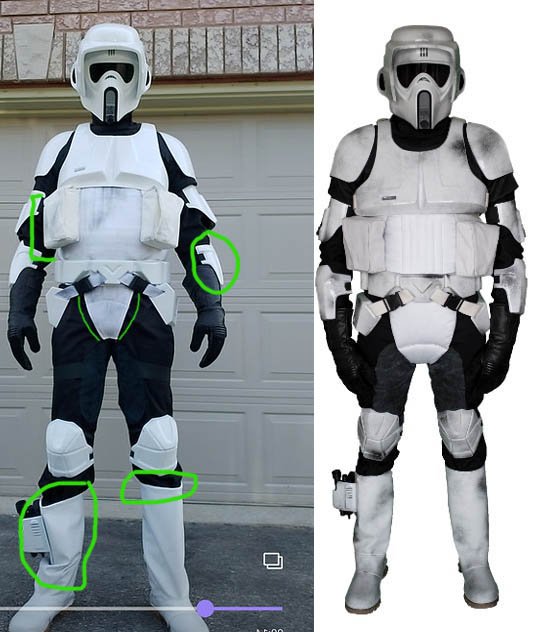
-
Congrats Pathfinder!
-
Depends on the paint you used -- you can use many different types of paints with an airbrush, such as acrylic, enamel, lacquer. If you're running acrylic with the airbrush and it's fully dried, then no, just water won't take it off. 90% iso alcohol will take it off though, with some scrubbing. You can clearcoat over acrylic if you want, just make doubly sure all layers and paint types are cured. I don't recommend it on the scout, since some of the scrapes and rubbing off is close to the screen used weathering. Also, keep in mind that many clearcoats aren't crystal clear and tend to yellow over time. The reactions you get to the rattle cans is usually due to either incompatible solvents used in the paints, or uncured layers of paint underneath...or both. Acrylics are fairly non-reactive, mostly because there's no solvents. Acrylics won't etch themselves into the plastic, they just sorta sit on top, which is why you can remove acrylic more easily than other types of paint.
-
Position looks good!
-
TB-74812 for lancer request (APPROVED)
Chopper replied to Infernau's topic in Lancer Deployment Request
Thank you, Sebastien. Our team will review your application and get back to you. -
Either will work as long as the final result looks like the screen weathering. The main advantages of the airbrush are that you have more control over the spray flow and can use acrylic paints, which is a bit more forgiving to remove if you don't like the way the "blast" pattern turned out.


