Chopper
-
Posts
4,889 -
Joined
-
Last visited
-
Days Won
272
Everything posted by Chopper
-

Project: "Get back in the saddle" My Scout Trooper WIP
Chopper replied to Nathanzx10r's topic in Getting Started
Spike won't let you down. Welcome back dude! -
Darth147s (Studio Creations) Scout Build-WIP
Chopper replied to Darth147's topic in ROTJ Biker Scout WIP
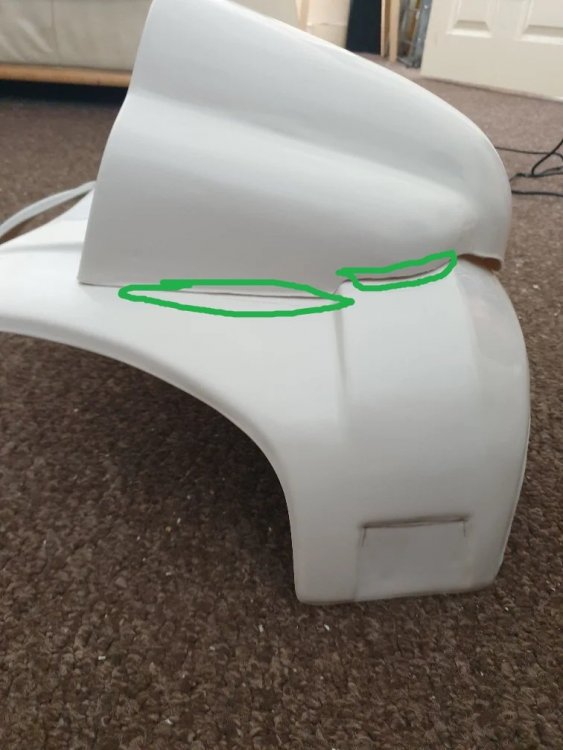
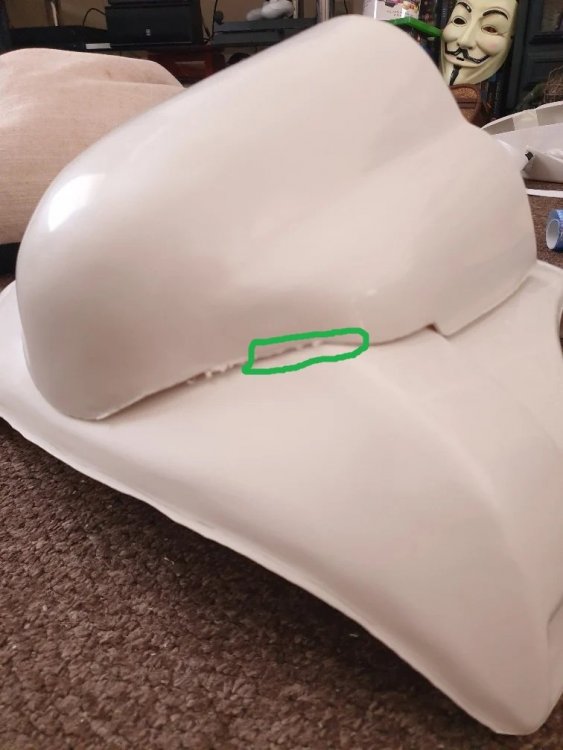
Yikes! Well, you've just experienced the dreaded paint crackles. It can happen for a few reasons, such as laying on the paint too thick in one spot, not letting any underlying layers dry, or reactions with any paint layers or primer underneath. Sometimes it can happen if the paint isn't fully mixed and there's an imbalance with the paint and solvent. On the last scout helmet that I painted I had a lot of issues with crackles -- especially in the area you did, as well as on the bottom of the back of the helmet. Spray paint can be super finicky. It's supposed to more be convenient, right? With where you are now, go ahead and sand down the abs paste once it's cured. Once everything is smooth again, I'd hit that area with some flat white primer first. Sand that with high grit sandpaper, then you can go over it with gloss. I've found that gloss paints tend to have a greater tendency towards crackling. I've also found that in instances where I'm getting crackles in one spot, throwing down a layer of primer after sanding tended to avoid the crackles once I did a gloss coat. Let us know how it goes and we'll advise as best we can. -
No way dude, you'd be right at home. The 501st Pathfinders Detachment welcomes Scouts of all sizes! 😁
-
Obviously, for non-501st troops at cons and such, you can do what you'd like. For any 501st-sponsored troops, it'd be up to your local garrison as to whether or not they'd let you troop in it. At this time though, it's not in the CRL, so it wouldn't be worn for basic or lancer approval.
-
Check with @spike on these forums. He makes the "Altmann" armor, which is well suited for larger folks. WTF runs larger as well, but unless you're planning on doing a Mandalorian Scout (CRL forthcoming), I'd say that the Altmann armor is the more accurate of the two for a ROTJ scout.
-
For some additional context -- The neck seal shows up in the speeder bike chase scene in ROTJ, which was filmed on a blue screen. It's also shown up in some of the costume photos, such as the photos that came included with the dvd releases some years ago, as well as the photo from the Star Wars Costumes book (which is the photo you've referenced). The scout costume described in the CRL tries to prescribe what a majority of the scouts looked like in ROTJ. There are always exceptions, such as the rubber stunt helmets, the scout with no stripes on his tank, etc. Because the neck seal was not included on most of the scouts in ROTJ, the Pathfinders Detachment does not include the neck seal as a part of the CRL.
-
Great work, Dennis!
-
That's a real nice job on the weathering, dude. Great work.
-
James, something else I noticed as I was looking at your pouches -- it looks like you trimmed the bottom left edge of your chest armor but not the right? They should both be trimmed, as you did with the left-side edge. You can try better aligning your pouches by rotating the bottoms of the pouches both outward a bit. That might make them align more horizontally. If they;re jutting out, you could also try hand sewing some velcro to hold them to your bund. How rigid is the filling you used in the pouches? Sometimes that can cause them to jut out at odd angles.
-
No, the velcro tabs are on both ends and there's some corresponding adhesive velcro inside the tank.
-
Yeah, I made them. I used some leftover 2" elastic and sewed the hook side velcro to it. You can see a bit poking out on the left side of the image.
-
Looks perfect
-
A few millimeters, eh? Those are some pretty exacting measurements 😁 The best photo we have of the tank topper is from the Magic of the Myth exhibition. I would go with your third photo, but I'd bring it just a tiny smidge closer to the back armor. Also, here's how I have my front and back armor connected:
-
From what you've shown, I would go with position B. You can always shim the gap a little bit. That said, before gluing anything, you might want to tape the faceplace assembly in place, so you don't have to hold it with your hands, and then give us a look at how it appears from the front, left, and right.
-
Great work on the tank, Phil. Looks A+! Your tank topper placement looks ok too. My front and back armor are connected with a strip of velcro underneath the shoulder bridges. It's easy enough to disconnect one side and pass your head through that way. My shoulder bridge coverings are wrapped around the top and then velcroed on the bottom, so those come right off and get get re-attached fairly easily as well.
-
James, you're always welcome to post your Lancer application at any time. I would still like to point out a few items, which are primarily dressing issues -- Your right knee is higher than your left. From the side, your belt is drooping downwards. Both can be remedied with some velcro. Your cod looks wrinkled and could use some steaming prior to your app. Your cod still seems wide to me, which I think is why you're getting some crumpling along the edges from your drop box straps. From the side, your bund is untucked from the belt, while in the head on shots it looks like your bund is tucked into the belt. The bund should sit just on top of the belt, not tucked behind. This may be an issue of the bund slipping down, in which case the answer is to attach some velcro to your flak vest. Again, this is just what I'm seeing. The review team is comprised of multiple sets of eyes and we come to a consensus before posting our reviews, so what I've posted may not be totally comprehensive. Please feel free to post your application at any time and I have no doubt that we'll successfully work through it -- same as the many Lancers who came before you!
-
Very nice, Clay!
-
The Mandalorian: Biker Scout WIP
Chopper replied to bobafett4ever's topic in Scout Trooper: "The Mandalorian" WIP
Yeah, I've been there. I actually bought one of a 1/8" cobalt drill bit just for removing them without melting the plastic around it. -
The Mandalorian: Biker Scout WIP
Chopper replied to bobafett4ever's topic in Scout Trooper: "The Mandalorian" WIP
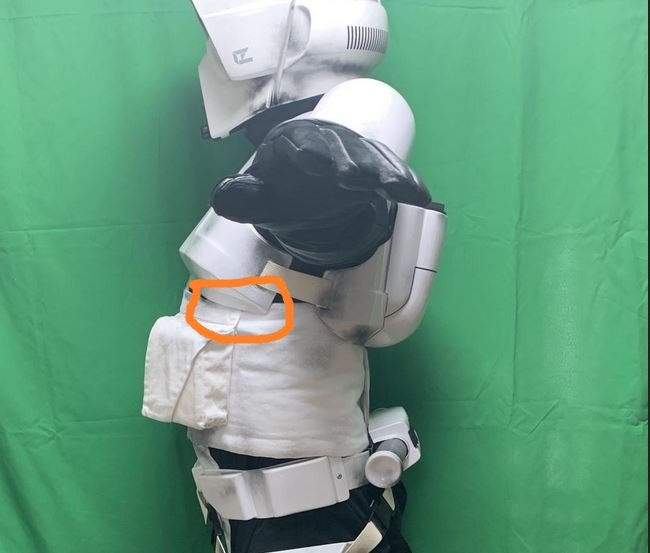
Are you using backing plates with the rivet? I can't see the cracked area in the photos? -
The trick is to try and find the spots that are causing it to ride higher up. I've circled a few from your photos. Remember, this is a lot like the helmet. Go REALLY slow and only trim a little bit at a time. It's pretty close as is -- you don't need it to fit absolutely perfect, like lego blocks.
-
Off the bat, I'm going to tell you not to use filler to attach the tank. It should remain two separate pieces, b/c that's the way it was on screen. If you don't want it super loose, there are some tricks you can do to secure it, beyond the 1/2" strap: I cut two slots on the back armor and fed velcro tabs through from the inside of the tank, to the inside of the back armor. Using tabs to secure the tank keeps it fitted flush and prevents anything from flopping around.
-
As Dennis mentioned, was this a fully made suit with the suede patches, etc, or just a set of coveralls? If this was a fully made suit, there are some tricks tailors can do to lengthen the torso for you, especially since none of it will show under the flak vest and bund. I've seen some folks basically add a cut with spandex at the shoulder blades and lower back that allows for more stretch when bending or sitting. RedKap is notorious for having a short torso for their coveralls and even their "long" sizes just mean longer legs. If it's just a plain set of coveralls that you plan to mod, then you may need to size up and then see what needs to be taken in on the arms and legs for a proper fit. You could also check out the Kolossus coveralls, which fit a bit better than the RedKap, they breathe easier as well: https://www.amazon.com/gp/product/B07BK87DYM/ref=ppx_yo_dt_b_search_asin_title?ie=UTF8&psc=1
-
Studio Creations armor/helmet kit
Chopper replied to Vraeden's topic in ROTJ Biker Scout Armor/Helmet
I haven't seen anyone use anything more than the 4 pop rivets to attach the holster. Usually the cracking tends to happen because aluminum back up plates aren't used on the inside part of the boot and the plastic gets stressed and eventually cracks. -
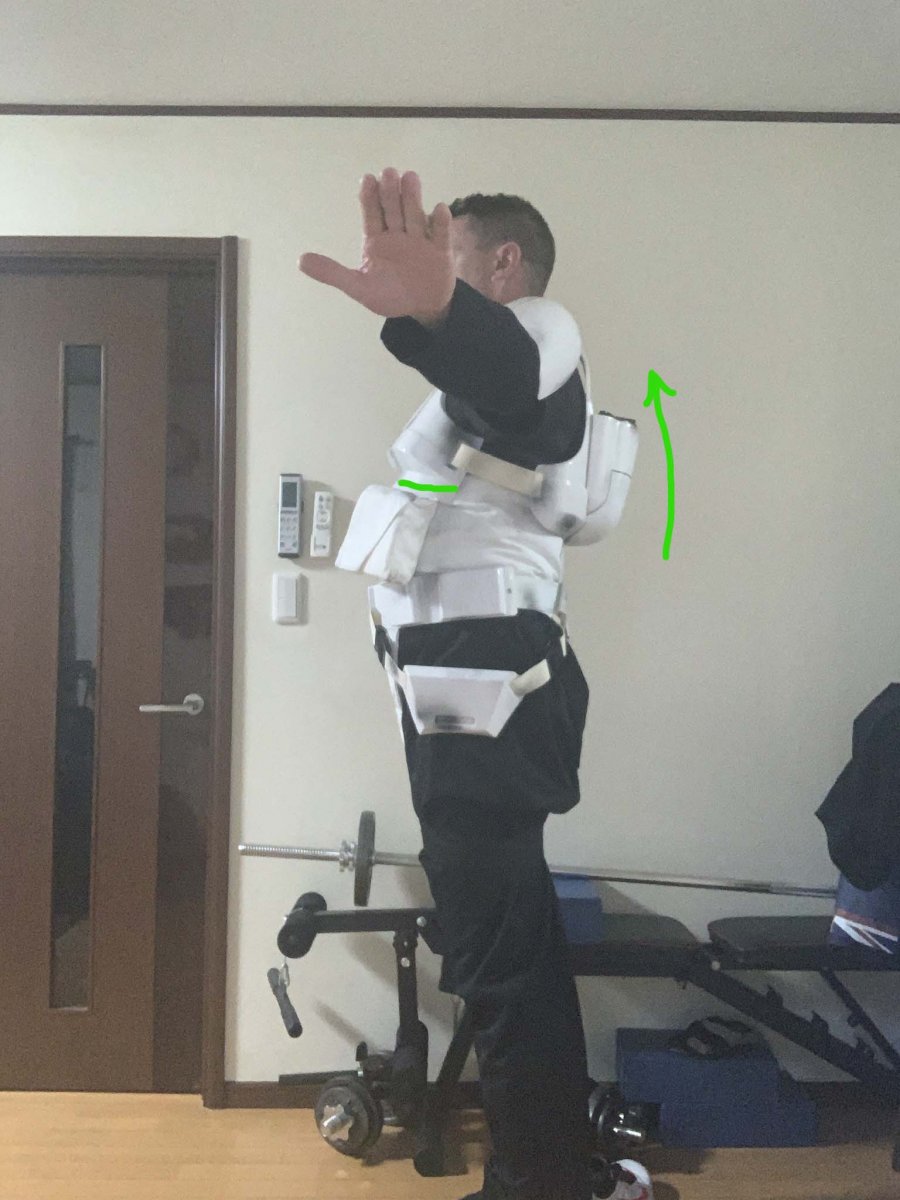
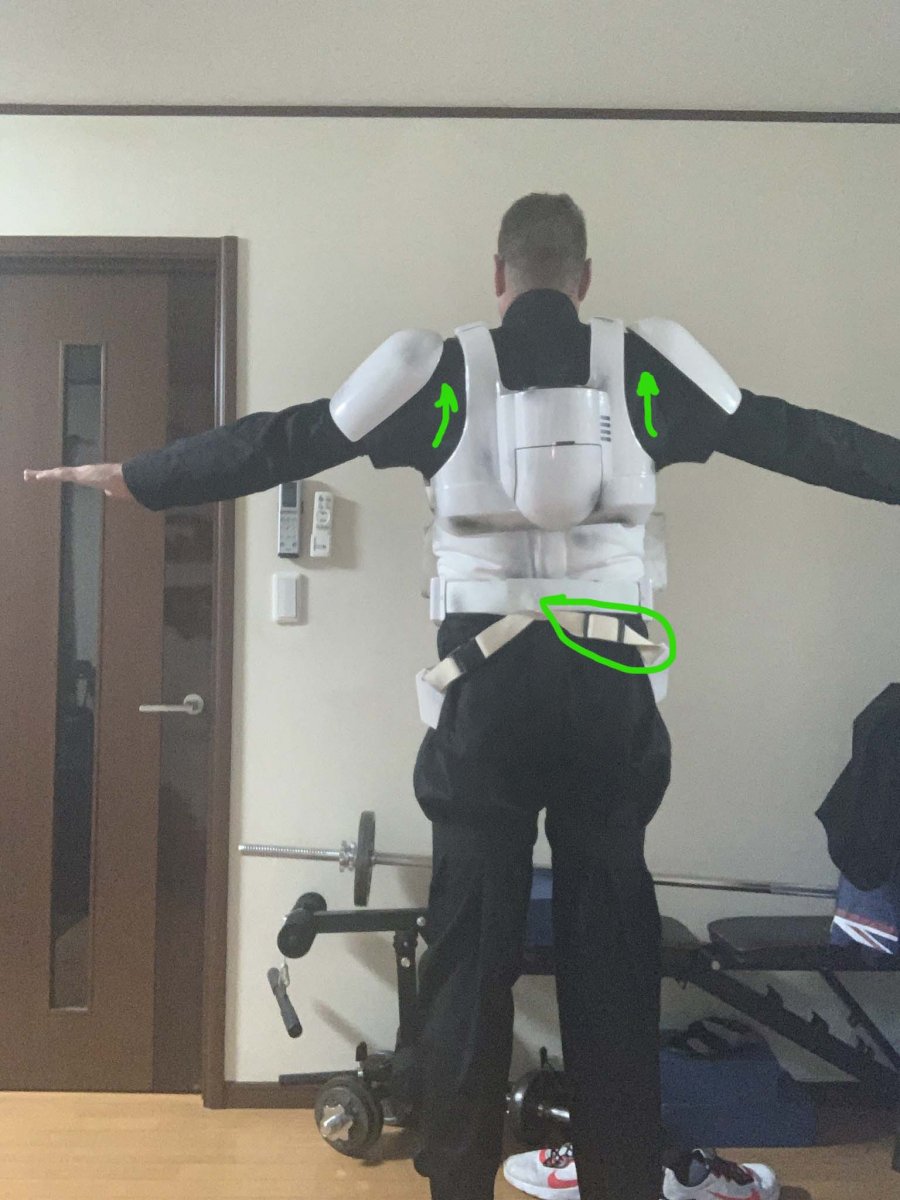
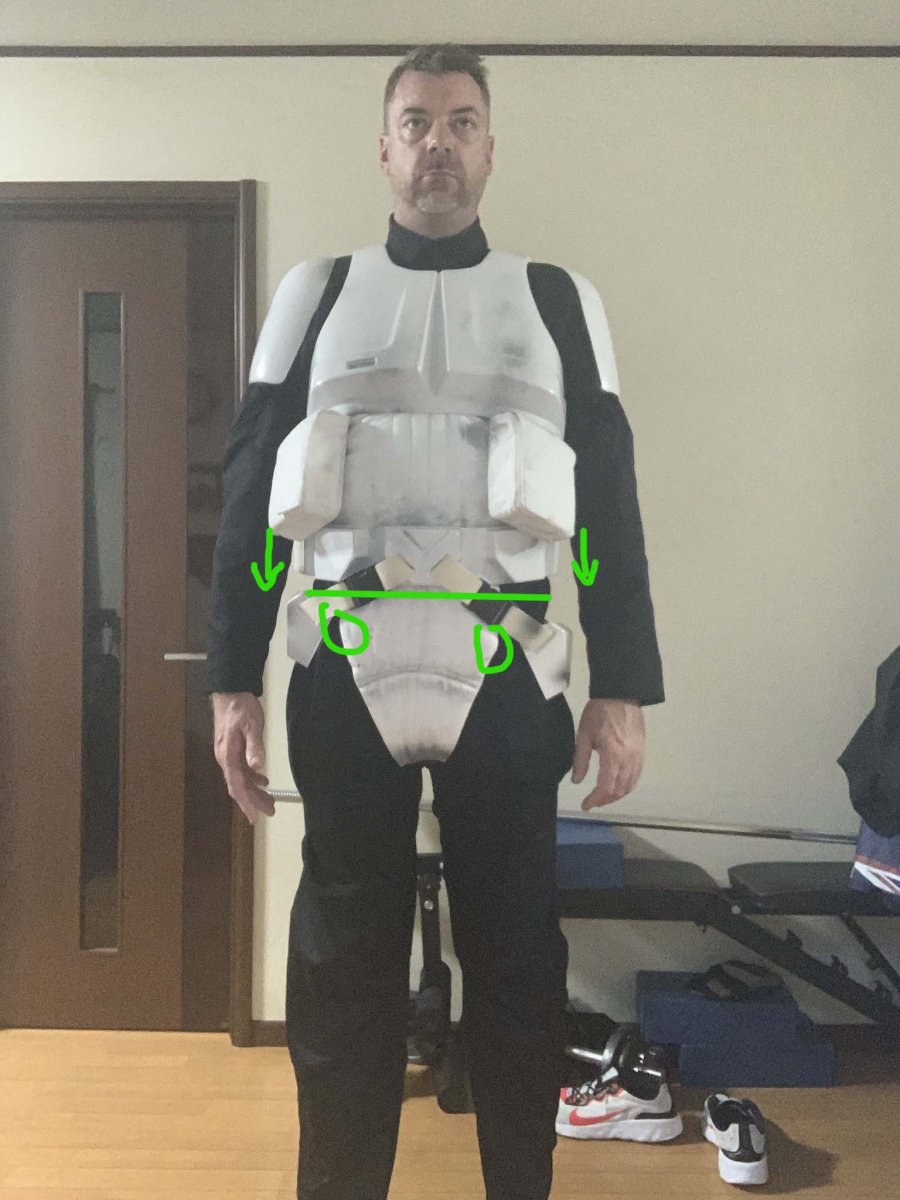
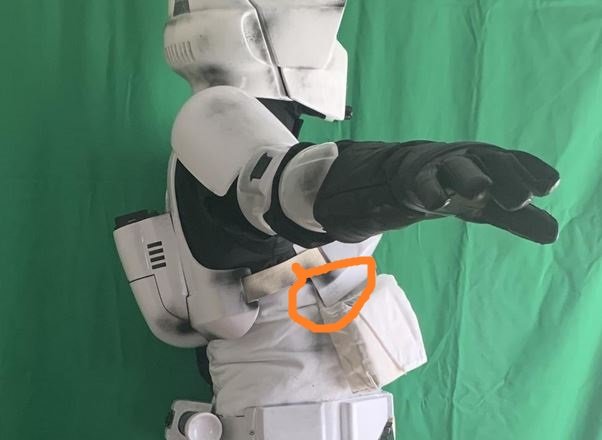
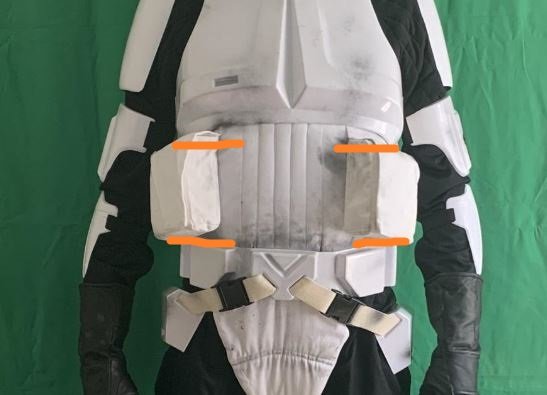
Hey James, I took a look at your photos and here's some tips for you - I tried to do some markup in the photos as well, if that helps. 1) I think your belt might actually be positioned a bit too high. Not by a lot, but I think it can come down slightly. 2) Are you tucking your bend under the belt? Ideally it should sit just on top of it. Does lowering your belt slightly allow the bund to sit on top? 3) I know that armor can shift a bit when your arms are out like they are in the photos. Your rear armor does look a bit low in back, but that just might be how it's riding due to your arms. If it is indeed a bit too long in back and needs to come up, then you might need to trim your back side shoulder bridges a bit. 4) The ends of the ridge underneath the bottom of the chest armor can get trimmed a bit so it tapers on the side. 5) Check your right rear drop strap, it's twisted. 6) I've marked two parts on the cod that you should look at -- it looks like there's a hard angle, especially on your left/photo right? Or is that just a funny bend while you're wearing it? 7) You might want to adjust the angle on your pouches a bit, so they're not canted upwards so much, but slightly moving your belt down a bit may help with that. Great progress, dude. Keep it up.


-
Hmmm, it doesn't look like there's any crackling reactions, which is good. It's hard to tell though, the bumpiness underneath could just be from unsanded primer? Pete, what do you think? @Retrofire