Retrofire
-
Posts
3,699 -
Joined
-
Last visited
-
Days Won
135
Everything posted by Retrofire
-

Jorge's first ROTJ Biker Scout WIP
Retrofire replied to SwiftieScout's topic in ROTJ Biker Scout WIP
Congrats Pathfinder and well done! -
Fist fighting trees and teddy bears: A Scout Story
Retrofire replied to Safetymanual's topic in ROTJ Biker Scout WIP
That's correct Dennis. Hahahaha I'm a dork! Got you and Dart mixed up there. Aradun is right though Rusty we're here for you so don't hesitate to reach out should you need anything. -
WIP - ROTJ Biker Scout Trooper 2022
Retrofire replied to nateopotato's topic in ROTJ Biker Scout WIP
Congrats Pathfinder! Well done!! -
Fist fighting trees and teddy bears: A Scout Story
Retrofire replied to Safetymanual's topic in ROTJ Biker Scout WIP
Hi Rusty! You can start working on various parts of the armor like your forearms, biceps, belt, etc. I believe what @Aradun is talking about are the bridge straps where your back and chest armor meet over your shoulders. You'll want to have your softgoods, vest & flightsuit, on before you do any trimming there to ensure a good fit. The rest you can certainly work on. The only other part that you might want to wait on a final fitting are the shoulder bells. Those will need to be trimmed based on where your vest sleeves fall. -
WIP - ROTJ Biker Scout Trooper 2022
Retrofire replied to nateopotato's topic in ROTJ Biker Scout WIP
Best of luck Nate! You're looking good! -
Hi Fibo! The weathering on the helmet looks great the only problem I'm seeing with it is that the details above the snout and forehead are indented into the helmet. We've seen these before on 3-D printed helmets and problem is that they need to be decals and not printed into the faceplate. For the helmet the CRL states that "Decals are screen accurate." Those areas will need to be filled in and decals applied in order for your helmet to be approvable. It's an easy fix to make and you can find decals from the vendor list here: You've done a fantastic job on this armor and you should be proud. This is a minor fix and you shouldn't have any issues taking care of it.
-
First Time 3D Printed ROTJ Scout Trooper
Retrofire replied to wegotdeathstar's topic in ROTJ Biker Scout WIP
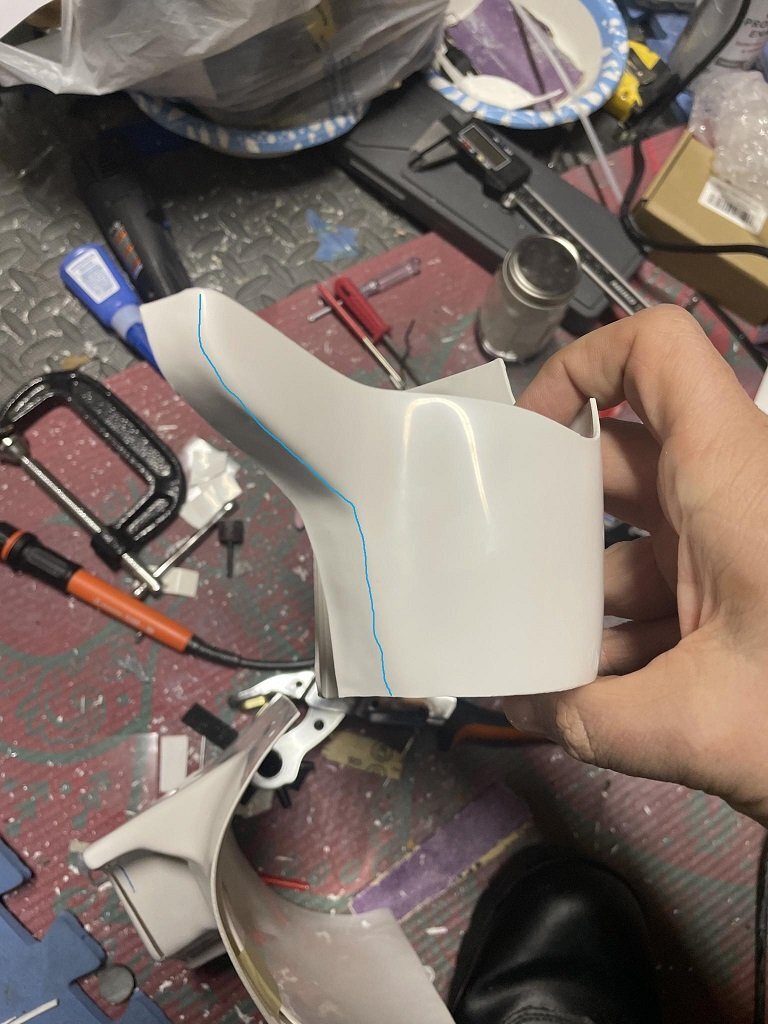
If you can close the gap cleanly then go for it but it's not crucial for approval. All the ROTJ tanks showed flaws in one area or another. For the SC you want the tank to sit as flush as possible but again it doesn't have to be "exactly" flush to the end of the back armor hump. I would recommend against putting a rivet through both pieces as you want the rivet to be in the bottom, center of the tank as shown in this picture. Before you glue the end of the tank to the back armor make sure attach a "blind" rivet in this area. When you place the rivet make sure to pre drill the hole and add a backing washer to keep the plastic from cracking. -
Best of luck Kevin! You've done a great job!
-
Hi Stefan! You're already getting excellent advice the only thing I can add is if you do choose to sew your boots would be to get denim needles which have a thicker shank than a standard needle for your machine. Here's a link to see what they look like. You'll want to make sure they are compatible to your machine. https://smile.amazon.com/Singer-75467-Sewing-Machine-Needles/dp/B004IHNDSW/ref=sr_1_5?crid=24DD2HJAC6FDB&keywords=denim%2Bsewing%2Bneedles%2Bfor%2Bsewing%2Bmachine&qid=1674412062&sprefix=denim%2Bsewing%2Bneedles%2Caps%2C832&sr=8-5&th=1 Best to you and best of luck with your build!
-
Those are looking fine Kevin! Keep up the great work and you'll be submitting before you know it!
-
Congrats Pathfinder and welcome to the Det!
-
Ola' Javier! There are quite a few troopers that use a strap for their DLT-19x typically made out of leather or canvas. You'll need to reach out to your GML to verify what your Garrison will allow. I'd also consider reaching out to a few troopers in the Spanish Garrison. That being said if you haven't had the opportunity yet then I would encourage you to reach out to your local garrison here: https://www.legion501.com/501web/ Looking forward to your build and please let us know if we can be of any further assistance!
-
I wouldn't use a snap as you risk tearing the pouch fabric opening and closing it. You could use a pliable magnet like the thin ones you get in the mail for your fridge. Those should fit flat enough to maintain the look of the pouch and keep it closed. Most of the rare earth magnets are too thick and will cause the flap to stick out. Any reason you aren't liking the Velcro closure? That's typically the best way to keep your pouch closed securely. I keep my phone and my mp3 player and a stack of trading cards in my pouches so I like the Velcro closure. It's robust and I've had my pouches for a long time and no issues with it.
-
Fragarock's Scout Build
Retrofire replied to fragarock's topic in Scout Trooper: "The Mandalorian" WIP
Armor is looking good Frank! Keep up the great work! -
We might also want to check and make sure we're not there over any major town functions like a bike meet or car show. I'm thinking of areas like Coachella or Gilroy that have big festivals and such like. I know from living in Oakland for several years that a lot of the smaller cities in CA have festivals of some sort. Just a thought.
-
Hi Kevin. That part of the holster is meant to be a compression fit so that's why the slot in the holster. The trim line should you desire to cut it would be about here: You can glue it in using E6000 and some holsters have two rivets attaching the front part of the holster. If you do rivet it then make sure to use backing washers and pre-drill the holes to prevent cracking. @Chopper @Aradun what are your thoughts?

-
I'd have to second what Chopper is saying. Put on your flight suit and knees then boots and take the pattern to fine tune your measurements. You're going to want some room between the top of the boots and your knees. Check out the CRL model for spacing.
-
This is a good suit up! I'm sure @Aradun and @Chopper will weigh in and I'll share some things I'm seeing, I agree with what you mentioned you have to fix apart from the knees and I'll explain that in a minute. Your boxes should be about an inch from the belt and your shoulders seem to be a bit too far out from your shoulder bridges. You'll want to rotate those forearms to sit on the top of your hands and move them a little further down your arm so they are not touching the biceps. The biceps could move up a bit to increase the spacing between them and the forearms. Regarding the knees the upper strap is optional so you do not have to install one if you so choose. I would also pull your bund up so it sits on your belt and straighten out your belt. It looks a bit too high in the back. You can see where the bund is bunching at the back of your belt area. Overall it's a good start and most of this is fitment of the soft/hard armor and that will come in time. There will be some adjustments so don't get discouraged. You're doing a great job and keep it up as you're almost there!!!
-
HUZZAH!!! Best of luck Kris and really nice work and attention to detail!
-
I am SO going to Endor! Been wanting to make a trip there for some time now.
-
Fragarock's Scout Build
Retrofire replied to fragarock's topic in Scout Trooper: "The Mandalorian" WIP
Hi Frank! You're making great progress on this and should be very proud. Here's some input for you on your list @Aradun @Chopper please feel free to add to what I have. 1. I'm going to add velcro to the back of the cloth belt so it will attach to the back of the cummerbund. May do this with a snap as well to prevent it from sagging. Need to think about this solution because it's already sagging without the TD being attached. I'm not sure why the belt should be sagging especially without the TD attached. If you need to add some strengthening there then I would forgo a snap and use white Velcro. Over time that snap will start to dig into your back and could rip the bund material. 2. Need to tighten up the crotch strap. The white crotch piece hangs a bit too low and loose. This will help raise up the pants which are also kinda low, just the way they were made. This makes sense and the soft armor will need to be adjusted as you grow used to it. Just be sure not to make the cod too tight or it'll fold over and cause what we call "cod crunchies" and it won't look right. 3. Considering taking the boots to a cobler and having the tops lowered 1" or 2". These look too tall for my short stature and I think having more black flight suit visible between the knee and top of boot will improve the look. Based on the CRL pics and your pics the boots look ok. The right boot actually looks a bit lower than the left in your pictures. Take a look at the overall CRL pic. 4. Need to fill the pouches, probably with furniture foam that I have left over from my TK build. What's the correct thickness for these pouches? Based on the CRL the correct thickness is no thickness. The pouches lay flat against the bund and belt. Check out the CRL photo and the model photo above. 5. Need to make the slot on the right side of the chest bigger where the side strap comes through. It's impossible for me to tighten up that side when I have the chest on. Can someone verify my strap rigging is correct on this side? Strap comes from the inside, through the slot to the outside and folds backwards upon itself. The rigging looks good to me. The only thing I would recommend is that you strengthen the the area around the slots on the chest armor to prevent cracking over time. I learned this after over 80 troops in my SC armor and ended with a bunch of micro cracks. The way I halted that was to cut out a square of ABS and plastic welding it to the inside of the chest then used a Dremel to cut the slot. It's much stronger now. I've learned that while it's always good to be able to dress yourself there are always folks that you're trooping with that can help you with dressing and give you a once over to make sure you're looking sharp!😉 -
That armour is shipshape in Bristol fashion! I can't see you having any problems getting basic. Really nice work Kris!
-
Hi Ron! Give this thread a good read through to get an idea of what you'll have to do for the suit mods. If you already haven't you can gather the required items, suede/strapping, so you can work it yourself or with another tailor. @Aradun is solid with a sewing machine so we're here to help should you need.
-
Tarok’s Remnant/Mando Scout [Approved]
Retrofire replied to Tarok's topic in Scout Trooper: "The Mandalorian" WIP
Fantastic to hear! Take your time and go at a speed that is comfortable to you. We'll be here should you need us.- 72 replies
-
- 1
-

-
- biker scout
- the mandalorian
- (and 1 more)
-
Hi Kris. This is looking good and the only thing I could suggest is to tighten up the drop boxes to about 2.5-3cm from the belt and pull up the bund a bit so it doesn't bunch under the belt. That's all fitment with the soft armor so it'll adjust as you start wearing it more and more. This looks ready to go to the UKG GMLs! Nice work!!