

Griffin-X
-
Posts
6,808 -
Joined
-
Last visited
-
Days Won
188
Everything posted by Griffin-X
-
Ah...nice touch.
-
Besides, who wants to get all up in someone else's sweaty bucket?! You are almost there and the rest of your gear looks awesome. Well done. These guys will all agree...there is nothing like trooping in your full gear. The feeling and experience is addicting.
-
Can anyone identify the rifle scope
Griffin-X replied to Grantd1*'s topic in ROTJ Biker Scout Weapons
I'm not sure if you have a Walmart in your area. I did a quick search and found this one though: http://www.walmart.com/ip/Bushnell-Tasco-3-9-x-50-Rifle-Scope/16767722 -
I'll do my best...also, you can see most of these straps in the pics above. 1" Velcro and elastic = used for your armor strapping (knees, shoulders, forearms, biceps) 1.5" Cotton webbing = used for your belt hang boxes; this loops through the belt and boxes using the plastic hardware (see pics); this is also used as your chest/back closure strapping... 1.5" male/female Velcro = used along with the 1.5" cotton webbing to keep your chest/back closed on the sides (see my pic above)... 2" Nylon webbing = used on your belt; this attaches to the ABS belt via (1) rivet on each side (see pics); also used to cover the "join" of the chest/back parts (again, see pics)... 2" elastic strap = could be used on the underside of the chest/back join; this is your choice. I made a "T" shape using the elastic and a smaller, 1" piece of Velcro; this holds my shoulder bells (see my pic)... Plastic hardware buckles = 4 @ 1.5"; used on the belt boxes. You should pick up a 5th one, size 2" for the belt closure in the back (if you decide to go this route-some use Velcro instead)... Tank topper and sticker = you have this right, although most paint this detail on using white and red. Grey chest sticker = good call on this one; use paint instead! Hope this helps Juan! Now, look at the pics and give it a shot!
-
Great job Eric!
-
I remember the feeling. I've heard great things about the new SC lid. The turn around time should be quick. It may be a good 2nd option for ya.
-
Let me guess...KS?! Also...when you are ready, I'll help with your cards.
-
As I understand it for the SC kit... You'll need to glue/attach the (2) smaller ABS belt parts to the main ABS belt. That will give you a one-piece looking belt. DO NOT rivet these parts if you want to go Lancer. Typically, you rivet the webbing for the belt on the back; only (1) rivet per side (see below). Some people will run the belt drop box webbing and re-use the same (1) rivet per side. Others may just use Velcro, or attach them to the back most part (see below). Attach the belt webbing plastic hardware and do a test fitting to get the right waist size. The TD can also be attached to the webbing hardware with a zip tie so that when you close the belt, the TD is already attached. I've seen a lot of people do this with the SC kit.
-
Looking really good Sara! Nice job!
-
Can anyone identify the rifle scope
Griffin-X replied to Grantd1*'s topic in ROTJ Biker Scout Weapons
It has always looked like a Russian sniper scope to me. -
Looking for MC snout greeblie to modify KS helmet
Griffin-X replied to JenB's topic in ROTJ Biker Scout Armor/Helmet
I'm sending them his way. -
Looking for MC snout greeblie to modify KS helmet
Griffin-X replied to JenB's topic in ROTJ Biker Scout Armor/Helmet
Incoming PM... -
Think of this as "tips and tricks". I use a rectangle piece of foam in my pouches and then keep trading cards, food, etc in them. The suit looks good above the waist, just kind of baggy below. I'm tall and thin and had to get mine altered to get a more fitted look. You might consider that too. The boxes need to sit about 2-3" or so from the belt. It just looks much better than having them too low. Again, just an observation. For the chest/back...see pic of mine below. I have a piece of 2" nylon webbing that wraps around the "join" areas on each side. Some folks use cotton webbing, cloth, etc. But...you need to have this part for sure.
-
I love that banner Matt!
-
I agree with Scar, all-in-all looks very good. Little tweaks: raise your belt boxes a bit and see if you can take the legs in some (should not stop clearance approval). How did you join your chest and back parts? You should have some sort of white nylon or clothe webbing over the joins. I can't tell from the pic...
-
I made "washers" for my boots to help secure the holster. For these I just cut round ABS pieces about the size of a US quarter and drilled a hole. Works great.
-
Yes, I agree...!!
-
I can totally do everything except the vest and cummerbund. My wife says I look funny trying...but no way yet. Side note...I'm actually moving to your area and the North TX Squad. I will see you soon Eric!
-
You will need a rivet gun for the belt, boot holster, and tank on the back. Aside from that, some E-6000 and Velcro is about all you need.
-
Box Party! Okay...first step, RELAX! You have proven yourself to be super good at this stuff so you'll do fine. Some folks start with the chest/back, others work on the arms or knees first. I did the knees first then the belt, then arms, and finally chest/back/tank. Take your time and most importantly...HAVE FUN!
-
Back in the 80-s this type of fabric was used a lot in the states. I actually had a white-ish ski jacket made out of it. Leia's Hoth jacket in ESB also looks like very similar material. I have seen this at Joanne Fabrics too...
-
Looking for MC snout greeblie to modify KS helmet
Griffin-X replied to JenB's topic in ROTJ Biker Scout Armor/Helmet
I sent you both the link. -
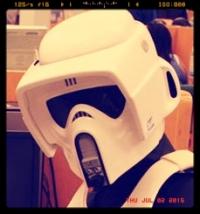
The new SC helmet looks really nice. I have not seen one up close. Unfortunately, KS is hit or miss. Just communicate with Scott @ KS and make sure you are happy. My helmet was a good one, but most KS helmets (and mine) have the "ear wrinkle" that Smiling Fox mentioned. It's not very noticable with the face plate down and ALL of my Stormtrooper helmets have similar imperfections from casting. I replaced the snout, decals, then added the 3M bolt covers. It's my baby...
-
I like Krylon...that Rustoleum has always given me a headache with projects. Great work on these blasters BTW...
-
I agree with BJ...great helmet and worn by many.
