

Griffin-X
-
Posts
6,808 -
Joined
-
Last visited
-
Days Won
188
Everything posted by Griffin-X
-
It has 4 pockets which come off real easily. I used one of the pockets and made a collar closure similar to a mandarin collar. Then, I added the suede riding patch, 'butt' flap, and 2" elastic. The best part is they make these in sizes that actually fit without being baggy, and are good for tall guys like me (6"2).
-
I live in South Texas where the average temp is 98°+ in the shade, freak'n hot. I have a modified work coverall as well and it works great for me. http://www.automotiveworkwear.com/RedKap/CT10/coveralls.html
-
I made 4 ABS washers about the size of a US quarter. Cut them, drilled the holes for the rivets and then attached the holster. Still going strong since Oct 2011 and about 5 troops.
-
I sent you a PM...
-
That armor does not look very accurate. I'd stay away from it. I know of only 3 good sources right now (MC, SC, and KS), but there are more popping up. Just be careful, look at the details (or lack of) before you buy.
-
I used 4 rivets (the 1/8 by 1/4 version) and made some ABS washers for the inside. That holds it in place nicely.
-
No doubt, cool pic Juan! Glad you got the upgraded cotton webbing too. So...TK done, Biker Scout on the way, and Mando done too?!
-
Congrats and looking forward to your WIP thread. Did this SC kit come with the cotton webbing, or nylon?
-
I can't sew my way out of a paper bag but mine turned out great. You can do it too! But, if you are looking for a great suit and vest, contact Deb (LadySewForUs). She's got a topic thread here -- > http://forum.bikerscout.net/index.php?showtopic=6013&hl=&fromsearch=1
-
Good idea and best of luck. You've done an outstanding job so far. I went with a simple Redkap coverall for my base ($20 US) and then added the suede, elastic, collar, and flap. It works for me.
-
Looking good Chris!
-
I like the way you attached the tank, neat idea. As Chex mentioned, you will need to tweak it a bit for Lancer clearance. As for the blaster, you basically have a cast of the Kenner toy blaster. So, it's not super accurate but you could mod it a bit to make it closer. Fine for general clearance...just not Lancer.
-
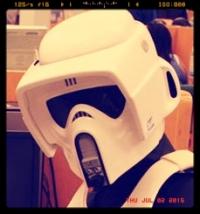
My weathered Biker Scout Helmet
Griffin-X replied to lonewolf's topic in ROTJ Biker Scout Armor/Helmet
Nice looking helmets LW! -
I have faux suede from Joanne Fabrics, a US fabric outlet. It looks and feels just like pig suede and my seamstress could not tell the difference. It cost about $5 US and is totally washable.
-
Found part snout greeblie woot!
Griffin-X replied to Darth Voorhees's topic in ROTJ Biker Scout Armor/Helmet
Great find! -
Replacing Kropserkel snout with MLC
Griffin-X replied to Goubatsu's topic in ROTJ Biker Scout Armor/Helmet
With my KS, there was a grey decal under the greeblie. I had to pry the greeblie off and then remove the decal. Once that was complete, I followed similar steps to LW above. Just take your time and have fun! -
Great overall progress! Your helmet looks nice and the boots are coming along great!
-
SC Scout Helmet Prototype 2012 - feedback?
Griffin-X replied to StudioCreations's topic in ROTJ Biker Scout Armor/Helmet
Nice work Jeff. Let us know when you're ready to release these. -
Looks good Jeff, very nice detail and size.
-
Ya...let her cure man.
-
Looking for MC snout greeblie to modify KS helmet
Griffin-X replied to JenB's topic in ROTJ Biker Scout Armor/Helmet
I sent you both the link. -
Whew...glad that worked! Good to know too about fiberglass and acetone. I've had the same thing happen on blasters and I know it stinks. Hang in there!
-
Yeah, unfortunately the solvents in the 2 paints must be different (like xylene vs toluene vs naptha, etc). This can cause the effect you have now and the tackiness to the touch. Did you put a primer coat down initially? I usually do a primer coat and let it cure for around 24 hours. Also, I usually let the coatings dry for at least 12-14 hours before another coat. I'm not super experienced with FG but you might consider just sanding it, then re-primer and paint. I'm afraid taking acetone to it won't be a good thing at this point.
-
Looking for MC snout greeblie to modify KS helmet
Griffin-X replied to JenB's topic in ROTJ Biker Scout Armor/Helmet
PM sent... -
electronics for scout helmet.
Griffin-X replied to shdwtrpr13's topic in ROTJ Biker Scout Armor/Helmet
I do not have anything inside mine. Since the scouts in the movie did not have an intercom like the TK-s, it made more sense to me. I've got a loud voice too so it's all good. I also find that the side vents provide good ventilation so I don't have any fans either. Sounds weird since I live in South Texas where the average temp is around 100+!
