

Grumpy
-
Posts
821 -
Joined
-
Last visited
-
Days Won
6
Everything posted by Grumpy
-
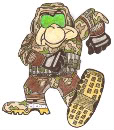
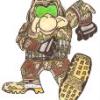
Yeah, I added that one (Republic Cog) to use at Cons and for fun. I have a regular one for "proper" events. (I honestly forgot it was in the picture.) My two long pouches, for the back, say "Grumpy" and CB-4312 in Aurebesh. It's not visible, but it I were to flip one of the drop pouches, there is a camo version of the Mando Mythosaur skull. Just having a bit of fun with it. Best of luck with your build.
-
Screen shots were the real killer in the past discussion. There is so much shadow play with the light and colors. Plus, dealing with a CGI character doesn't help too much. There was a discussion in the past on style and colors. Through a lengthy discussion between members, past armourers, and current armourers, we decided upon a grey cummerbund, with vertical grey striping. Weathering will help darken the material. (Because there was never a "clean" Kashyyyk Trooper shown in the very limited screen time.) Molle vests have the zipper right in the front. My very first attempt at the Kashyyyk Trooper had a Molle vest. While it was easy to put on, it was not the right style. Hell, I had no idea what I was doing back then. (2009) There were only about 5 Kashyyyk Troopers at that time. Patience and digging into old build threads and asking those that were already approved how they made theirs really helped. Looking at screen shots and still pre-production photos, there is a specific style with measurements on where the vertical strips will be placed. It's a wee bit odd, but after the front spacing, I spaced the rest out evenly around to the back. Here was my first attempt at a cummerbund. (I will not show a picture of the Molle vest that I had...it's just awful...). Plus, I had hard pouches. Old WW II German mag pouches. That ended up to be wrong, too. The pouches were agreed upon to be soft. (Yeah, yeah, much discussion and blabbering...never again...) I used white sheet material and dyed it grey. (I had no idea that there was actual grey material out there...sheesh!) Reversed colors for the new cummerbund. Plus, I had no idea how to space the straps back then. I was a true Rookiee... (Good Lord...kill it with fire!!) This is my current cummerbund. It has one grey vertical strip right in the middle, and then the rest are spaced at different intervals, and then evenly. Not everyone will have the exact same spacing on their cummerbunds. We've always gone by "As close to screen accurate as possible." Since there was never any real tangible materials to go by, we had to rely on our own interpretations and designs, based on a CGI character. (Pain in the arse at times...seriously...) Some Kashyyyk Troopers have also made their cummerbunds with a darker base material and lighter grey vertical straps. That is also acceptable. It also comes down to what material you might have available. Not everyone's will look the same. Similar, yet different. (Clones, but each with separate individual identities.) I might not get on here all that much anymore, but I will help you with any questions as you go along. Post pictures as you progress. Hopefully other KT's will drop in and offer their opinions, as well. Cheers!
-
Looks great!
-
Yay! I'm not alone! Alright Pathfinder Command Crew...that's now TWO new "Kashyyyk Trooper: White Variant" participants for the "third" area of our happy detachment!!
-
Yes, it looks acceptable to me. It is hard to see the white on white. But, we know it's there. Correct. Since you are already 501st, it only needs to go to your GML. Not sure about the last question, though. Each GML is different. The written CRL is complete. The visuals were sent to the LMO. He has to edit out backgrounds for the visual CRL. (I did shoot them on a plain black background, though. But, I understand. I'm no photoshop expert...) If the GML has any questions, they can contact me, or show them what has already been cleared. (I guess...)
-
Dang! That was quick! Makes mine look like crap... heh! Well done! ...looks like the next Kashyyyk Biker to me. (Did you get a white Kashyyyk "fishhook" sticker for the helmet?)
-
Concerning the comment above about "selling" the greeblie masters...... No. I did not "sell" the "blueprints" for the Kashyyyk glove greeblies. I was given the masters for them from Tom Cuthbert. (MrBungle) I "loaned" them out to anyone that wanted to make more of the gauntlet greeblies. They have been to Florida, Germany, Canada, and California. At no time did I ask for any money for their use. (Just wanted to help the new Kashyyyk Troopers.) The only thing I asked, was that the master greeblies were returned to me.
-
Cummerbunds - piccies for new troopers
Grumpy replied to Heatshock's topic in Kashyyyk Trooper Soft Parts
Looking good. -
With minimal mods, yes. The grey part on the brown gauntlet needs to be replaced with an actual rubber gauntlet greeblie. The puffy regular material is not the accurate look. Otherwise they did a good job on the rest of the glove. (I thought you sold that Kashyyyk Trooper that you had.)
-
If anyone does want any of my CRL pictures, and all of the reference pictures that I used, please feel free to send a request on Facebook. Yes, even though I hate Facebook, it happens to be the easiest way to send pictures. I just don't get on Facebook that much anymore. Sorry. Just not feeling like making Kashyyyk parts anymore.
-
I have removed all of my pics from Facebook. I have had many, many problems on there, with Mark Zuckerberg's evil creation. Got hacked. Wasn't too happy. I did send all of the proper parts pictures to the LMO for the White Kashyyyk CRL. Hopefully they will be on there sometime soon.
-
Looks great! I'm going to eventually go back and add to my lens area. I made it too "open." For the strap piece on the left bicep, I used a piece of grey craft foam sheet. (8' x 10" piece.) And cut it to the shape of the greeblie strap piece. Otherwise it would be E-6000 and clamps... The rubber belt is another story. Ii sewed it to the bottom area of the 2" black nylon strap. (Had to sew that part by hand.) Was your rubber belt already white? (For my original belt, I used a white Plasti-dip spray can.) I have since got a white rubber belt from Bikerchick. I then added a 1" strip of Velcro to the top of that same black nylon strap. I added the opposite part of the Velcro to the back of the cummerbund. Definitely do the best you can on the back and tank. Any cracks will show on white.
-
Everybody usually posts their build threads on the main page... http://forum.bikersc...hp?showforum=25 But, it really doesn't matter. Now that we know where yours is, we can follow it. And, we are here to help as best we can. It's a big puzzle, but it can be done. (Especially if you do the White Kashyyk... )
-
Oh, YEAH!! That's what I'm talkin' about!! Looking great Mike! Glad to see you back on here. Cheers!
-
Are you done modifying your boots? You might want to paint them one color of tan. I noticed that the parts that make up the boot sides have different colors of tan leather. Your armor build and all of your pieces look very good. You are on your way to being a Kashyyyk Trooper!
-
It's okay to leave the bumps on the helmet. That's just how it was originally designed by PGHFett.
-
That helmet that is actually my son's helmet. (Used for the CRL reference pictures.) That is a Mr.Bungle version. That was how he saw the helmet then, based on the very few references that were available six years ago. His style should still be accepted, but you don't have to do that to your helmet. Mr.Bungle's helmet was also a little larger than the PGHFett/ Bikerchick version. It is not required to have those three little vents above the lens. Bikerchick's is the current proper version.
-
The grey rubber "greeblie" on the brown part of the gauntlet still doesn't look correct, though.
-
Yeah, those look good, but the greeblie that is on the brown gauntlet part needs to look like what's in the movie. It's a specific part. Otherwise, they got the grey on the knuckle area to look good. Here is a picture of what the gauntlet greeblies look like. The one on the left is a master, and the two on the right are rubber pulls from the master style.
-
Sorry to have been a wee bit on the late side. I still have to take pictures of all of the pieces and send them into the 501st LMO. Work and real life gets in the way of fun and imagination... I'm not saying real life isn't fun, but the work part of it tends to suck the life out of me... (Switching work shifts three times over the past 5 months tends to put a drag on doing anything.) The written CRL has been sent in and put on the CRL page. I realize that doesn't help without a visual reference, so I apologize. I would love to see more of these being built. Cheers!
-
"Beige"..."tan"...yeah...sounds good. If you want to add a similar color to the boot to make it a darker color tannish-beige, that's up to you. When the boot (toe) topper is on and the shin slides down into place, there will only be the bottom part of the boot and the sole showing, so weathering will cover up some of that last part anyway.
-
Those would work, Scott. Just take a dremmel to make the small arches and up as high as you can for the large arch, without cutting into the boot itself. (And they will stay tan...with some heavy weathering.)
-
That's what I've used.
-
Buck10, I sent you a reply on your pm. Send a pm to "bikerchick."
-
Making you own is just as good. I was just offering another name, for those that cannot sew, or would just like a finished product. But, for your question... Right after the grey wrist strap, leave about an inch or so of black, and then start the brown gauntlet part. The brown will go up to almost your elbow. You'll want to leave some room near the elbow, so the elbow armor doesn't get snagged on the glove. Here are two different sets of gloves that I have made, for example.
