Chopper
-
Posts
4,887 -
Joined
-
Last visited
-
Days Won
271
Everything posted by Chopper
-

Another thanks to the Pathfinders community
Chopper replied to spyder918's topic in ROTJ Biker Scout HQ
Great work dude! You can request pathfinder access here: http://forum.501stpathfinders.com/index.php?/forum/162-access-requests/ -
Great work! Congrats!
-
Less accurate on the armor? It's cast from a screen used set, so it's pretty much the standard for scout armor.
-
Helmet Rear "Indent" Clarification
Chopper replied to f3tt4l1f3's topic in ROTJ Biker Scout Armor/Helmet
That's definitely a mould seam line. Nice attention to detail in your research though. -
Suggestions on the right holster
Chopper replied to Infernau's topic in ROTJ Biker Scout Armor/Helmet
Check with @sskunky CFO/Cast From Original for the Strider holster. -
Gotcha. I see what you're talking about. To me that looks like part of the tri-glide, but I'm open to other options! 😁
-
Hmm, is there? I see the tri-glide in the photos above. Can you pick out where you think there's a d-ring? I linked the images, so you should be able to click to get the higher res.
-
Here are the ref photos I have: Bag is cylinder in shape. The material is shiny and black in color, but it's hard to tell if it's leather or nylon. The straps do not go all the way around the bag, only sewn onto the top quarters. Straps are made from webbing and have a tri-glide slider on each strap.
-
Yep, it was only $15 so I ordered it and it should be in the mail. It'll need some mods to the straps, since the screen used ones don't go all the way around the bag, but hopefully it'll look pretty close in the end.
-
I was chatting with Cory/holmie827, above. One thing that may be important to note, is that there's two different Kingshow boots available on Amazon -- Folks should get the "KINGSHOW Men's 1366 Water Resistant Premium Work Boots" with wheat soles. The "Kingshow Men's 1801 Work Boots" are also available on Amazon, but they have a split colored sole and will be much more difficult to work with for your boot cuts. Hope that helps.
-
Very sad to read this. I feared the worst when I saw the missing persons notice last night. Jason and I traded patches and stickers quite a bit and we often shared the latest news on available ART items. Always an incredibly positive guy. Very glad his dog will be taken care of. Rest easy.
-
I'm not a 3D print expert, but just in terms of helmet design the items that stand out to me are the indents on the right rear, as well as on the faceplate. Also, it looks like the traps on the upper rear of the helmet have vents cut into them. Both the traps and the vents on the faceplate were decals on the original helmet. The indents on the right rear were more like bumps on the original helmet, rather than stepped intents. The front visor looks awfully squared and the return edge on the very top looks very narrow. I don't think that there will be an issue clearing this helmet for basic, but it would need some modifications to pass for level 2 (Lancer).
-
Some small edits. Borrowed some terminology from the Tie Pilot CRL for the flight suit and edited some other details in bold. Flight Suit The undersuit is a one or two-piece black textile suit, such as military flightsuits, motorcycle racing suits, industrial work clothing (Red Kap/Dickies), or similar suits modified appropriately. A Mandarin style collar closure flap covers the neck area with a chevron shaped, left-over-right velcro closure. The suit is free of any visible labels, logos or zippers (including built in flight suit pockets). (2) leg pockets with straight flaps. Belt and Detonator Gloss white or semi-gloss Moderate to heavy Sandtrooper-style weathering The front and four "boxes" of the belt are made of plastic. The remainder of the belt that fastens at the back of the waist is made from webbing material. There are only two (2) visible rivets on the belt: one on each side toward the back to connect the webbing closure material to the plastic belt Hanging from the sides of the belt are two plastic hip boxes ("drop boxes"). 4 black parachute buckles attach to the drop box straps, one on either side of the drop box. The parachute buckles attached to the back of the belt are threaded with the white textile straps in front of the buckle. Drop boxes connect to the belt via white textile straps. If using off-white cummerbund pouches and side straps, the drop box straps are also off-white. Thermal detonator box with short corrugated hose attaches to the back of the belt. The correct thermal detonator greeblies are attached to the box. The rectangular part of the thermal detonator greeblie, fixed on the left right side of the detonator, is the same as used in the rebel Endor trooper rank badge. On the right left hand side is the same round greeblie as used on the Scout tank topper. See the detonator detail page for a close up image of the greeblies. Knee Armor Knee armor is worn inverted, as compared to the ROTJ Scout Gloss white or semi-gloss Moderate to heavy Sandtrooper-style weathering Black elastic is used to secure the armor around the leg.
-
Scout Bag Items Sourced
Chopper replied to dreadmaster's topic in Scout Trooper: "The Mandalorian" Weapons/Accessories
They look like chicago screws. -
It's not listed in the CRL, so no, at least not for official trooping purposes. The DLT19X is also from a different era, so it'd sorta be like a WW2 GI carrying an M16. :)
-
TB-24576 Lancer deployment request (APPROVED)
Chopper replied to HSM76's topic in Lancer Deployment Request
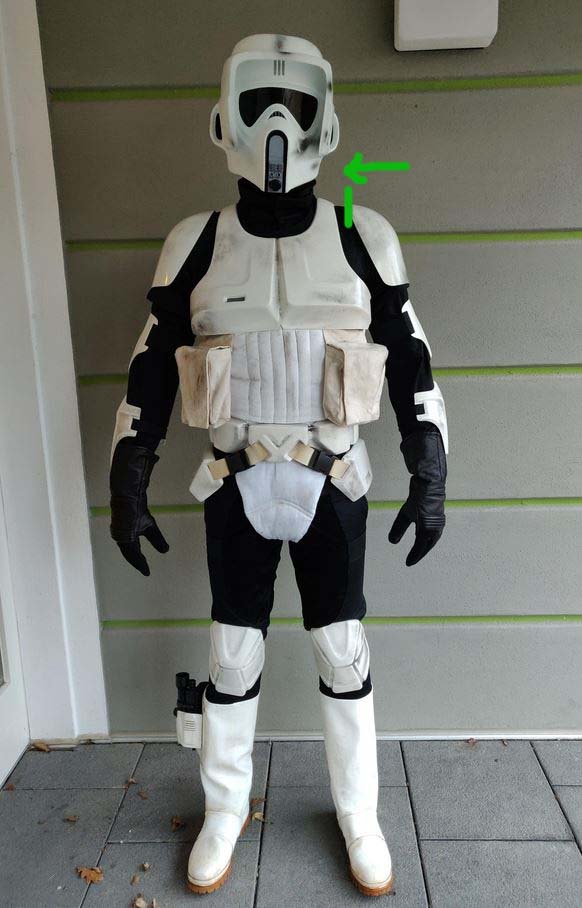
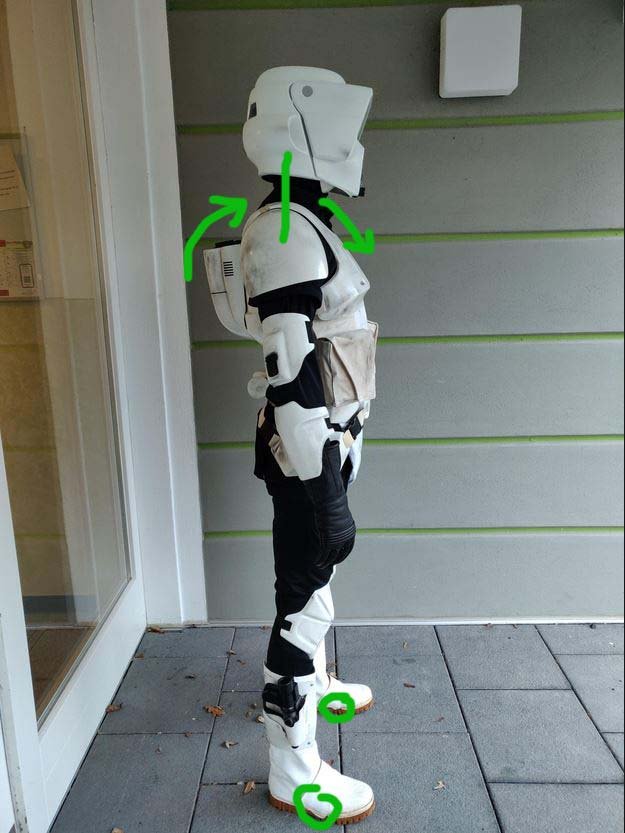
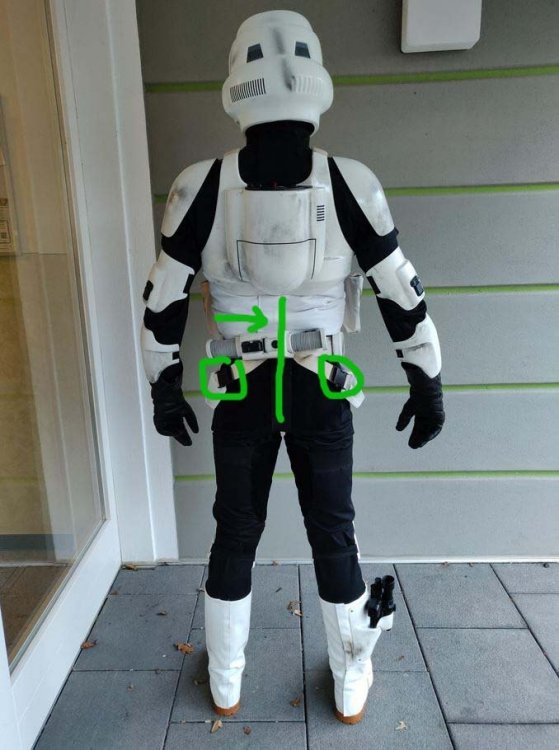
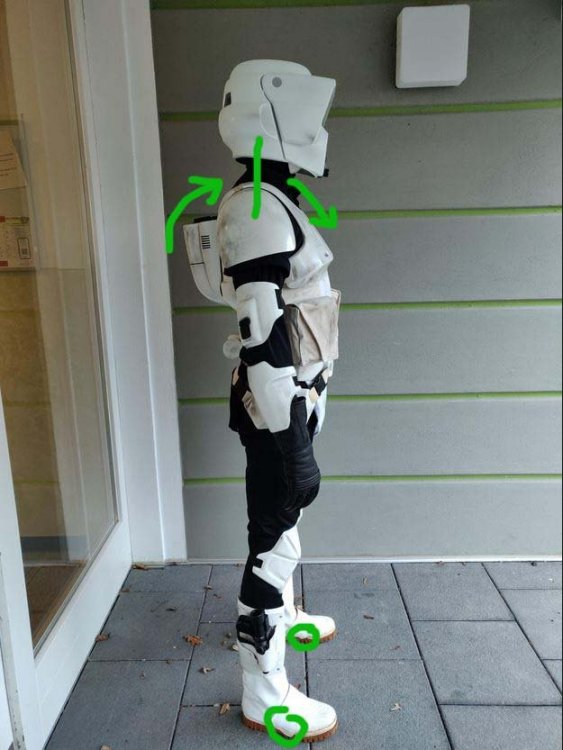
Happy New Year, Sven. Thank you very much for your application. The Lancer review team has consulted on your application and we have the following items for you to address -- Shoulder Armor Please bring in your left-side shoulder armor slightly. The spacing on the right looks good, so you should emulate where that one is positioned. (See image below) Chest Armor Your chest armor is slipping back, please move it forward, so that the shoulder bridges are approximately on the top of your shoulders. (See image below) Cummerbund Pouches The weathering on your right-side pouch is very heavy. Are you able to reduce the weathering with a toothbrush or something similar? Belt and Detonator Can you please clarify if your dropbox straps are elastic or webbing? It is difficult for us to tell from the photos, but they should be white cotton webbing for Level 2. Also, please re-center the detonator on your back and center the rear parachute clips of your dropbox webbing. (See image below) Boot Holster It's hard for us to tell if the slots are cut into the holster. Can you please post a photo of the inside of the holster, so we can verify the cuts? Boots Please trim the small excess part of the dog bone that extends onto the sole. The screen used boots did not have the dogbones glued onto the sides of the soles. Forearm Armor Just a general fitment issue for the future and not a requirement for this application -- try and rotate your forearm armor inwards on both arms. They should be slightly canted inwards, in comparison with your bicep armor. Check the CRL photo below for the forearm positioning -- Overall you've done a very good job! Please let us know if you have any questions or need any clarification!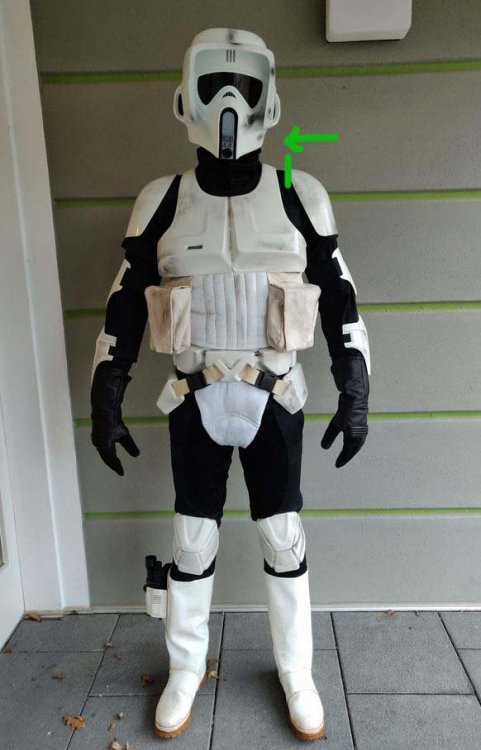
-
Happy new year fellow troopers!
-
For the bund, cod, and pouches, Level 1 of the CRL only calls for "white fabric" for the bund and cod. However, Level 2 calls for smooth white cotton fabric. Polished cotton or mercerized cotton is preferred, but at a minimum, smooth white cotton fabric. Your pouches should be made of white canvas-type material (e.g., duck cloth).
-
Here's a good set of tips from a previous post about the bund pattern: As for the materials, Level 1 of the CRL only calls for "white fabric" for the bund and cod. However, Level 2 calls for smooth white cotton fabric. Polished cotton or mercerized cotton is preferred, but at a minimum, smooth white cotton fabric. Canvas or duck cloth is not permitted for the bund and cod. Your pouches should be made of canvas-type material (e.g., duck cloth). Hope that helps!
-
The MANDALORIAN Biker Scouts
Chopper replied to Rosso's topic in Scout Trooper: "The Mandalorian" HQ
The EFX helmet is indeed expensive and has it's own issues. If you're interested in something that uses a similar construction to the EFX helmet, you could check with Mon Cal/Far Away Creations to see if he's doing a helmet run. RS Props does the red label scout helmet as well, which also has a similar construction. -
The MANDALORIAN Biker Scouts
Chopper replied to Rosso's topic in Scout Trooper: "The Mandalorian" HQ
They appear to be EFX biker scout helmets. -
Most folks use a RedKap flight suit. But I've always found that the fabric is pretty stiff and rigid. Tend to get hot too. They're also short in the torso, which can make things uncomfortable. This is an alternative that a few folks have used instead of the RedKap: https://www.amazon.com/gp/product/B07BK87DYM/ref=ppx_yo_dt_b_search_asin_title?ie=UTF8&psc=1 Undersuit mods are covered in Mickey's thread here: http://forum.501stpathfinders.com/index.php?/topic/19259-undersuit-mods/ Additional soft parts info are in these threads: http://forum.501stpathfinders.com/index.php?/topic/19967-soft-parts-best-practices/ http://forum.501stpathfinders.com/index.php?/topic/19200-pouch-dimensions/ Let us know if you have additional questions!
-
The MANDALORIAN Biker Scouts
Chopper replied to Rosso's topic in Scout Trooper: "The Mandalorian" HQ
Pssshhh, the ROTJ Biker Scout has their OWN tote bag! 😀 -
Yeah, same as what Tim said. I also don't often lift my visor all the way up to the detent that frequently, so it doesn't get a ton of wear.
-
An exact commercial paint match to the white SC plastic will be very difficult to achieve without custom mixing. Most folks paint the whole helmet if they fill the seams for the cap and back style helmets. As for the paint matching the armor, there's always going to be some difference between the two -- the screen helmets used "Ferrari White", while the armor was unpainted white abs. It's not super noticeable with the bright outside lighting on endor. You could always buy a few brands of white, paint some white abs styrene squares as samples, and then compare them to the SC white abs color.