Chopper
-
Posts
4,888 -
Joined
-
Last visited
-
Days Won
272
Everything posted by Chopper
-

Imperial Boots... Boots.
Chopper replied to theenglishdjentleman's topic in ROTJ Biker Scout Soft Parts
Just to add to this part of Mickey's post, the height and circumference of the IB scout boots aren't customized to the wearer, aside from selecting a shoe size. The height and circumference should be listed in their size chart, but depending on your body size, there's the risk that they fit your calves poorly, or they're too short in relation to your knee armor. -
Show me your shoulder brige and covers please
Chopper replied to jwnikita's topic in ROTJ Biker Scout Armor/Helmet
These are mine, though when I did this build, I had used the 1.5" cotton webbing, instead of the updated standard in the current CRL. Strider also has some excellent examples in his thread of how to rig it up, here: http://forum.501stpathfinders.com/index.php?/topic/17305-lancer-build-tutorial/& -
Snout placement looks good. I'd also suggest cleaning up the edging on the black nose paint, but that may already be in your task queue.
-
Here's how mine is rigged:
-
Great work Whiskey!
-
Looks ok based on what I can see in the google photos. The angles make it hard to judge, but you could always do a bit of sanding on the bottom of the greeb to even it up with the face plate.
-
New Bund and Cod. How’s it look?
Chopper replied to Lawless Scout's topic in ROTJ Biker Scout Soft Parts
Pretty good job, dude! My feedback: The left and right edges of the cod should be more of gradual curve. Yours actually looks a lot like Gino's scout from celebration 2017, but the screen used codpieces had a more rounded edge (see below). Regardless, it all looks like great craftsmanship. Really awesome work, man. -
Congrats on approval, pathfinder!
-
You mean from the stunt suit photo? To clarify, I don't think they're bund straps. I think it's excess chest/back armor strapping.
-
I know the photo you're talking about, I think. I can't find it in any of my books right now though. I'll keep looking.
-
That's the stunt armor, but what's flopping out is most likely excess side strap webbing.
-
The front and back armor should join relatively close together at the shoulder, and the width of the shoulder bridge cover, as marked by the line in the photo below, should be between 0.5" and 1".
-
DLT-20a Blaster Rifle added to Biker Scout CRL!
Chopper replied to BikerScout007's topic in Announcements
I believe the one used in the CRL image came from Christopher Zuk @ https://www.procoprint3d.com/ -
Yikes! Gorilla glue is cyanoacrylate, which will create a temporary bond, but won't actually "weld" the plastic at a molecular level. CA is also rigid, which means it'll snap when it flexes. Because the shoulder strap is already weakened from the break, it'll likely break not long again in the future. As you suggest, you will need to create a splint behind the break, using some plastic "for sale" sign material. I'd glue that to the back of the strap using devcon plastic weld. You'll need to clean and sand off all the gorilla glue before you bond it, otherwise it won't work as well. In terms of repairing the visible break on the front end, I'd sand everything down as best you can, then fill the rest of the gap with abs paste, using scrap ABS plastic. There's a number of guides on youtube and the internet for making abs paste, here's one -- https://www.youtube.com/watch?v=8bYLRFMKDSY If all else fails, you can talk to Jeff at SC about getting replacements parts ala carte.
-
Speedbolt/rotator bolt question
Chopper replied to jwnikita's topic in ROTJ Biker Scout Armor/Helmet
While the photo for the Amazon listing shows the correct bolt, what arrives is the newer version, which is not concave. You want the version available here: http://forum.501stpathfinders.com/index.php?/topic/10270-fs-accurate-tb-helmet-hardware-kit-headband-kit/ -
Ah yes. I can think of at least one person on this board who has built up that same model. It's pretty nice, though it's hard to get a good idea of the size comparison vs the RS Props version. Regardless, once it's assembled and painted properly, I can't see any reason it wouldn't be ok for Level 2 (Lancer).
-
Much better on the ears. You just need to smooth it out with a dremel or nail file. Regarding the black on the nose, if you look at the first helmet image I posted earlier, it shows that the black goes onto the "flat lip" portion just a bit. Try to emulate that as best possible.
-
As Frank said, that's a decent start. I think you should go wider on the holes though -- use the screen used helmet photos as an example for what to aim for:
-
Great guide, Mickey. Can we pin this post?
-
Imperial Boots Biker Scout Soft Parts
Chopper replied to Whiskey's topic in ROTJ Biker Scout Soft Parts
Gotcha. No prob. -
Imperial Boots Biker Scout Soft Parts
Chopper replied to Whiskey's topic in ROTJ Biker Scout Soft Parts
@Whiskey what did they say about the revised suit? Anything you could share? -
Thanks, Max, for the photos. My armor isn't accessible at the moment :)
-
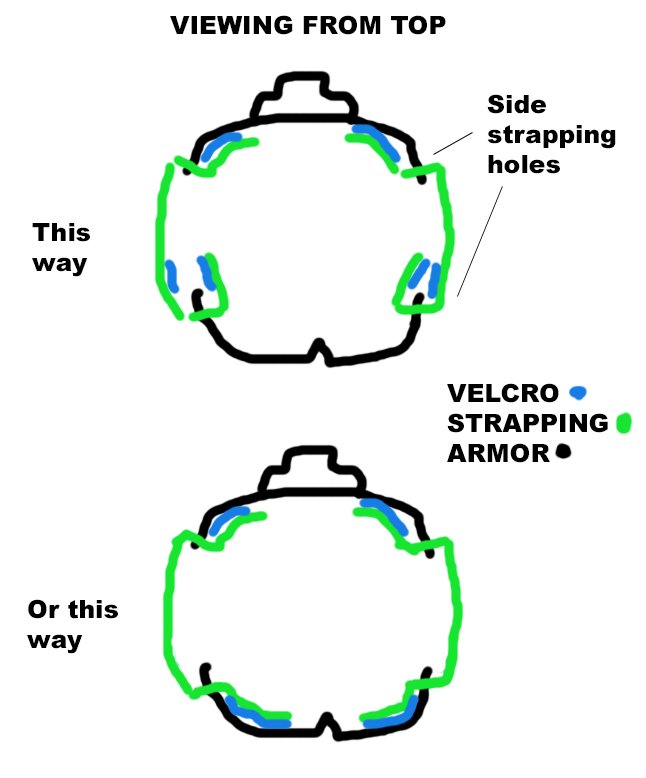
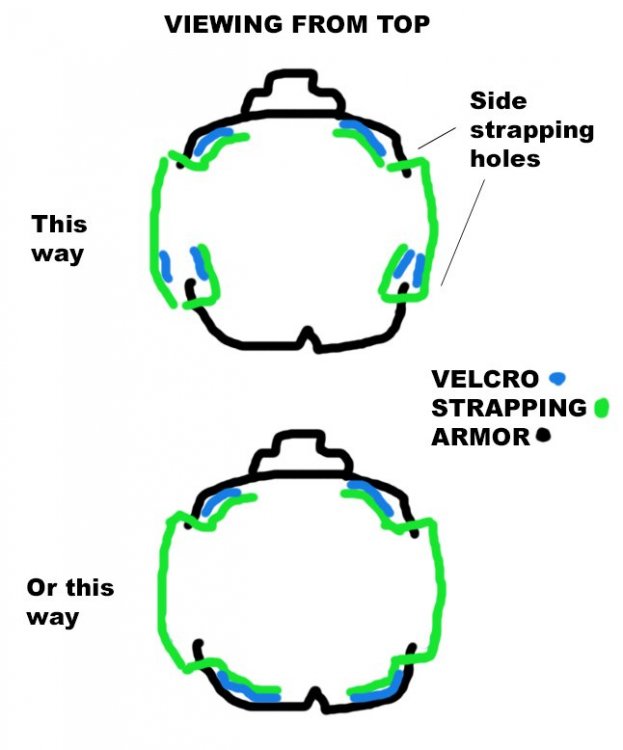
Yeah, that can be a tough spot. Sometimes I can do it myself, sometimes I need to ask someone for help. I've seen a few ways of closing the side strapping -- (pardon the terrible drawing in the attachment, but it'll hopefully make more sense than me writing it) For convenience. the first way in the drawing is probably the easiest. Regardless of what works best for you, I usually leave one side strapped up and secured once everything is fitted and adjusted. That way I only have to put my arm and head through, and then connect one side when I put my chest armor on.
-
Scout Boots WIP. How do these look so far?
Chopper replied to Diadem's topic in ROTJ Biker Scout Soft Parts
Gotcha. My read was always that the thread was white and had just gotten dirty and dingy from weathering and wear. -
Awesome thread and great tutorial. After looking at the images though, I've gotta ask -- are you sure they used brown thread on the boots? To my eyes, it looks more like white thread that's gotten dingy from dirt and weathering. In the first photo, from the costume exhibit, the horizontal thread at the top looks like it goes from brownish near the velcro seam, to more white as it get closer to the holster. I also found this other photo from one of the costume books where the stitching also looks white: