Retrofire
-
Posts
3,699 -
Joined
-
Last visited
-
Days Won
135
Everything posted by Retrofire
-

ANOVOS Patrol Trooper helmet
Retrofire replied to BikerScout007's topic in Patrol Trooper Armor/Helmet
Maybe it’s time to start thinking about other options and considering getting your money back from them. Hask has a fantastic rig for the patrol trooper. I’d see who he went with for his bucket and maybe reach out to them for more information. I would hate to see you abandon this project due to the Anovos frustration syndrome[emoji6]. -
Chopper gave you a good pic to go by. Depending on the maker you can use a #2 pencil and carefully go around the inside of the ear hole and trace out the impression from the molding process. Give it a shot and post up a pic before you cut and let us take a gander at it.
-
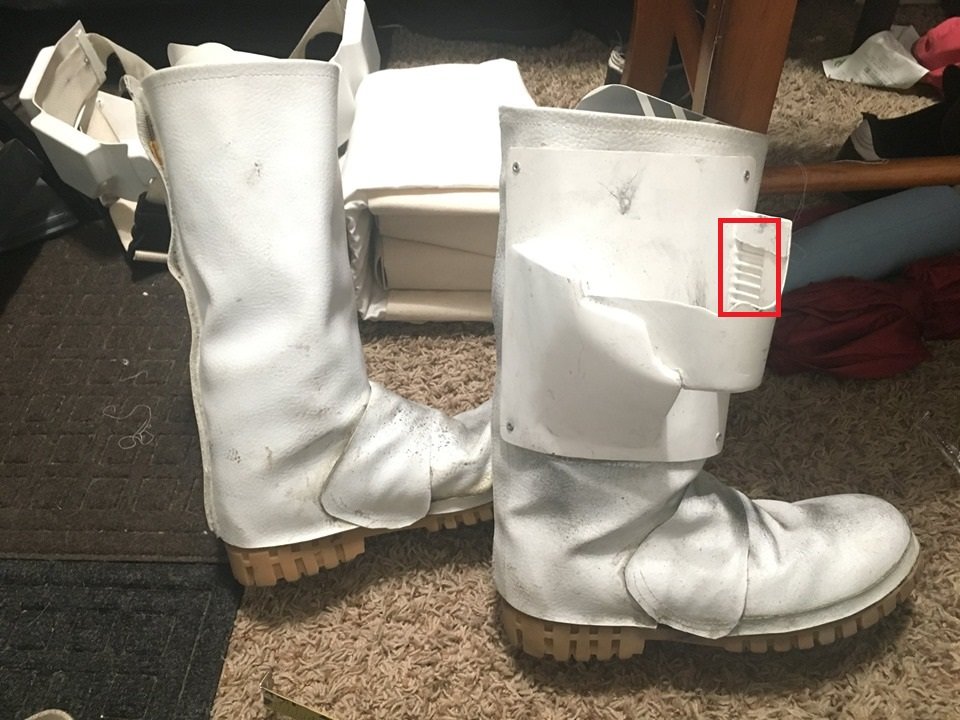
I’m not sure if that’s going to be sufficient to maintain the shape of the boot but when you sew the Velcro on and the seam along the top it might give it just enough rigidity. I don’t think you’ll want to double it unless it’s really thin as that will make stretching it difficult and you want it to be very smooth. From what I can see of the grain on the material it shouldn’t be an issue for Lancer. Do be sure to follow the boot build thread and make sure you sew your closures correctly. For the right boot the closure is right over left and the left boot it’s left over right. It’s a good idea to use a pencil and mark the parts for your left and right boots for reference. Also, the dog bone should not cross over onto the sole of the boot. Just things to keep in mind.
-
Heh I learned the hard way cutting my boots with x-acto knives and took an unplanned trip to the ER to get stitched up[emoji6]. Funny look on the docs face when he asked me what I was doing. Best of luck with your build and make sure to start up a build thread. As a GML I see a huge difference in ease of approvals when folks spend time with the detachments building their rig. Don’t forget we’re here if you need us so reach out if you need any help.
- 254 replies
-
- 1
-

-
- lady
- rs prop masters
- (and 4 more)
-
Those soles will be fine for Lancer with the correct cuts. Keep in mind that the dog bone part of the boot does not cross over the soles so that’s a measure twice cut once part. It’s best to cut out a pattern from something like a paper grocery bag to check the fit before you cut your vinyl. If/when you decide to do your cuts a Dremel tool makes fast accurate work of them so if you have one or can borrow one I would recommend it. You can cut them out with hobby knives but you got to go slow and be careful to just cut the boot and not you.[emoji6]
- 254 replies
-
- 2
-
-
- lady
- rs prop masters
- (and 4 more)
-
I’m sorry the RS didn’t work out but I am happy that they worked with you to take it back. It’s just a minor setback and we all get them so don’t be discouraged. Your boots look like they will work just fine. You don’t need to worry about the cuts unless you go for Lancer (which we hope you do) so this base boot is good. Too many troopers neglect their feet so make sure they are comfortable on yours for those long stints in armor. If your researching armor types that will fit I would recommend dropping by the Recon Fatale thread on the forum and see what providers they used for a smaller frame. Keep chipping away at that soft armor and I would suggest to use the Lancer CRL specs even if you don’t have any immediate plans to go there yet. It makes for an excellent looking scout. As always you’re not alone on this journey so keep posting those questions and let us know how we can help.
- 254 replies
-
- 2
-
-
- lady
- rs prop masters
- (and 4 more)
-
That lid looks so epic in the black I’ll hate it when you have to paint it. Although I know it’s going to look fantastic when you do.
-
Chopper and Stroker are right. I've been down the glue path and trust me it's better to sew it on. Fabric glue is a good thing to have in your emergency armor repair kit for troops but it's really not a good long term solution.
-
First of all you’re not alone and second of all take a deep breath and relax. You’re in good company and we’re here to help you be the best scout you can be! Cool? Cool! Ok so good start getting your bucket so let’s focus on that for a moment. Sweet you got the chin cup trimmed out and now you need to work about fitting the strap. No problem. I don’t use one myself as my bucket fits nicely (I too have an Altman’s) but I would recommend getting some 1” stick on Velcro and some 1” sew on. Now, you will use the stick on in the helmet and sew-on with the strapping. Make sure you leave yourself a bit of slack as you want it to be adjustable. Now if you already haven’t drop by the armory and start a build thread where the Armory team can come along side of you to help. You can post pics and ask questions and get all the help you need. Also look through some of the other build threads and learn that you are indeed not alone. We were all there once so no worries. Some things you can start thinking about are sourcing your boots and gloves and thinking about your armor but take it one step at a time and if you need a hand post up.
-
Congrats Ranger!
-
Your best bet is to get a Redkap suit and do your own modifications. That’s the best way to get it right. You can find all sorts of information in the armory forum on how to do the mods. Their flight suit isn’t a good choice and will require a bunch of mods to get right. It’s cheaper to get a Redkap and do the mods yourself. For the gloves Wampa will work just fine just keep in mind to order a size larger than you need as they run a little small.
-
If you need any help or clarification don’t hesitate to reach out to us. We’re here to help you become the best looking Scout you can be.
-
Patrol Trooper CRL revision (and Level 2)!
Retrofire replied to BikerScout007's topic in Patrol Trooper HQ
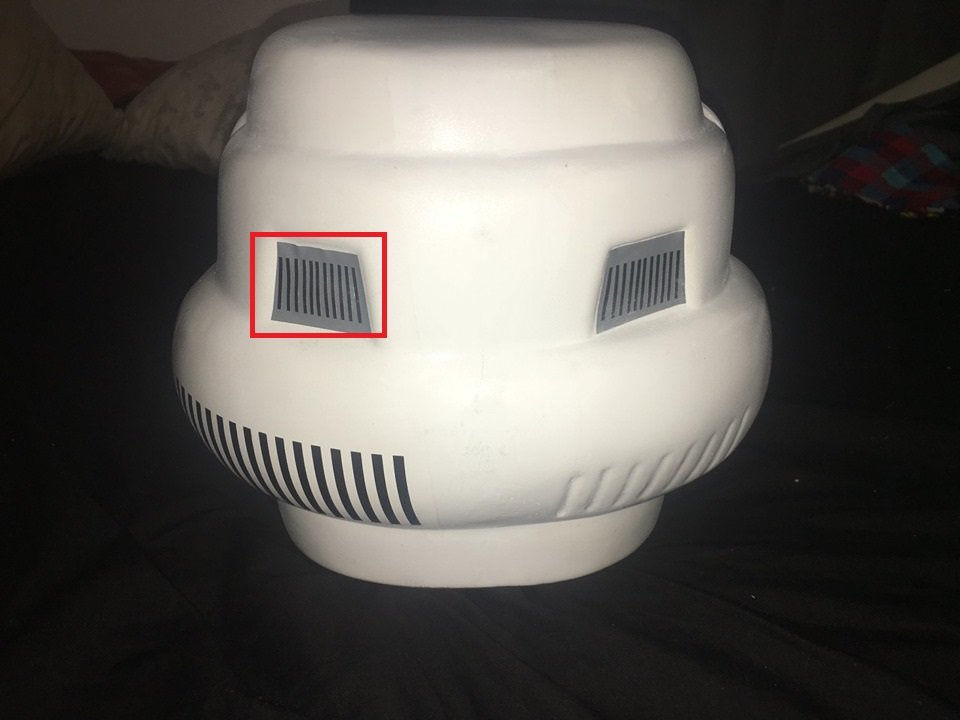
I would strongly encourage opening the frown with mesh behind to enable more airflow into the bucket. All the TK buckets have a mesh type some are left to the user (ESB, ANH) and some specify like the Rebels TK with a metal mesh. I’m all for accuracy but you got to keep your brain cool when it’s encased in ABS or plastisteel! If there is a concern with Anovos and their accuracy I’d reach out to the DL and see if we can tag up with LFL and possibly get some more info. I’m just coming at this from a safety issue. The more air you have flowing through the more comfortable and safer you will be. -
It could possibly be prototyping from the armor squad at LFL. Maybe it’s something Nilo had made to see if George approved before he went all in on production then they made changes to the kits that we recognize today.
-
Welcome Taylor! It’s great to have you onboard!
-
Congrats Ranger!
-
Researching the GREY color of the Biker Scout
Retrofire replied to StudioCreations's topic in ROTJ Biker Scout Armor/Helmet
Think about taking into account aging when looking at screen used helmets. Over time some colors are going to dull and become much less vibrant unless it’s been professionally restored. I would try and match it to a set photo from ‘83 or possibly a pic from Nilo’s crew. Floquil was a very popular paint during that era but they’ve since been bought out by Testors. It would be worth it to do a little research on the paints from that time to get hyper accurate. -
Congrats Lancer!
-
To Stroker you listen. Help you we will.
-
Congratulations and Great job Lancer!
-
TB-69211 requesting lancer deployment (APPROVED)
Retrofire replied to Nekroxnikki's topic in Lancer Deployment Request
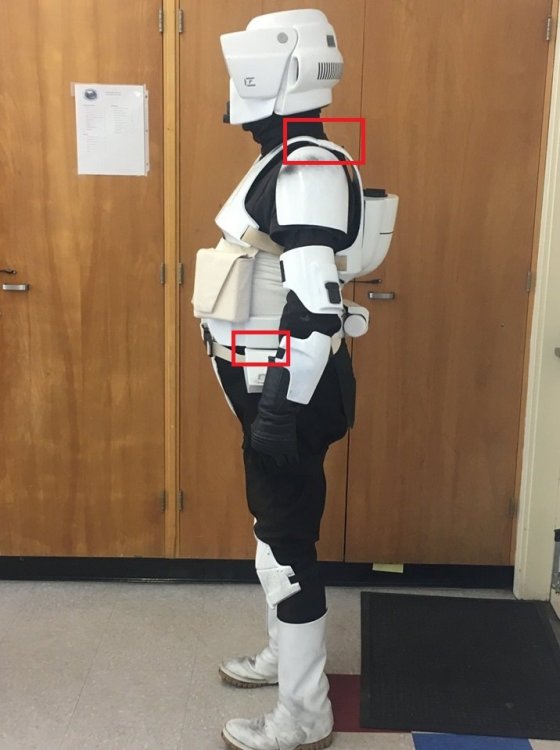
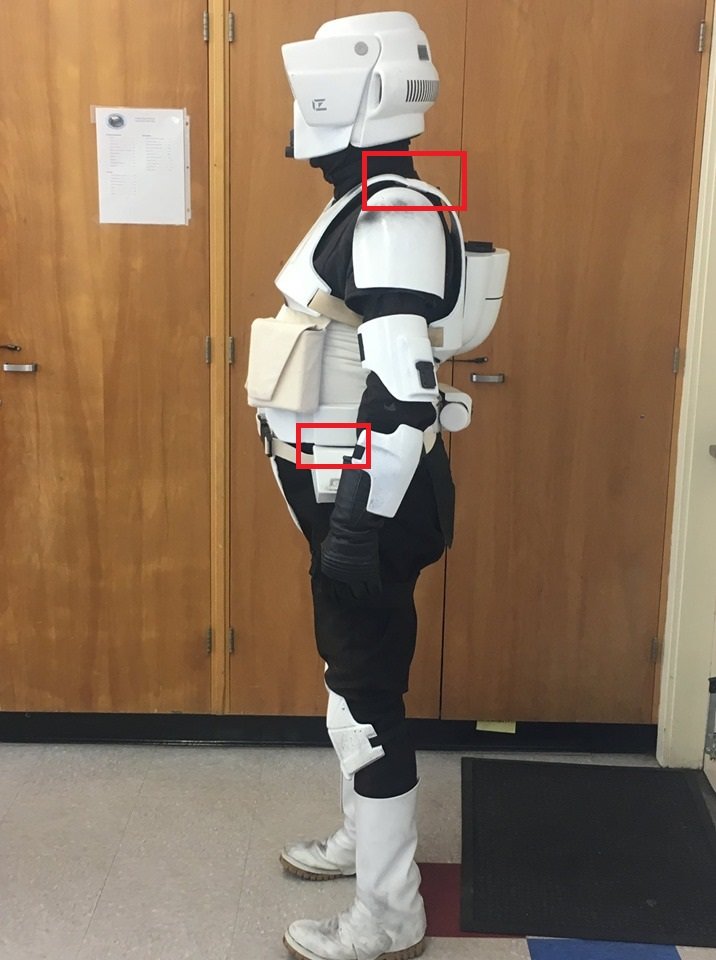
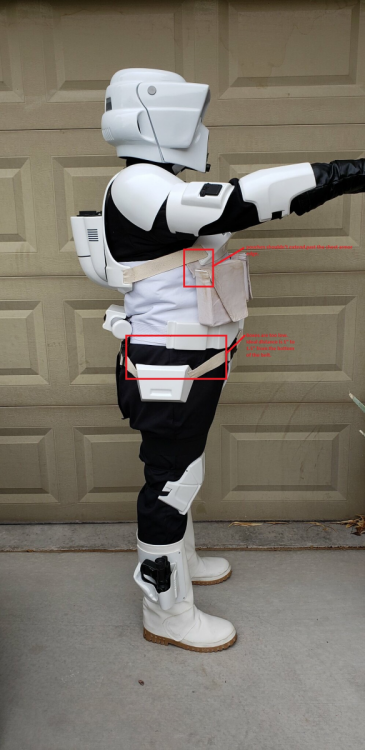
Nikki, I apologize I should have clarified regarding the boxes. Your pouches on your cummerbund need to move in towards the middle of your bund so they don't go over the edge of your chest armor (the upper red box in your side view photo). Your cummerbund pouch height is fine. The 1"-1.5" distance was in reference to the thigh boxes hanging off your belt. Those should be adjusted up to the required height from your belt. They are sitting too low. That can be fixed by adjusting the strapping length. Just be sure that your boxes are sitting square after you adjust so I would recommend that you have someone that can eye those for you after you put your belt back on. They should sit even to your leg and not at an angle. As for the color for your TD tube you want just a straight grey not light grey nor dark grey but middle of the road. If it hasn't been painted I would consider removing the tube washing it in soap and water to remove any oils or dust and using a primer or if available a paint that has both. I've had good results from Rustoleum paints but you can also use acrylics if so desired. Just make sure to clean the tube and prime it if you go that route. I hope this helps and feel free to ask for any additional clarification if you need. -
TB-69211 requesting lancer deployment (APPROVED)
Retrofire replied to Nekroxnikki's topic in Lancer Deployment Request
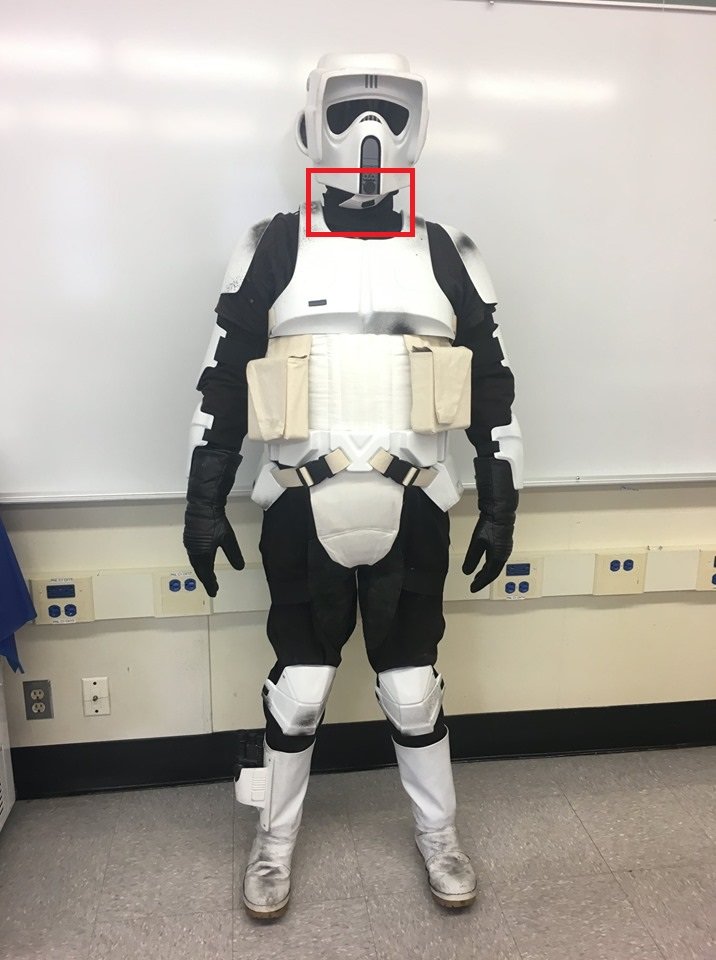
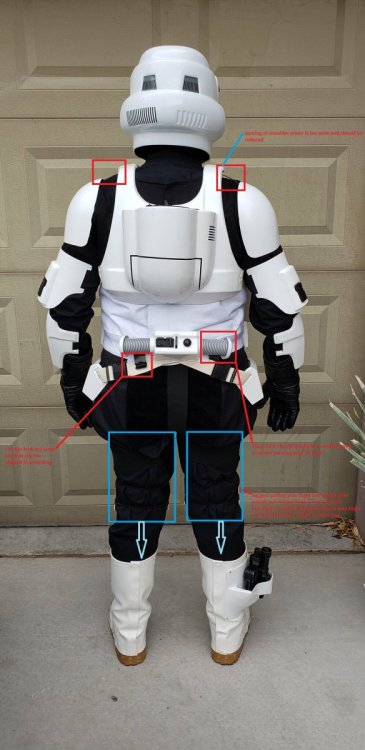
Nikki, Excellent work on a difficult armor upgrade. After a thorough review we have the following findings for you. TD tube color should be medium grey color TD clips are oversized and the left clip slipped its mounting. Thigh boxes are too low. Adjust boxes to 1"-1.5" (2.5cm - 3.8cm) from the bottom of the belt. Shoulder armor should be closer to the shoulder bridges. You may need to tighten the zip ties to bring the armor in. Chest pouches are extending past the chest armor edge. Relocate the pouches to center to realign with the edge. You've done an excellent job on your kit and you should be proud. There are just a few items to address. If you have any questions remember that we are always here to help if you should need. Shoulder spacing reference from ROTJ
-
TB-83107 Lancer deployment request (APPROVED)
Retrofire replied to jadloc's topic in Lancer Deployment Request
Thank you for your submission! The Lancer review team will review your application and get back to you. -
The holster cut out omission on your first go around was my fault Jason and I apologize for that. Thanks for addressing the fixes!
-
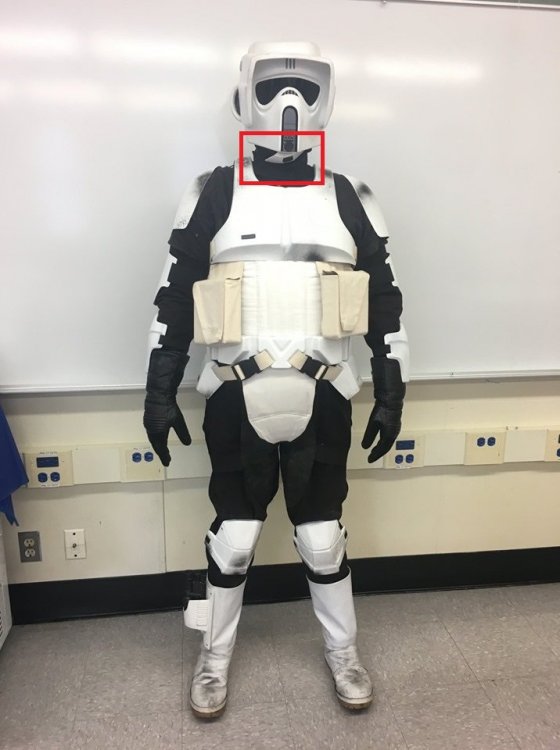
Jason, Thank you for your patience. Overall your new kit is very well done and you should be proud of your work Scout! We have a few items that we would like you to address before full acceptance. 1.) Drop boxes are a bit too tight to the belt and need to come down a touch. Typically 1"- 1.5" (2.5cm - 3.8cm) from the bottom of the belt. 2.) Shoulder bridges buckling. It looks like your chest piece is slipping up causing the back armor to be pushed down which is causing that buckling to occur in the middle. Some possible fixes could be to affix the chest armor to your flak vest to keep it from riding up and pushing the back armor down in concert with a little trimming of the shoulders. 3.) Boot holster cutouts. We're not seeing the boot holster cuts required for Lancer. " Vents on the holster are cut out." [https://databank.501st.com/databank/Costuming:TB_Scout_trooper] 4.) Minor Fixes to Helmet: We have two items for you to review here. 1.) Please address the left trap on the back of your lid and smooth down the decal. 2.) Your chin cup seems to be askew in your front photo. Might need to adjust the strapping there to square it up. Overall you've done an excellent job and just need to square away a few items. Please let us know if you have any questions.