Retrofire
-
Posts
3,699 -
Joined
-
Last visited
-
Days Won
135
Everything posted by Retrofire
-
Yeah you can use a flat lace but most of us just go without them at least on the uppers. I think I only have about three rows at the bottom. Your boot is already going to be snug with the calf piece. Just make sure they’re snug enough not to rub.
-

opinions on best ready to wear scout boot
Retrofire replied to That One Scout's topic in ROTJ Biker Scout Soft Parts
Hi Mike. I’m sorry but the answer to that question is no. The remnant scout and ROTJ scout are two different costumes and the Lancer requirements only apply to the ROTJ Biker Scout. So you would need two different costumes. There may be a level 2 created for the remnant scout sometime in the future but at the moment we’re just working to get the basic requirements established. Keep those great questions coming! -
Hi Mike. Looks like you’re off to good start. The one issue with the Redkap is that although it’s a great base to work with they are pretty baggy right out of the box. You’re going to want to make sure your tailor/seamstress takes in those legs. The upper body isn’t as problematic since it will be covered by your cummerbund, vest and armor. Make sure it’s comfortable but not overly tight. I recommend that you keep the detail page here: https://databank.501st.com/databank/Costuming:TB_scout_trooper-suitdetail handy to ensure you get the suit in an approvable state. There are also a ton of good threads for the soft goods that you should take a look at here: http://forum.501stpathfinders.com/index.php?/forum/3-the-rotj-biker-scout-armory/ Your base boot looks good with the solid color sole. Make sure they are comfortable for you since you’re going to spend a lot of time walking around in them. There are some vendors here on the boards where you can buy the parts already sewed and build the boots yourself. On that note most of us never sewed before either and picked it up to build our costumes. If we can do it you can certainly do it so don’t be afraid of taking a shot at it. There are some fantastic and talented folks here would would be more that happy to help you along so don’t feel like you can’t do it. You can do anything sir and we’re here to help should you need.
-
NIce work on the boots Joe! Good on you for adding the sole cuts as well they look really great. Remember with the weathering that less is more and you don’t want to overwhelm your armor with it. Think about the areas where a scout would get a little dirty hopping through the forest. Keep up the great work and keep that CRL handy for reference: https://databank.501st.com/databank/Costuming:TB_Scout_trooper We’re here if you need us so keep posting those progress pics and give us a shoutout if you need anything!
-
Congrats Lancer!
-
TB-90277 Lancer Deployment Request (APPROVED)
Retrofire replied to Surfinshore's topic in Lancer Deployment Request
Hi Will. We’re trying to review your fixes but the links are coming up broken on our end all except for two of them in your response thread. Can you take a look at those when you get a chance? Thanks! -
Is my scout armor going in the right direction?
Retrofire replied to CasperBB8's topic in ROTJ Biker Scout HQ
Hi Casper and welcome to the Pathfinders! Bjorn gave you some good tips regarding the codpiece and the pouches but it should be ok for basic approval. One item I’m not seeing is your boot holster: Holster Gloss white or semi-gloss and may be lightly weathered. Attached to the outside of the right boot with rivets. The blaster pistol fits into the holster. And Mickey is correct regarding the crescent sewn into the cod: Codpiece Tapered codpiece has a sewn inverted curve detail. Black elastic strap connects codpiece between the legs to either the back of the cummerbund or the flak vest. https://databank.501st.com/databank/Costuming:TB_Scout_trooper If you want you can post pics of your right and left side and rear we can give you a once over prior to your official submission if you like. I’d also like to encourage you, if you already haven’t, to sign up with your local 501st Garrison where you can find help and local resources. That would be the Dutch Garrison http://www.dutchgarrison.nl/ Keep up the great work!- 3 replies
-
- 2
-

-
- stormtrooper
- 501st
- (and 2 more)
-
Congratulations Pathfinder!
-
Congrats Marc! Welcome Pathfinder! Make sure to link to your 501st profile and post up an access request here for detachment access. http://forum.501stpathfinders.com/index.php?/forum/162-access-requests/ Again welcome to the barracks Scout! Find yourself a bunk and a place to park your speeder bike!
-
TB-90277 Lancer Deployment Request (APPROVED)
Retrofire replied to Surfinshore's topic in Lancer Deployment Request
Thanks for updates Will. We’ll take another review and get back to you. Stand by Pathfinder! -
Hi Cheryl. Pictures are always worth a thousand words to the Armoury team. Always recommend posting a pic of the part in question along with the question when applicable. Keep up the great work and keep those questions (and pics) coming!
-
Hi Stephen @equuspolo recently was awarded Lancer and he’s wearing the IB scout boots. He might be a good troop to tag up with. Dennis is also right on point with making them look like the screen used Hi-Tec Sierra Sneakers. Please keep in mind that when you are making your boot cuts you’re using basically a scalpel so go slow and watch those fingers! I say this from experience and a trip to the ER to get a couple of stitches and a funny look from the Doc who asked me how I did it. “You’re making what now?”😂 We’re here for you so you need us you let us know!
-
Hi Cheryl. I think it’s great that you got your armor in that’s so exciting. You got some expert Shoretrooper builders (and painters) here in the detachment so keep posting up those pictures and questions. @KOtrooper Is a Vanguard a talented member of the Armory team and I’m she she’ll be dropping by too. Don’t hesitate to reach out if you need anything we’re here to help you be successful. Best of luck with your build!
-
Great idea! I just sent him an email about that.
-
Do we have a hack on how they attached the shoulders to the bridges? Zooming in on the pics looks like they might be using t-straps? It looks like a black strap with a white border to it. It’s really hard to make out. Does anyone have a good screen cap of the scouts from a good angle where we can make that out better?
-
Getting that BBB will be a milestone brother so be sure to bask in it. Getting suited for the first time can be a little daunting so let us know if we can assist in any way. We’re here for you if you need us!
-
DLT-20a Real world parts
Retrofire replied to theenglishdjentleman's topic in ROTJ Biker Scout Weapons
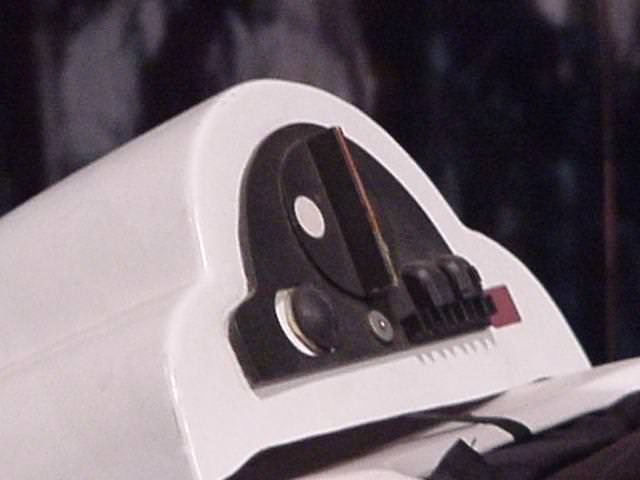
I think that cylinder piece on the top of the assembly behind the scope is a muzzle break much like what’s on the Endor Commando A280. -
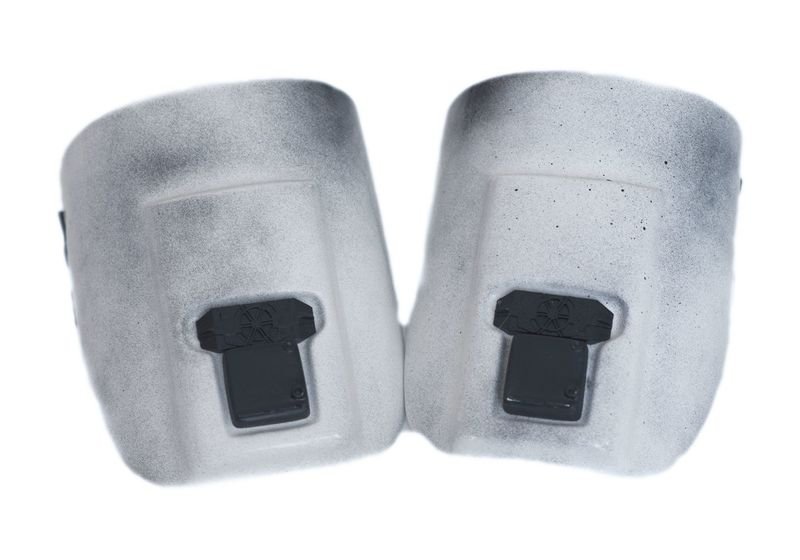
That’s awesome of you Justin! Yeah I’m really confused why the GML dinged him on that as it’s not specified in the CRL. Even the screen used tank has indents. The GML has the last word though and it’s all fixable. The thigh box straps could come in a bit since you’re redoing them. Here’s where they are on the CRL model: The box strapping just goes through one side of the clip and out the other so it just “looks” like the clip is connected. That’s the way the screen scouts were fitted so we’re mirroring that. For the buttflap take a look at the second picture in the suit detail link I sent you. Looks like you can lose about 2.5cm (1 inch) from each side @Chopper what do you think? As I mentioned we are here to help you so you just keep asking those excellent questions and we’ll be here to help answer them!


-
That sounds great! If you need any assistance we’re here for you. Best of luck with your build!
-
Hi Sean and welcome back to the Scouts! Are you having WTF do a full commission for you? I was just wondering why he would send your armor to Tye? I used to be in the Dewback Ridge Garrison so I know Tye pretty well. You have all sorts of choices for your armor and softgoods and can find more information here: Once you get your items together think about starting a WIP thread here: http://forum.501stpathfinders.com/index.php?/forum/96-biker-scout-wip/ That way we can come along side you and help should you need. Let us know if we can be of service!
-
Take a trip over to the SpecOps Detachment forum and take a look: https://specops501st.com/, They are a friendly folk and have a lot of knowledge on that armor. The Shadow Scout CRL (https://databank.501st.com/databank/Costuming:TX_shadow_scout) indicates that The armor is gloss, semi-gloss, satin or matte black. Most of the armor is gloss as that’s the material the makers typically use. You can put your own touch on it by giving it a repaint with the finish of your choice. That’s probably your best bet. Let us know when you get to the word from your GML Jason! We’re all pulling for you!
-
Hi Mike! I’m sorry you got rejected but you’ve come to the right place and we will be more than happy to help you get sorted out. @Chopper and @MrPoopie I’d love to have you weigh in on this candidates armor too! Boots: Those look ok as far as height is concerned. If possible I would just paint up the soles with a wheat color paint unless you want to redo them and in that case check out this forum for more information: Chest and Back Armor: Looking at the pictures that looks a bit too small for your build and should be scaled to you. Flightsuit: The GML is correct there. The riding patches extend up too far. You should be able to trim those down and resew them. The same with the thigh straps. I would loosen those hems and redo them. You want them snug but not “cut off your circulation snug” they should sit about mid-thigh. A good pattern can be found here: https://databank.501st.com/databank/Costuming:TB_scout_trooper-suitdetail and here: Your buttflap seems a little on the large side and you might want to narrow that a little bit. Belt and Detonator: The clips were not functional on the screen used armor and the webbing is fed through both clip openings. That should be an easy fix. Tank Topper Greeblie: Regarding the indents I’m not sure what the GML was focusing on there. Can you provide a picture of your tank topper so we can take a look at it? Cummerbund: The cod is folding under where it passes through your legs causing what we call the dreaded “cod crunchies”. You can fix this by inserting a bit of stiffener at the lower part of the cod piece. It’s not required for basic approval but it will make your armor look so much better. Keep in mind that the soft armor is a large part of this costume so it is really important to your overall look. This may seem like a big list but we’re here to help you along so don’t hesitate to ask questions. We want you to be successful in your app!
-
TB-90277 Lancer Deployment Request (APPROVED)
Retrofire replied to Surfinshore's topic in Lancer Deployment Request
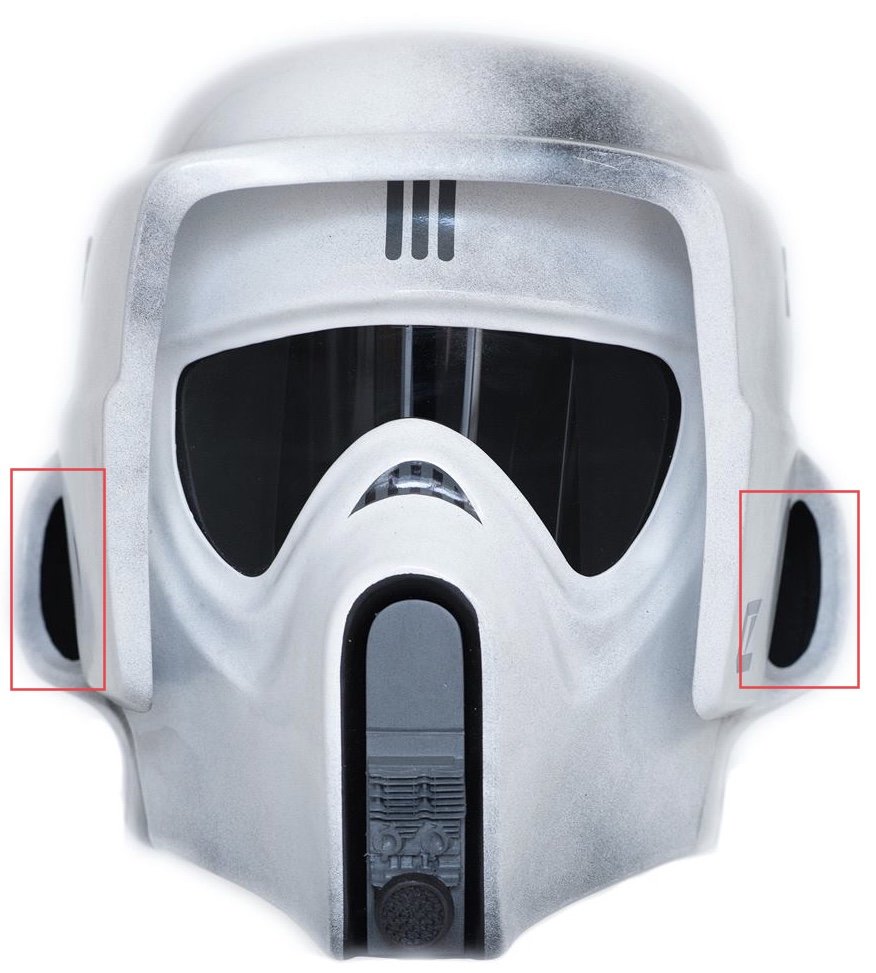
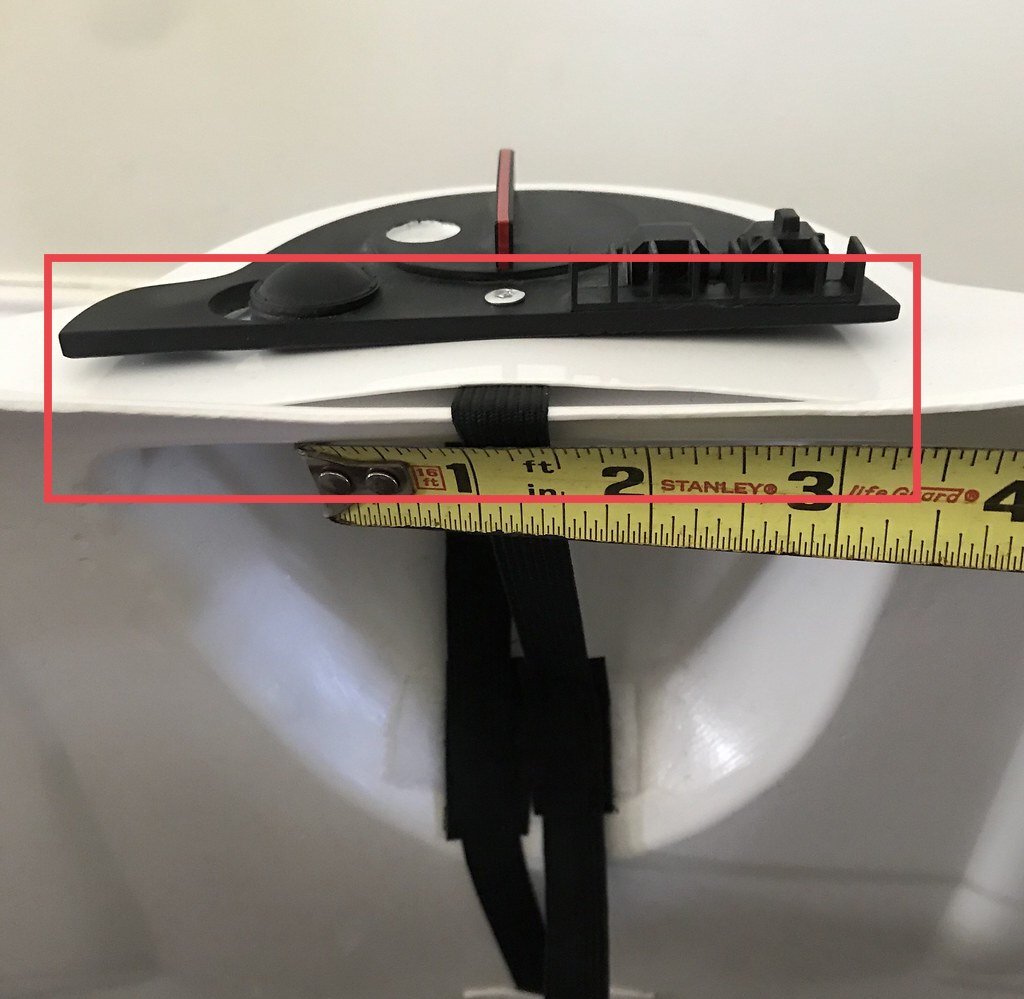
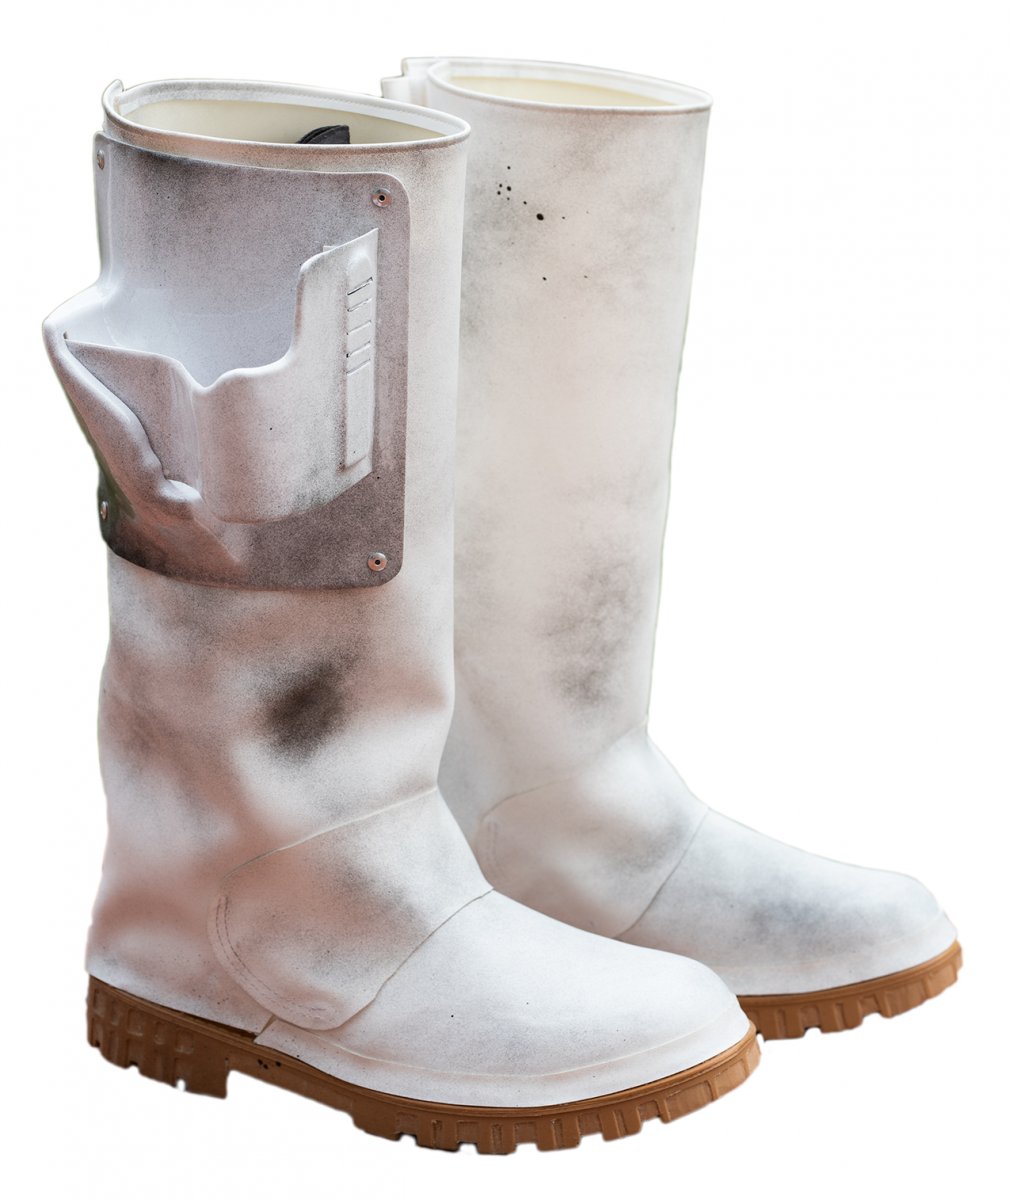
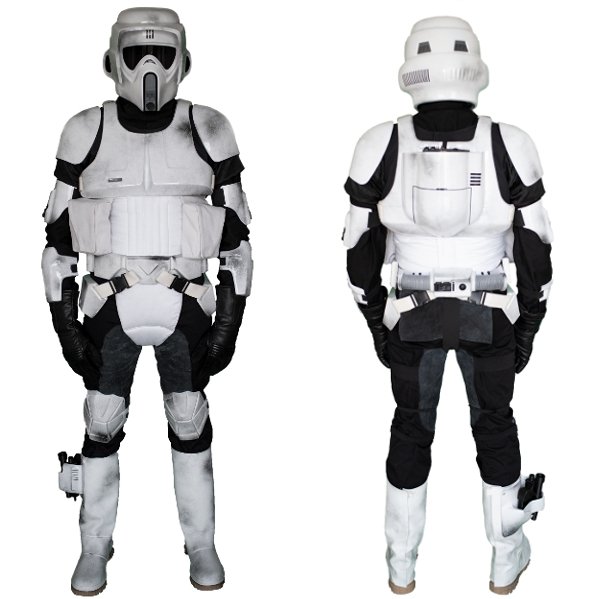
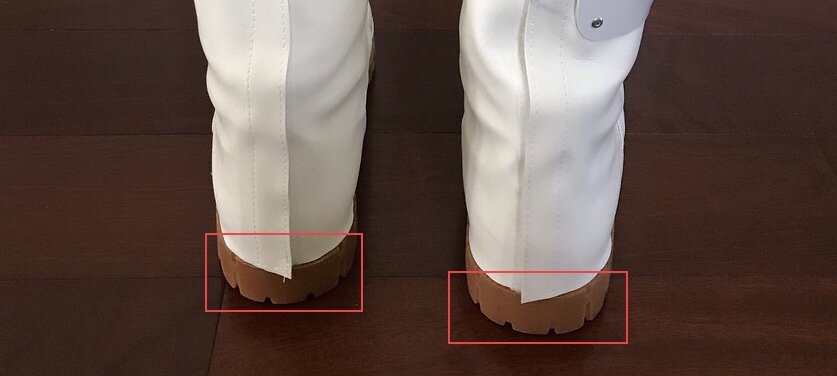
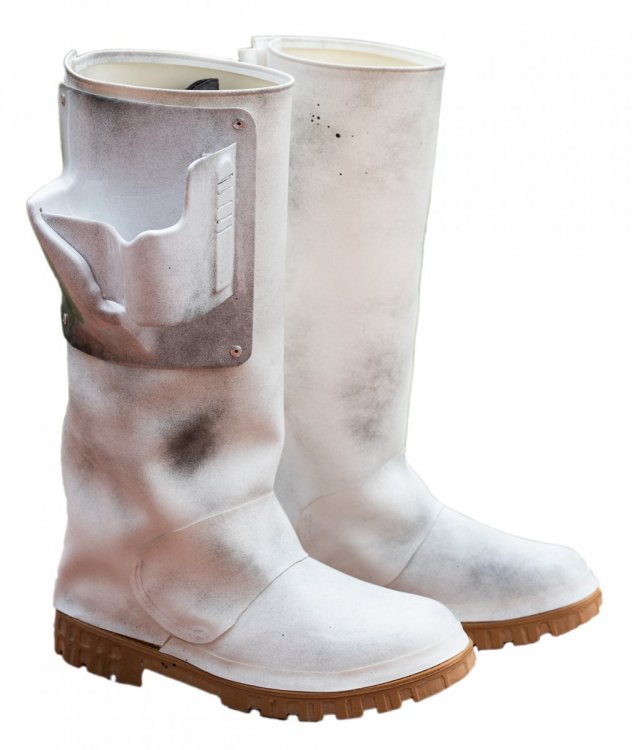
Will, Overall really great work. We found a few items that will need to be addressed and they are noted as follows: Helmet: The side vents (ears) will need to be opened further. Note the helmet from the CRL model. You can take a sharp pencil and trace around the inside of the vent. There should be a line where it transitions from vertical to horizontal and that’s where you want to cut to open up the ear further. Tank: The top of your tank has a significant warp to it from what looks like to be the 1/2” elastic wedged underneath the tank topper. It also looks like there is a separate piece of plastic installed here that should be removed. The tank topper is not completely adhered to the top of the tank and will need to be removed and re-addressed so the top of the tank and topper sit flat. The elastic on the top of the tank should be riveted on the inner side of the tank. Screen used tank assembly from the Magic of the Myth exhibit. Boots: Your boots do not meet the requisite sole cuts of the screen used Sierra Sneakers. Those boots have the cuts around the circumference of the boot sole. You’ll need to add some cut outs in the locations in the photo below. From the CRL: “The boots have slots cut into the heels and toes as seen in the film.” CRL Model Boots for reference Vest: We would like some additional photos of your vest especially the sleeves as it’s difficult to make out the ribbing and the amount of batting there. We would like to have an edge on picture looking through the arm hole of the sleeve to verify. The length of the sleeve past the shoulder cannot be verified due to the length of the bicep and the should armor. We’ll need additional photos of this area once you are able to address them. From the CRL: “Raglan sleeves are padded and contain ribbing similar to the front of the cummerbund.” Forearms: Fitment related - Your forearms need to come down to a bit below your elbows. Reference the CRL model. Biceps: The biceps are too long and should be reduced from the top of the armor piece. In the photos they are interfering with your shoulder bells. I had to trim my SC biceps and my shoulder bells down a bit to fit my arm length. We think that the biceps are too long so start with those first. With these remember to trim in small increments of say 1/4” because it’s hard to put plastic back on after you cut it. It looks like you may need to trim about 1/2” or so off those to make them fit you but as I mentioned take it a little at a time. SC Biceps of a Lancer approved Pathfinder: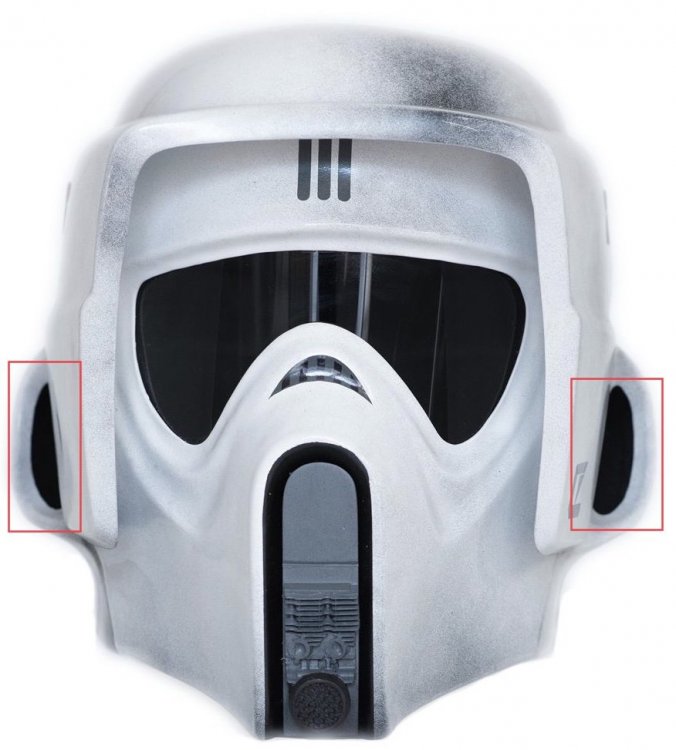


-
Ah the eternal struggle isn’t it? So a good way to do that is once you’re dressed use your TD clips as a reference. By that I mean slip a clip over your belt then pull the TD across and place the second clip over the belt. You just need to do it a few times to get the feel of where it centers and you can only do that by doing often. Another good way to judge it is by using your thigh box straps where they connect to your belt as a reference to the center. You can feel where the TD clip is in relation to that connection and correct if necessary. Again it’ll take a few times dressing to get a good feel of where it’s centered. Keep up the great work you’re going to be at approval stage in no time!
-
TB - 87093 Lancer Deployment Request
Retrofire replied to Nimble's topic in Lancer Deployment Request
Hi Eliot! I just wanted to check in with you to see how it’s going. We’re here for you if you need anything so don’t hesitate to ask!