

comm tech
-
Posts
251 -
Joined
-
Last visited
-
Days Won
1
Everything posted by comm tech
-
I do like a little added chrome for a little pop. I just finished applying the latex to do masking spots for the chrome and there is WAY less on this paint job, than the last one. THe chrome really gets muted when the matte finish is applied any ways. If it wasn't for the black that I chose to add, it may not have stood out so much. I have learned...I can be taught!!! My allegiance is to the dark side, not to interested in the Rebel side....not that there is anything wrong with them. If I decide to do something with them I will do a rebel pilot. If my chrome gave me any more problems, I was going to go without it as well. Will know tomorrow when I spray my first color coat.
-
Thanks Gerald. Here is what it looks like now LOL Of course, minus the tie pilot helmet.
-
It is going good got everything with a chrome coat again. Tomorrow I will mask spots with latex and start my final coats Friday Then I will have the weekend to work on the camo. I think this will come out really good this time. It has to , cause I ain't painting this again.
-
I was trying to make it look like the chrome was a metal base and then covered with a black primer and then the top coat...Who paints on metal without a primer coat?? Apparently this time I do
-
He was also questioning the black ...Ie in reference pics ?
-
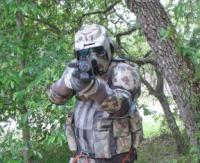
This was my Kashyyyk Trooper which I love. But my GML did not like the fact that was black on the outside of the Chrome (silver) so I have to repaint it. I was contemplating just using it for cons, but I really want to troop in it. So Everything is back to primer. SIGH Trying to get it done for Star Wars Weekends
-
No Problem Brent, I know the glove greebs are a bit (alot grey) but I just overestimated the CC's needed to do the pours, I 've got it down now though. So you may never need or use them, but at least you have a spare.
-
Congrats Woodman. Looking forward to seeing your progress. Lucky find BTW.
-
Looking pretty good as far a fitting goes. Under the shoulder bells, I used a cheap black knee pad (bought at Harbor Freight tools for around $3.00. THat worked perfect for me. The paint sticking has been an issue for everyone that got the black BikerChick straps. I was so tired of the Paint coming off, I molded my own out of clay, cast them in plaster and them made the final product out of tinted grey silicone. I have not molded the belt yet, but it is next on my list. I had a lot of silicone left over on the first batch so I used the left over to make another set of glove greebs.
-
Brown looks great Gerald. Good job on the color and the pattern is really good. I agree with your statement that the green needs an Olive shading.
-
WiP - Daelma `s Kashyyyk Scout for his wife
comm tech replied to Daelma's topic in Kashyyyk Trooper Armor/Helmet
It is finding the time to do it. Lots of work in the real world means little time in my alternate universe. -
WiP - Daelma `s Kashyyyk Scout for his wife
comm tech replied to Daelma's topic in Kashyyyk Trooper Armor/Helmet
The gloves need to be changed and/or finished. -
WiP - Daelma `s Kashyyyk Scout for his wife
comm tech replied to Daelma's topic in Kashyyyk Trooper Armor/Helmet
At least yours has been approved. I still have not had the time to repaint my armor yet -
WiP - Daelma `s Kashyyyk Scout for his wife
comm tech replied to Daelma's topic in Kashyyyk Trooper Armor/Helmet
THe hard armor prep looks really good. BUt the paint colors seem to be off a bit on the camo. The green is too bright and thin and the brown(?) looks more like a black. Also did you do a chrome color under coating? The armor looks well put together though. One last question, are the rubber parts (belt, knee straps and elbow straps and left bicep parts) you got with your bikerchick kit grey or are they black. Mine and a few others got the rubber in black, with our kits. And nothing will stick to them as far as paint, so I wondering if she finally is making them out of some form of grey rubber or silicone. THanks and keep at it. -
Rather that go through the aggrivation of Bondo, another option is to adhere a 1mm shim on the unerside of the tank, so when you push the greeb through it will now be flush. Thin Lexan sheet should work for you
-
OK that will be one million dollars!
-
So I trimmed the excess silicone off and I have my set (minus Belt) They really are grey in color. lighting and flash really effects the silicone. A better color shot
-
Came home at lunch time for a quick demolding I am not a professional sculptor - never claimed to be. But the straps and greebs look good enough for what I want. I did not want them perfectly smooth and clean looking. I wanted them to have maring and imperfections, looks more battle worn. That being said...here they are. I will trim them when I get home tonight. Grey silicone, no paint required. Be nice , it's my first attempt LOL
-
So I mixed my silicon and poured into the molds. THe silicone has been tinted grey so I do not have to worry about paint rubbing off anymore. All I have left to do now is mold the belt,,,,gotta get more clay first though. Here are the glove greebs (was not going to pour these, but I mixed too much silicone, so I figured what the heck) and Knee Armor straps The Left bicep Greebs And finally the elbow armor straps
-
I knew I should have poured the plaster mold last night when I had the time...before one of my cats stomped on the clay. Strangely enough, when I asked them which one did it, no one fessed up! Other molds are coming along. When I fix the above sculpt today I will cast this one (or at least put it in a safer place). Then the last thing I will have it the belt.
-
Nice thing is if the belt still wont hold paint, we can use small leather strips glued into the inserts instead of paint.
-
DR, Since they will be grey (when the finished product comes along) you will not need to paint them, except for a little weathering. I plan on doing all of the rubber parts and I plan on pouring them all at the same time so that there is no color variance in a set. 2 elbow straps, 2 knee straps, left bicep pad, left bicep wrap around, belt and maybe even the shoulder straps. I am going to start the knee straps this weekend. I think the belt is going to be the biggest pain, but I have an idea for the molding on that, we'll see if it works.
-
Yeah I have been trying to get my boat back in the water, so I have been working on that as well. Here is the first pull from the new mold, I am not too worried about it no being perfectly smooth as it just adds to the worn look.
-
Well, we will see how they turn out.
-
Plaster molds made
