LENOX61
-
Posts
164 -
Joined
-
Last visited
-
Days Won
1
Everything posted by LENOX61
-
Hello Colleen.
-
Lookin' Awesome!!!
-
Your KT is looking outstanding!!!! Awesome camo job!!!
-
After adding the decals and some more minor weathering, my bucket is done. I also got my armor from Mr. B and have already trimmed, sanded, mudded and am ready to paint.
-
Thanks Angelo. I used a medium green, acrylic paint and carefully rubbed it on. I am probably going to add some more dirt and a little more moss after I get the decals from Mr. B. (you can bearely see it coming from the bottom of the visor where it attaches to the helmet----I wanted it to look like his face went through some brush). My goal is to have the uniform appear to have been in a muddy, active, hellish fire fight (per the Wookie battle with the droids). I'm still not done.
-
Thanks. I used glue which was misted onto the helmet (a little goes a long way).
-
Thank-you Jessie. It's not quite finished, but I am hoping to have it completed by the end of this week-end.
-
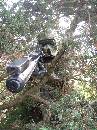
Here are the pictures for my KST bucket. Here is the PghFett / SGB helmet in raw form straight out of the box. After trimming, sanding, cleaning up the helmet, along with some Bondo work, the helmet and visor is just about ready for primer and first base coat. Obtained several paint colors from the Kashyyyk Scout forums, then performed the camoflage paint scheme. The helmet was then green washed, banged and scratched up, and weathered to represent a trooper in the midst of battle. Visor was just recently installed, however, the decals have not been applied yet. Please excuse these photos, the pictures were taken in our workshop / garage at night. Therefore the lighting is not the best. More pictures to come once the bucket is completely finished and the armor arrives.
-
Question for ya...........What did you use for your visor tint? I have been reading about different things (window screening, tint, motorcycle visors, etc). What material did you use to get the green, reflective look or is that your camera flash on the pics???
-
Well- after getting my SGB helmet, it was cut, sanded, and prepped for paint. I discovered the paint colors which were recommended by the website and applied a camo pattern. My brother and I then weathered the helmet with some green wash, a little blackwash and some moss (made it appear to have been in numerous confrontations and as if I crawled out of the swamp). Its amazing what a driveway can do to fiberglass. The helmet really looks cool and authentic. Right now, I am getting ready to install the front visor. I am going to attempt to attach some pics so you guys can see my progress......but I have been having trouble accomplishing this. In addition, I aquired some boots which have the same tread and high arches seen on the high resolution pics on the site. I also found the soft armor which has been dyed according to specs and located a cumber bun thanks to Lonescout (thank-you again). I am anxiously waiting for my hard armor to arrive in the mail which was ordered from Mr. B and am looking forward to getting started with that. Hopfully I will put this project into high gear. Once again, I am going to attempt to attach some pics of my rad helmet........I am hoping they appear. More updates to come.
-
Well- after getting my SGB helmet, it was cut, sanded, and prepped for paint. I discovered the paint colors which were recommended by the website and applied a camo pattern. My brother and I then weathered the helmet with some green wash, a little blackwash and some moss (made it appear to have been in numerous confrontations and as if I crawled out of the swamp). Its amazing what a driveway can do to fiberglass. The helmet really looks cool and authentic. Right now, I am getting ready to install the front visor. I am going to attempt to attach some pics so you guys can see my progress......but I have been having trouble accomplishing this. In addition, I aquired some boots which have the same tread and high arches as seen on the high resolution pics on the site. I also found the soft armor which has been dyed according to specs on the website and located a cumber bun thanks to Lonescout (thank-you again). I am anxiously waiting for my hard armor to arrive in the mail which was ordered from Mr. B and am looking forward to getting started with that. Hopefully I will put this project into high gear and or overdrive. Once again, I am going to attempt to attach some pics of my rad helmet........I am hoping they appear. More updates to come.
-
Lookin' AWESOME!!! I am also working with an SGB helmet. I like what you did with cutting out those back vents. I agree the decals seem a little glossy. With cutting those vents, it appears so much more real. Your pics just inspired me to cut mine out. Keep up the great work!
-
Mosi, Those pics are AWESOME!!!!!! My Kash project is slowly coming along and looking at your pics gives me more inspiration.
-
Hello everyone........my name is LENOX61 (aka-Kevin) and I am a current member / cadet of Garison Carida........just north of the Philadelphia area. I am also currently working on a Kash project. I know this kind of build is a little more difficult than some of the others. I am currently working on my bucket and am about to start piecing together the soft armor. Concerning the pants.........Does anybody have any suggestions about the riding patch color........grey, tan, mocha??? Also, does anybody have a suggestion to the type of material which should be used for the riding patch?? I hope to upload some additional pics of my progress in the near future. Thanx.