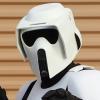
yoshix Posted May 23, 2020 Share Posted May 23, 2020 Hey everyone! Sorry for the long pause. To be honest I was a little discouraged from the project and was close to giving up entirely. Luck recently I had a change of heart and thought the only way I will finish is if I paint the armor, then I'll be forced to make progress. I made a few small changes including making the dome smaller, which pushes the helmet up and my eyes down. But none of the other troopers can see eather so why not, its about looking cool right!?! I also thinned out the frame around the eyes because with the dark paint all around it, it really made it stand out and look too fat. 1 Quote Link to comment Share on other sites More sharing options...
yoshix Posted May 23, 2020 Author Share Posted May 23, 2020 I did a test of the armor today. Its odd, I noticed in earlier photos that my hear or rather my neck looks like it sticks out really far, it try to avoid that look I ended up pushing my shoulders up and I think it really did the trick. What do you think? I'm looking forward to your feedback @ferra 1 1 Quote Link to comment Share on other sites More sharing options...
yoshix Posted May 23, 2020 Author Share Posted May 23, 2020 I think my next task will be to try to replicate the sholder connections and painting the tank top details. 1 Quote Link to comment Share on other sites More sharing options...
spike Posted May 23, 2020 Share Posted May 23, 2020 nice job mate 1 Quote Link to comment Share on other sites More sharing options...
BikerScout007 Posted May 24, 2020 Share Posted May 24, 2020 Wow looking really nice! I will let @ferra weigh in, but this gets us a lot closer to finishing this CRL. @mrrikki -- look! another one. 2 Quote Link to comment Share on other sites More sharing options...
yoshix Posted February 6, 2021 Author Share Posted February 6, 2021 Time for an update! I've been distracted working on a clone trooper crl but it's pretty much done and I can get back to work on this. Unfortunately, I was working on my helmet the other day trying to get it more like the reference photos, and I dripped it. It cracked into a few pieces. I decided to take the opportunity to order a new helmet from a 3d printer on etsy. From what I can tell it will look much better than my lame pepakura helmet. It will take a few weeks to a month before it comes in so in the meantime I wanted to work on my tank. My tank is ridiculously large in comparison. 2 Quote Link to comment Share on other sites More sharing options...
BikerScout007 Posted February 10, 2021 Share Posted February 10, 2021 So which one is this? I thought the officer was what you posted up on May 23rd? Quote Link to comment Share on other sites More sharing options...
yoshix Posted February 10, 2021 Author Share Posted February 10, 2021 10 hours ago, BikerScout007 said: So which one is this? I thought the officer was what you posted up on May 23rd? No, I'm still doing the officer. The comparison photos that I recently posted was before the dark green paint job and was intended to show the large tank. 1 Quote Link to comment Share on other sites More sharing options...
yoshix Posted February 10, 2021 Author Share Posted February 10, 2021 I found a place online that has free pepakura files for a scout costume, I scaled it up a bit and used the tank from that as a guide. I'm no stranger to pepakura so a little bit of improving to get the right shape was no problem. I laid it inside my original back and added paper around the frame. When I added resin and fiberglass cloth, the original back helped to keep its shape. Pep is a slow process but it will look great when it's done. 1 Quote Link to comment Share on other sites More sharing options...
yoshix Posted February 13, 2021 Author Share Posted February 13, 2021 It's been a little over a week since I started and I've made some great progress. Sanding and filling gaps and more resin and then more sanding. Primer, more patching. Sanding. Thanks to oneredstar for his model of the tan topper. I filled some lego pieces with resin and then sanded them down to a good size. I used wood and small pieces of plastic for the other greebles. After paint I did a little comparison. Very happy! I wanted more green this time and spottyer. Finally today I glued on the rest of the peices. Quote Link to comment Share on other sites More sharing options...
yoshix Posted February 13, 2021 Author Share Posted February 13, 2021 Oh, I also repainted the other parts to match the tank. Quote Link to comment Share on other sites More sharing options...
yoshix Posted February 13, 2021 Author Share Posted February 13, 2021 I have the shoulder connections pretty much put together. I'd like to open up the conversation to everyone though, especially @BikerScout007 and @ferra Other than the sholders, what else do I need to change? The boot straps? Looks like they are white or should they stay tan? With the top strap being a little thinker? Or the buckles for the boot straps. Should I make them larger and grey? What about my pouches on the cummerbund? Should I change them to grey as well? Is there more? Is there something I missed? I've been away so long I'm not sure of the actual position on different things. Quote Link to comment Share on other sites More sharing options...
BikerScout007 Posted February 13, 2021 Share Posted February 13, 2021 I would say definitely go medium gray on the bund and pouches. Boot straps I'm not as sure on. Some shots they look green/sage, others they look gray. I dont think they are white though 1 Quote Link to comment Share on other sites More sharing options...
yoshix Posted February 13, 2021 Author Share Posted February 13, 2021 1 hour ago, BikerScout007 said: I would say definitely go medium gray on the bund and pouches. Boot straps I'm not as sure on. Some shots they look green/sage, others they look gray. I dont think they are white though Understood. Do you think my cummerbund is too Dark? The reference photos appear to be a dirty ash grey. The trouble is I just did a quick search and then nylon webbing only comes in a dark gray/charcoal or a silver/light grey. Quote Link to comment Share on other sites More sharing options...
yoshix Posted February 14, 2021 Author Share Posted February 14, 2021 I found a better alternative for what I have. Its still a little on the darker side but it's not as blue grey as what I already have. I can work off this as a base to build a new cummerbund and change the color of the pouches. 1 Quote Link to comment Share on other sites More sharing options...
yoshix Posted February 21, 2021 Author Share Posted February 21, 2021 I found a fabric that I think match the straps pretty well. I tried to go with a solid color as the game doesn't have light and dark lines other than the shadows. I'm almost finished with the cummerbund and I'm working on covering the pouches. The shoulder connections are also pretty much done. I used wood and painted them a metallic gray color. I used velcro to attach them. Photo above shows them not fully painted because I cut them down some more. Quote Link to comment Share on other sites More sharing options...
yoshix Posted February 21, 2021 Author Share Posted February 21, 2021 After looking at the side by side I noticed that the bottom strap on the shins was too low. I filled the holes and repainted. I figured while I was at it I could redo the buckle to the game style. As you can see, they stick out a bit more.. I painted them black as a base coat but I'm thinking about painting them dark gray. I bought some dark green straps, I figured why not. It wasn't that expensive and if I need to change them out later it shouldn't be too much of a problem. Honestly I like the look. 2 Quote Link to comment Share on other sites More sharing options...
BikerScout007 Posted February 21, 2021 Share Posted February 21, 2021 Hard to tell it's even green honestly! 1 Quote Link to comment Share on other sites More sharing options...
yoshix Posted February 24, 2021 Author Share Posted February 24, 2021 Outer buckles are done. I need to redo the inner side. It's hard to tell from the pictures but I swear the straps are green. 1 Quote Link to comment Share on other sites More sharing options...
ferra Posted February 28, 2021 Share Posted February 28, 2021 This looks great man, sorry I have been away the baby soaks up all the time 😄 2 Quote Link to comment Share on other sites More sharing options...
yoshix Posted March 1, 2021 Author Share Posted March 1, 2021 12 hours ago, ferra said: This looks great man, sorry I have been away the baby soaks up all the time 😄 I have a three year old so I can totally understand that 😝 Quote Link to comment Share on other sites More sharing options...
yoshix Posted March 4, 2021 Author Share Posted March 4, 2021 So again, looking at the side by side comparison I noticed my cod had the wrong shape so I made a new one. This one is more rounded and less triangular. I also took the time to make a few of my pouches to be a bit larger including my drop down pouches. I also changed these straps to be thinner. Test fit - I didn't put my boots on that why I cut the pictures off at the bottom. Also, the new cod doesn't have velcro on it so you'll just have to imagine it's a little higher and you can't see that line on the top. I learnd a few things with this test fit. One, I Think my pants are too baggie, I'm going to change them. I also think my cummerbund needs to be tighter under the arms. Let me know what you think. Anything that needs attention? Quote Link to comment Share on other sites More sharing options...
Aradun Posted March 5, 2021 Share Posted March 5, 2021 This is really coming together. Looking sharp! 1 Quote Link to comment Share on other sites More sharing options...
BikerScout007 Posted March 5, 2021 Share Posted March 5, 2021 22 hours ago, yoshix said: So again, looking at the side by side comparison I noticed my cod had the wrong shape so I made a new one. This one is more rounded and less triangular. I also took the time to make a few of my pouches to be a bit larger including my drop down pouches. I also changed these straps to be thinner. Test fit - I didn't put my boots on that why I cut the pictures off at the bottom. Also, the new cod doesn't have velcro on it so you'll just have to imagine it's a little higher and you can't see that line on the top. I learnd a few things with this test fit. One, I Think my pants are too baggie, I'm going to change them. I also think my cummerbund needs to be tighter under the arms. Let me know what you think. Anything that needs attention? That is looking really nice! I'm going to start banging out the CRL so I can see if there is anything needed. @ferra @Jakeputt any thoughts? 1 Quote Link to comment Share on other sites More sharing options...
yoshix Posted March 8, 2021 Author Share Posted March 8, 2021 Fixed the pants and made a few other small adjustments. Looks better! still waiting on my helmet to get here. It shipped from Europe two weeks ago so it should be here any day now. 2 Quote Link to comment Share on other sites More sharing options...

Recommended Posts
Join the conversation
You can post now and register later. If you have an account, sign in now to post with your account.