


Mandrake
-
Posts
188 -
Joined
-
Last visited
-
Days Won
2
Everything posted by Mandrake
-
https://ibb.co/dQrDyD0 https://ibb.co/q94qHCg https://ibb.co/cyJjD9b https://ibb.co/svL5f6N < better quality images
-
So my jacket is finally finished,as ive stated elsewhere on this forum, thin breathable material was added to the design to try and keep as cool as possible and can confirm that it does the job very well,and isn't very warm at all !!! hopefully it will pass inspection ... when I finally receive my armour- it's been 7 month's since ordering and I'm still waiting, due to the painter being hospitalised over summer and they have recently had a fire in their workshop Sent from my M2007J20CG using Tapatalk
-
I'm really sorry to be the bearer of more bad news ,but it looks like armour prop shop aren't making / selling any design's of armour currently, due to the backlog of uncompleted armour ,because of their painter being Ill and hospitalised for several months due to Corona .On the positive side,at least this will give you more time to save up for the armour and you can still order the helmet, which is currently 30% cheaper than normal! Edit- it's worth signing up to the newsletter on their site and also following them on Facebook,so you can keep up to date with any changes.
-
Trouser to reference--I've just noticed your are now ( probably) in Poland,so it would be best to source them from the USA.
-
Hello, first time builder here too! I'll start by giving you the bad news,the soft goods are Not available from armour prop shop anymore, unfortunately no one ,as far as I'm aware at least ,is doing the soft goods for the patrol trooper 😕 I'm currently in the process of having a jacket made, which should be completed by the end of October,the details of the jacket should be screen accurate as I've had some help / information from someone very knowledgeable on here. The seamstress I'm using is happy to make more when the jacket gets approved, as there's several people who I know of ,who own the armour but don't have the soft goods. Ive redesigned it so it should be a bit more comfortable / cooler than the prop shop one,I'm not going to be making any money from the sales, just so you know . There's a post about trousers , which I'll post below shortly, Otherwise reference the post and try and find something similar near you. The helmet Now comes with a grill glued in place inside the helmet and the teeth are pre cut out ,so you don't have to cut the teeth out like the previous builders had to. I'm still waiting for my armour that I ordered in march, there has been a problem with the armour painter at prop shop so its been delayed, however I don't think a six month wait is that unusual for them . sorry about the long post , hopefully it should be of help. If you need any help , from someone who is in a similar position, don't hesitate to contact me
-
Oh and by the way thanks for the tips on resizing ;),I double checked with the one that had been auctioned. I noticed good old Mr poopie sorted you out after yours breaking a few months ago ,so I had the file seeing as I wanted to replace the one that comes with the armour!
-
Thanks Sent from my M2007J20CG using Tapatalk
-
I decided that a replacement EC 11 blaster was in order as I have no doubt I'll drop and break the one that comes with the armour. I 3d printed this from a file Mr poopie put up on the scout section of this site. I didn't have the correct size screws that the design uses to join the main body together, so I decided to use e6000 glue instead.The dimensions I got from a screen used one that was auctioned off several years ago.Its been printed nearly solid so it should cope with it being dropped, hopefully Sent from my M2007J20CG using Tapatalk
-
This 3d printed batton design is by Mr poopie,imho it's very very close to screen accurate! I used a plastidip type spray for the handles and alclad airbrush paint for the 'metal' parts.The inside is made from a piece of plastic waste piping.Big thanks to Mr poopie for all your help and assistance Sent from my M2007J20CG using Tapatalk
-
The boots are brogini Modena vegan riding boots, the side detail was removed ,it was easily picked off with a stitch remover, and I will fill the circular hole with a press stud or Chicago screw to the leg armour. With the elastic strap I cut to size and sewed a leather wallet / purse clasp strap and glued it in place, using sewing clips to get a tight bond. The sewing clips and wallet straps were from AliExpress. Sent from my M2007J20CG using Tapatalk
-
It's worth mentioning that the helmets now(July 2021) come with the teeth cut out and mesh being glued in place as well as the side vents being white underneath,all the other builds on here seem to have a older versions of the helmet,I received a MK3 according to the card that was in with the helmet. Sent from my M2007J20CG using Tapatalk
-
Seeing as there are many different ways to do the various parts ,I will be using and crediting different people's previous build method's and providing additional information that I've learnt outside of the patrol trooper forum. For the helmet I have used knee pad inserts and Airsoft padding, double sided tape and e6000 jewelry glue. The flexible and perforated knee padding was Ideal to cut to size and mold it to the shape of the top of the helmet as well as provide additional spacing at the back of the helmet,this was put in to place with double sided tape . The Airsoft padding came with sticky backed velcro patches these were placed directly on the helmet shell ,the additional layer of Airsoft padding was glued with e6000 . It took several attempts to place everything for a comfortable fit ,and I personally needed one extra block on each side of the rear of the helmet to stop 'bobblehead' as well as a small piece of foam for the ridge of the nose underneath the visor,but everyone's experience will be different to mine! handy tip - for transporting / storage use the thin foam padding that arrives with the helmet and cut and tape it in to the rough shape of the helmet. I had a spare motorcycle helmet bag lying around which provides a little bit more protection as well as making it easier to move it around. **Edit** The Airsoft padding was from AliExpress and helmet bags are available on there as well.The knee pads I got from a local hardware shop,but are available online.
-
I thought It was worth mentioning that the vent's are not open underneath in to the helmet interior and it seems after testing with a flash on my phone, that the lenses may have been updated to a better material as no eyes or glasses😄 Can be seen in the pictures taken.
-
So my helmet arrived today(July 2021),and while I'm really happy with it ,it held a few surprises! It came with the teeth already cut out and mesh behind them as well as the side vents being white underneath! I thought I'd let anyone who is considering purchasing one, that it already comes more screen accurate than previous versions that are on here in the WIP section.ive not seen any mention of the changes any where,so you don't need to buy the mesh or white fabric like I did! Sent from my M2007J20CG using Tapatalk
-
Hopefully these photo's should be a bit clearer! Sent from my M2007J20CG using Tapatalk
-
I thought I'd post for others to reference what the bergoni boot's look like with the side strap removed( hole could be used as a anchor point for shin armour?) along with the original calf strap which is elasticated and with a strip of leather sewn and glued in place. Sent from my M2007J20CG using Tapatalk
-
Cheers, still waiting for my armour and helmet to be completed though 😕
-
-
Just to clarify something..these boots are called Modena Vegan Riding Boots made by a company called brogini,I've bought a damaged pair directly from them for the grand total of £28 ,full price is around £70 , which seems to be a lot cheaper than most other suitable boots. I am correct in thinking the outer strap will need removing though? It can be easily removed by 'picking' the stitches.
-
@MrPoopiethank you for this! your a good one! depending on how the armour prop shop Ec-17 looks,I may end up printing this out also! I'll undoubtedly need a new one at some point though,I have no doubt I'll end up dropping it and it breaking.. just like every mobile phone I've ever had.
-
After reading tk175's rather handy advice,I've sourced some green mirror film from AliExpress, it's pretty much the same shade of green as the lenses!
-
A few items and measurements needed
Mandrake replied to Mandrake's topic in Patrol Trooper Soft Parts
Yet some more questions,I promise I'll stop asking soon (probably) 😉 I'm considering replacing the chest ( like ruthar) and waist buckles with some that are a bit more detailed than the ones that come with Denis's armour,the file I'm thinking of using is here https://www.thingiverse.com/thing:4316677/comments my questions are - 1)do they look ok to you/ are the dimensions correct ? 2) would it be a problem if I subtly painted the 'screws' a metallic colour for a more realistic look? Cheers and as always ,thank you. @MrPoopie@BikerScout007 -
Hopefully this will System will help some people here who don't really want to spend a lot of money because they've already forked out lots already 🤣 total cost is around £25 or just over $30!
-
-
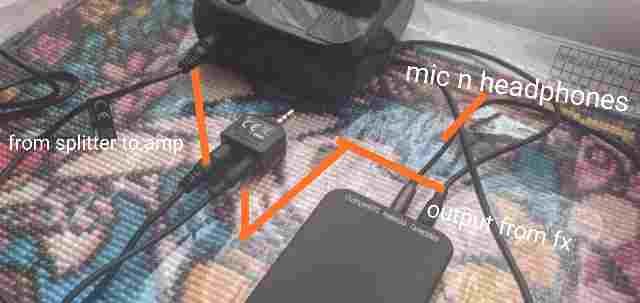
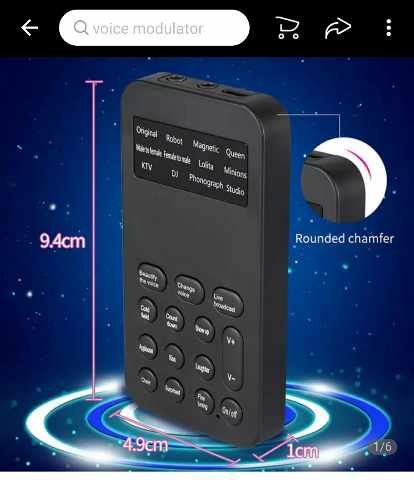
Hello I'm new here and awaiting my patrol trooper armour to arrive,so in the meantime I've put together a very cheap and easy voice system , that I thought I'd share with everyone ,if you're on a limited budget these items give impressive results for very little outlay. For just straight up voice amplification I bought one of these from AliExpress for about £12 or $16 -Rolton K400 Wired Audio Speaker Voice Amplifier https://a.aliexpress.com/_vaAd6h- the provided microphone is very clear and volume of the amp is very loud and the clarity is very good.The amp comes with a memory card slot that could be used for background radio chatter to be played from the card, it does not work alongside the microphone though. Example of volume output below - the amp starts from it's quietist and gets progressively louder so watch out The second way is using both the amp above and a voice changer, also with a pair of phone earphones that have a microphone built in ,a 3.5mm audio cable and a 2 in to 1 headphone jack or a 3.5mm joiner .I've Pictured the voice changer as there's no model name ,I got it from this seller on AliExpress for £10 / $ 14 https://a.aliexpress.com/_vFy1qZ. This way does have a downside ,in that the volume output is lower than simply using the amp outright, infact output volume is a bit above normal speaking volume, but could be rectified by a additional small headphone amplifier.. again available on AliExpress for £13 / $ 17 although I haven't used one yet. To use this method you connect your phone earphones in to the voice changer, out from the voice changer using the 3 pole lead provided with the amp into the 2 in to 1 headphone splitter and out of the splitter in to the amplifier. I'm using the phonograph effect on the video below, it's worth noting that my phone was picking up my voice as well as the amp,but with a helmet on you won't have that problem. I'm having trouble uploading pictures on this post so I'll the pictures of the effect unit and diagram of wiring shortly.

