

Gree23
-
Posts
154 -
Joined
-
Last visited
-
Days Won
2
Everything posted by Gree23
-
Dennis, Thank you for pointing me to your build. A TON of helpful information has been posted by you in this and will help me take my build to Lancer I hope. I have been "thinking" and mind melting over the soft goods for a few months now, but I think that stops today and I am going to jump on getting the Patches and mud flap installed. I am also going to look at making the vest as I had an idea, but then looked at Lancer and will change it up a bit based on your build. Thank you so much for taking the time to focus on the information provided and helping future Scouts get done.
-
This is perfect. I like your idea of drawing on the patch to get the look right. And I can use butcher paper to trace off the sketch. Great help, THANKS!!!
-
I did, but for whatever reason there is a major disconnect for me. Idk, and honestly think I am at the point where I have overly complicated this for myself and it hurts lol. Was more so trying to find a picture of the patch prior to being installed. more of a "lay it on the table" type of thing.
-
This was a super helpful post with pointing out that a simple seam should be located, as I had not thought of that. I have just started sewing...But my question is and the hardest thing I am having to wrap my head around, is the shape of the patch. Does anyone have a picture of the patch before its installed?
-
Build Your Own Vest... w/Pictures!
Gree23 replied to scout.trooper's topic in ROTJ Biker Scout Soft Parts
Its been too long since someone has thankd you for this, So THANK YOU! With the growing cost of people producing these items, it helps so much to have a DIY that makes sense. I will be working on this for not only my Scout, but my Swampy, and shadow as well. Great that all three are the exact same! -
ah ok. I was gonna say thats brilliant for construction lol. But makes sense. I love looking at these photos. Hope one day I can see stuff like this in person.
-
If you hit this hard, and I mean just give it some attention, you should nave no issue with finishing this well before you deadline. I would say a solid week spent on it and you should be good. You already have your bucket, boots, and soft goods, that is the hard parts. Everything else is easy and should come together as such. Honestly, a solid day could get you finished. Strapping is easy once you have that figured out, meaning what system you are gonna use. the only other thing that might be funky is getting the tank on the back, but you got this and it looks great so far. Keep up the good work!
-
Wait.....the chest armor was made in two parts?!?!?! Would this hold up and need a CRL change?!?!?
-
Gree gets around. Biker Scout WIP (WTF and 3d print)
Gree23 replied to Gree23's topic in ROTJ Biker Scout WIP
a little update... -
Is there a "best" 3d model for a scout helmet?
Gree23 replied to Pandatrooper's topic in ROTJ Biker Scout Armor/Helmet
Yeah, love my GML job too [emoji6] Sent from my SM-G986U using Tapatalk -
Is there a "best" 3d model for a scout helmet?
Gree23 replied to Pandatrooper's topic in ROTJ Biker Scout Armor/Helmet
And I prefer the 3d print. To me the work that goes into is therapeutic. But it has to be worth it to the person doing it. Its a lot of work. But if I wasnt doing it my time would just be spent watching TV or something. So for me, its time well spent Sent from my SM-G986U using Tapatalk -
Is there a "best" 3d model for a scout helmet?
Gree23 replied to Pandatrooper's topic in ROTJ Biker Scout Armor/Helmet
Totally agree. Good way to lay that out Sent from my SM-G986U using Tapatalk -
Is there a "best" 3d model for a scout helmet?
Gree23 replied to Pandatrooper's topic in ROTJ Biker Scout Armor/Helmet
Sorry what? "3d print will never save you...money"? Ive saved a but load 3d printing lol. Maybe that was a typo? Time no, i spent alot of time on my prints but its time that would have been wasted if not having something to do. But i cant agree if you are claiming it doesnt save money. For the cost of my helmet I am able to print and finish the rest of my kit Sent from my SM-G986U using Tapatalk -
Is there a "best" 3d model for a scout helmet?
Gree23 replied to Pandatrooper's topic in ROTJ Biker Scout Armor/Helmet
I havent found one. The way the 3d prints have been dont make them as accurate as the ABS kits. So I am 3d printing everything but the helmet. Went with a Studio Creations helmet (3 of them) and saved a ton Sent from my SM-G986U using Tapatalk -
the wrong paint just gives it that much more layering lol. And yes catching a problem like that is key early in the build. Glad you caught it. Nothing worse than going "done" only to have to start over lol. Keep up the good work, looking forward to seeing the rest.
-
I thought this was how it was supposed to be done? How are others doing it Sent from my SM-G986U using Tapatalk
-
Do like the TK does and use and elastic strap that runs from the shoulder into the bicep to hold it in place. Some use a snap on both ends and others use velcro for adjustability
-
Square helmet bolts help
Gree23 replied to EC-17 Holdout Blaster's topic in ROTJ Biker Scout Armor/Helmet
I used a soldiering iron and squared the hole by heating up the plastic and shoving the bolt throw. Actually works really well to maintain the face in the up position without slipping. Sent from my SM-G986U using Tapatalk -
Gree gets around. Biker Scout WIP (WTF and 3d print)
Gree23 replied to Gree23's topic in ROTJ Biker Scout WIP
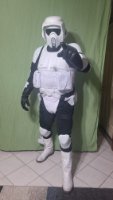
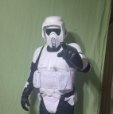
Just waiting on Helmet and Chest piece. I do have the greebles just not in the picture. -
Yeah no worries. Like i said it was just something that stuck out to me and i completely appreciate the fact that we want the CRL to be at its best. Sent from my SM-G986U using Tapatalk
-
Gree gets around. Biker Scout WIP (WTF and 3d print)
Gree23 replied to Gree23's topic in ROTJ Biker Scout WIP
Ok yall....making some changes here. 3d printing everything but the helmet. just waiting for the chest to finish. Going to start working on the flight suit tonight and am scared to death of the suede lol. I know I am seriously overthinking it and have some TBs on the GML team that are gonna help me out. But that is my biggest hurdle right now. I also ordered 3 helmets from Studio Creations (super awesome guys! even talked me out of making a purchase from them for a back piece that might not work with a printed chest, so that speaks volumes to me about how much the care) so will be waiting for those to come in. I think this will give me plenty of time to get my scouts ready for the con in Oct which is where I hope to have all 3. Will post pics of my 3d printed parts when I get home. -
I would like to add my two cents here if I might. I know I am not currently an approved Scout, yet....but I have had a Swamp trooper in the past and am working on a Swamp, Shadow, and ROTJ scout currently. I know my opinion doesnt mean a lot and but the time this happens, probably wont affect me, but....I would ask that the collar option be left in and not removed. Of course this counteracts all my "lets get it right" push for most things lol. But I know currently, the same undersuit is used in all 3 costumes i mentioned. If we change and take the mandorian collar option out completely, people will need 2 flight suits. Again I know this isnt the detachments problem, but wanted to throw that out there for a reason not to remove it
-
Big/Fat trooper soft parts options.
Gree23 replied to Crazy French Geek's topic in ROTJ Biker Scout Soft Parts
I loved my Studio Creations kit, in fact I just ordered 3 more helmets from them (doing a biker, swamp, and Shadow scout) but just be aware, their helmets tend to run small. I have a big head and it fits me great, but its not the "big head" option out there. Hopefully everything works out and you are able to submit. Cant wait to see your progress! -
Gree gets around. Biker Scout WIP (WTF and 3d print)
Gree23 replied to Gree23's topic in ROTJ Biker Scout WIP
Worked on the Boots this weekend. Suede just came in today so will be working on the flightsuit this weekend. really freaking out over the riding patches lol. But I think its gonna be one of those things i just need to start and it will turn out ok. -
Gree gets around. Biker Scout WIP (WTF and 3d print)
Gree23 replied to Gree23's topic in ROTJ Biker Scout WIP
Lol, Hey we all deal with our own prints lol jkjk. And yeah I have been scared of alot of the projects I take on and its always forcing myself to just start, and it turns out fine. But yeah I am looking forward to this and the entire reason I bought a sewing machine was to safe myself money, but its costing me anxiety lol. But yes there is a TON of info here and love that its all so detailed. Its funny to watch how to videos that only show the start and finish but not the exact process lol. Hoping to eventually tackle a Kashyyyk Trooper and would want to do my own soft goods. Really appreciate all the help and encouragement so from from this group. Glad there is still a ton of active members here

