

StudioCreations
-
Posts
203 -
Joined
-
Last visited
-
Days Won
11
Everything posted by StudioCreations
-

Two specific types of Biker Scout
StudioCreations replied to lonewolf's topic in ROTJ Biker Scout Armor/Helmet
I personally like designations to be instantly recognizable by a first-time costumer coming into this hobby . "Clean" and "Dirty" brand the look of a costume immediately. Perhaps there is better terminology or a word that is more common between languages.... possibly "Not Soiled" and "Soiled". Using a designation like "Endor" or "Deathstar" is ambiguous. A first-timer would not know what we are talking about for a while, probably 3 or 4 threads worth of reading at least. -
We almost went with a 3-part wedge buck, but cost and time factored in and we went the simpler route of a one piece buck. In order to make that single buck work, we had to make our ear areas shallower than the ILM helmet, so that we could pry the vac parts off the mold once it was sucked down. Currently we are only getting 1 out of 3 vacpulls safely off the table. We'll have a slew of 'Factory Seconds' parts available after this testing phase is done.
-
We can do that. This particular faceplate was an older faceplate sitting around the shop that we grabbed. Our mold allows for the 'roll under', and we have cut these properly in the past. Good catch! Everyone, thanks so much for the positive feedback on this test fitting. It's very encouraging. We'll plow through tweaks this week and try to post something new ASAP.
-
Thermal Detonator Clips
StudioCreations replied to lonewolf's topic in ROTJ Biker Scout Armor/Helmet
The spacing of the bars look a little wider apart than they should be, but the principal is spot on. Much more accurate looking than money clips or Alice clips. Kudos!!! -
I agree with the softness issue. This protoype used .080 guage ABS plastic, and we are going to try vacforming it with .060 guage ABS plastic to increase the sharpness, if we can find any .060 sitting on the shelf in the plastic warehouses. Griffin-X - this will be a 4 part assembly: Top, Sides/back, Faceplate, Visor/Blinder (we could not vacform the Top with the Sides/back and release the vacuum-buck from the plastic, just too many undercuts in that buck to make it happen) Panda - We are planing on making the recessed temple area wider to accommodate the strap you talk about. Chin Cup is in the works too. TB7076 - Size wise, our helmet will be similar to the 1996 Don Post helmets. So think small to medium sized heads. No "large head" troopers will fit this helmet. MJ - Kits are actually our main goal here. We want to offer the fans something they can work on themselves, therefore increasing their crafting skills and allowing them to feel like they had personal ownership of their final costume. One of the main problems with our old helmet was the fact that we felt seaming the two side plates together was a little beyond the novice builder, and that the failure of the seam over time could discourage the newbie builder from ever attempting another costume project.
-
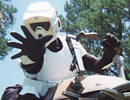
------------------------------------------- Update: Assembled and Painted test helmet images are on page 2 of this thread. ------------------------------------------- Below are images of the first assembly of our fan-made scout helmet parts made from our latest vacuumform bucks. We have made the sides and back of the helmet a seamless, one-piece part. Anyone who saw, or owns, our old helmet will remember the sides of the helmets were each a separate piece and they had a seamline running down the back of the helmet. This meant in order to be approved in the 501st the costumer had to putty and sand the seamline, and then paint the entire helmet a consistent gloss white color. Not too user freindly. This is just a test-fit assembly of the helmet parts, so we did not add in the accurate speedglass bolts or the decals or visor. We were just testing how the parts fit together and still expect to tweak and clean up the molds a little more in the coming weeks. Feedback is highly appreciated. If we have one major group of fans to please, it's here on the BSN! -Jeff
-
EFX to make a Biker Scout helmet from the original molds
StudioCreations replied to lonewolf's topic in ROTJ Biker Scout HQ
As a vacformer myself, I can see why EFX is going with fiberglass and not ABS. The Original scout helmet has many nuances in the design that do not allow for "mass production" with ABS. The undercut depth in the ears, the vent indentions in the back of the helmet, and the sloping sides of the Blinder/Visor all contribute to a vacummformer's nightmare. Going with Fiberglass allows for EFX to capture all these details quickly and more efficiently. I am in no way sad by this decision of EFX. I am ultra happy that they are taking the time to trying to get as-close-as-possible on a first run of such a low-demand character. This is not a fan sculpt, or a 3rd party company sculpt, this is a master model being made from vacuumforms off the original molds. Usually the fans have to endure years (or decades) of market testing of innacurate products before a company goes to this level of accuracy. I applaud EFX for "geeking out" and doing this helmet this level of justice the first time. I know I will try to be first-in-line on the website, the second they open up presales. -
There are a couple threads about armor comparisons and who-prefers-what.... http://forum.bikerscout.net/index.php?showtopic=8396 http://forum.bikerscout.net/index.php?showtopic=9027&hl=comparison&fromsearch=1 http://forum.bikerscout.net/index.php?showtopic=8220 And here's a 6-year-old, but excellent, comparison thread between 4 different propmakers armor offerings... http://forum.bikerscout.net/index.php?showtopic=913&st=0
-
SC Kit Purchased - anyone want to help?
StudioCreations replied to Uplandmacenter's topic in ROTJ Biker Scout Armor/Helmet
I've done the photo thing in my tutorials before , but not in ultra-minute detail. Between You, Uplandamcenter and SaraBO's affirmation of the need for this, I will put making the video at the top of the priority list when I start building the new costume in May/June. In the meantime here are some old-skool 'image' tutorials of basic Rivetting and Buttoning techniques... http://studiocreations.com/howto/rivetingbuttoning/riveting.html http://studiocreations.com/howto/rivetingbuttoning/buttoning.html I'll see what I can do about making a "Strap Sewing" tutorial in the coming week. I think a lot of us 'old-timers' are so deep into the costuming world that we forget just how daunting and scary the basic techniques can be to the first-time costumer. -
''lancer'' knee armor questions!
StudioCreations replied to mariellejaworski's topic in ROTJ Biker Scout Armor/Helmet
SC was slated to have the kneecaps remastered by end of April, but now that is pushed back into late May. Currently we are finishing up revamping our Helmet and thermal det molds, then we move on to the Chest and Back, then the Kneecaps... unless of course the BSN members feel the accuracy of the SC kneecaps are more of a priority for than the chest and back. -
I totally agree with the sentiments in the replies on this thread so far, shim the greeblies for the time being.... and in a couple weeks, email me about getting a replacement box that is way more accurate (I am about 1 week away from vacforming the new thermal det box prototype).
-
SC Kit Purchased - anyone want to help?
StudioCreations replied to Uplandmacenter's topic in ROTJ Biker Scout Armor/Helmet
Would videos of a costume assembly (from the ground up) really be helpful to the first time builder of a Scout costume? I am about 4 weeks away from starting a new costume build, and could video tape the entire process, but not sure if it would be overkill. -
Really, No vest tutorial out there? ACK!!! Not good for the community.
-
Does anyone know of a tutorial out there for making the black, ribbed sleeve under-vest? With the new 501st rules for 'basic' admission adding the under vest to the list , I figured there would be one out there, but I have not found it yet.
-
Help needed with KS armor
StudioCreations replied to Smiling Fox's topic in ROTJ Biker Scout Armor/Helmet
Smiling, Looking at the picts, I think you can salvage this armor kit and make it fit you right. The boot might be the hardest thing to get to attach, but it does look workable. For the chest, it looks like you only need to trim the bottom a little to get it to curve and fit more flush around your chest, not much though, just 1/2 an inch or so from the center, then taper the trimming till the original edge starts to cuve around. A few of the the original scouts had this 'flat' issue too, hence why KS sculpted his armor this way.... The back plate looks like the shoulders need to be trimmed in a bit , therefore bringing in the back plate closer to your body. I recommend having a friend of your stand behind you, hold the back plate to your back, then you take the chest plate and hold that in the proper position to your chest. Have your freind then mark the over-lapping area on the back plate shoudler area. Trim where need be. You might want to trim a little off the chest shoudlers and a little off the back shoulders, everyone is different when it comes to proper fit and finish in this area. For the boot holster, the front edge of the holster could be trimmed down a bit, and you might be able to trim a 1/2 inch off the back, and that might tighten it up enough to be able to rivet the holster to your boot. The ILM holster did not cuve around too much either, so their boot is a little mis-shapened with the hoslter attached to it. I do think the ILM blaster was a bit smaller than KS's, hence why his holster might be a tad bigger. The helmet... That 'crunch' area is the one thing that has me thinking you want to get a replacement. Message us back here on the discussion baords if you want a few more tips. We are all here to help. PAthfinders helping Pathfinders!!! -
Just read this reply. Your Cotton Webbing will ship out Tuesday.
-
Sara, I can send out 1.5 inch cotton straps if you like, free of charge. We are in process of upgrading our kits to always include the cotton straps, but just running-out the nylon stash for the next month or two. Just say GO! and they are in the mail.
-
Yeah, getting the chest and back shoulders to line up is painstaking and time-consuming. Measure... tweak... measure... tweak... measure...measure....measure... tweak... It's a slow process, but it is all worth it in the end. Keep posting progress notes. WOOHOO!
-
Those chest and back vacforms look fabulous. Trim, assemble, and post more picts!
-
WOW! Those molds look awesome! Congrats! For the chest mold, are you going to fill in the area under the pectorals? That a huge void there, and if left unfilled, the plastic will attempt to seal up under the 'bridge' making it difficult to pull the mold out of the formed plastic. Also, I am currently working on a new thermal detonator mold myself, and I noticed your thermal detonator box is a little squarish looking. You might want to sand the top 'long' edges of the thermal det more, rounding it off for a more curved look. Also, the half-cylinder area for the ribbed pipe tunnel needs to be a little taller, you'll have trouble getting the pipe to fit properly in that short hump area. But, dude you have done a fantastic job. If you wanted to vacform the parts today, you could. And we all can't wait to see the final vacformed plastic. WOOHOO!
-
Did the printed instructions come with your box? I beleive the instructions start off talking about "Plastic Preparation" (sanding down sharp corners, trim any plastic piece that's blatantly too long for your body size), then the instructions talk about "Sewing the Elastic Straps to theVelcro". Those two things should get you started down the right path in terms of assembly. Sewing the Velcro to the Elastic is generally the most tedious part of the armor assembly process and the most crucial (in terms of placing armor parts on your body for checking the fit-and-finish)
-
Marcel, The kneecaps are on the OVERHAUL list of things we are tweaking in the armor molds. It's low on the list though, Helmet, Chest, Back and Thermal Det are at the top. But this thread is about webbing... so to get back on topic, we will be supplying our kits with the 1 inch wide black elastic for the knees and the elbows. That's something we've been wanting to do for a while too.
-
Currently the 1.5 inch webbing is Nylon in the SC kit, but we do have cotton webbing on order, and should ship with kits mid February.
-
SC Armor questions
StudioCreations replied to BananoPower22's topic in ROTJ Biker Scout Armor/Helmet
Unfortunately the SC kit does not come with quite everything you need to finish out the armor. The red and black pinstripping is not included with the armor parts-list at this time, nor is the grey decal for the front chest indention. The 2 resin detail bits on the back of the Thermal Detonatopr are not included either. The cotton Webbing is nylon, but we hope to offer cotton webbing by spring. We just finished out our 300-foot roll of 1.5 inch wide nylon webbing we bought years ago, and have cotton webbing enroute now. All in all we hope to slowly rectify all these omitted items in the coming months, with a tentative deadline by May 1st to have everything included in our kit. -
Thermal detonator greeblie, new pics
StudioCreations replied to lonewolf's topic in ROTJ Biker Scout Armor/Helmet
Marcel, I would say this this screencap allows for an 80% identification, but that's just me erring on the side of caution. So much shadow in this scene.
