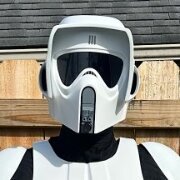
LookBehindYou Posted January 9 Share Posted January 9 Hi everyone! I’m finally going through with doing a scout trooper build. Always been my favorite so I figured I’ll finally go through with it. I am 3D printing all of the armor and helmet with Galactic Armory’s files. The soft parts from KriptonTop and I’ll be making the boots. Below is the progress so far on the helmet and armor. Is there anything that sticks out as not being approvable? I know the helmet needs to have the inlets on the back filled in for the sticker, same for above the snout. I also need to fill in layer lines on the dome and a few small areas. This is just the first coat of primer some of the pieces to see where I was at with the sanding. one thing I do question is the tank. The CRL doesn’t specify the lines being decals like the parts on the helmet. Is them being imbedded an issue? Im sure this is going to be a long journey but wanted to see if there are any “show stoppers” so far. Thanks! Quote Link to comment Share on other sites More sharing options...
Chopper Posted January 9 Share Posted January 9 Hi Chris, the CRL is considered both a visual and written guide, so the indents on the tank will need to be filled in. A few folks have recently picked up the galactic armory files and asked us about them. We are still reviewing them for 501st compliance, but we do have a few initial notes which you can read here: https://forum.501stpathfinders.com/topic/24366-doms-scout-trooper-rotj-wip/#comment-230139 https://forum.501stpathfinders.com/topic/24378-galactic-armory-stl-files/#comment-230152 1 Quote Link to comment Share on other sites More sharing options...
LookBehindYou Posted January 9 Author Share Posted January 9 2 minutes ago, Chopper said: Hi Chris, the CRL is considered both a visual and written guide, so the indents on the tank will need to be filled in. A few folks have recently picked up the galactic armory files and asked us about them. We are still reviewing them for 501st compliance, but we do have a few initial notes which you can read here: https://forum.501stpathfinders.com/topic/24366-doms-scout-trooper-rotj-wip/#comment-230139 https://forum.501stpathfinders.com/topic/24378-galactic-armory-stl-files/#comment-230152 Thanks for the quick reply Chopper! I did see that about rounding the top edge of the helmet so I’ll get that taken care of and also fill in the lines on the tank, he included both files one with the tank lines filled in. I should’ve printed that one instead. But it’ll be easier to just fill them in at this point. Hopefully that’s all that will be needed. I’m hoping the rest of the pieces look good to go (EC17, thermal detonator center piece, top of tank (which I’m currently reprinting in a different orientation to look better). Quote Link to comment Share on other sites More sharing options...
LookBehindYou Posted January 9 Author Share Posted January 9 Hopefully the pics show it but I was able to round it out a fair amount. I also rounded around the visor slightly, but not much. First pic is the before Quote Link to comment Share on other sites More sharing options...
Plugger Posted January 9 Share Posted January 9 I just start to round those corners, Glad to see there is some sanding leeway! I made 2 other mods on this helmet: Added a front piece to the front head. I was able to see inside the helmet with the visor closed! And add a piece of styren to the nose to get that smooth inside curve. And replace the original aerator model with MrPoopie model. Way more accurate. Hope it helps 1 Quote Link to comment Share on other sites More sharing options...
Plugger Posted January 9 Share Posted January 9 Ho and the back vents on the helmet need to be stickers, not 3d. Quote Link to comment Share on other sites More sharing options...
LookBehindYou Posted January 9 Author Share Posted January 9 Just now, Plugger said: Ho and the back vents on the helmet need to be stickers, not 3d. Thanks! Yep knew about that after I finished printing it. Going to fill that in as it’s a longer print and “shouldn’t” be too hard to fill in. Guessing there is still supposed to be an indent just not the vent bars, so that may be a bit trickier. Yeah I did a bit more sanding on that top after I put those updated pics. Pretty good difference so there is definitely some leeway. Do you know if the original aerator that came with is approveable? Quote Link to comment Share on other sites More sharing options...
LookBehindYou Posted January 9 Author Share Posted January 9 8 minutes ago, Plugger said: I just start to round those corners, Glad to see there is some sanding leeway! I made 2 other mods on this helmet: Added a front piece to the front head. I was able to see inside the helmet with the visor closed! And add a piece of styren to the nose to get that smooth inside curve. And replace the original aerator model with MrPoopie model. Way more accurate. Hope it helps Was the addition to the front because it didn’t line up or was there a gap? I don’t appear to have that issue on mine. It’s close and not much room for error but you can’t see in with it closed. Quote Link to comment Share on other sites More sharing options...
Plugger Posted January 9 Share Posted January 9 Yes there is an indent: I'm not sure about the aerator. I just don't take chances any more ... and used MrPoopie files, just in case. Quote Link to comment Share on other sites More sharing options...
Chopper Posted January 9 Share Posted January 9 FYI the GA aerator, depicted on the right in the earlier photo, is not accurate and should not be used. 1 Quote Link to comment Share on other sites More sharing options...
LookBehindYou Posted January 9 Author Share Posted January 9 2 hours ago, Plugger said: I just start to round those corners, Glad to see there is some sanding leeway! I made 2 other mods on this helmet: Added a front piece to the front head. I was able to see inside the helmet with the visor closed! And add a piece of styren to the nose to get that smooth inside curve. And replace the original aerator model with MrPoopie model. Way more accurate. Hope it helps Thanks! I messaged Mr poopie to see if they’ll sell/share the stls. I’m going to assume the thermal detonator, t shapes and top of tank may not be approvable either so seeing if he can provide those as well. Quote Link to comment Share on other sites More sharing options...
LookBehindYou Posted January 11 Author Share Posted January 11 I made some changes with more to come. Rounded out the top of the visor that had the hard edge, still think I can round some more. Still need to fill in above the snout for the decal as well as the line on the tank. Also replaced the snout and t greeblies with those from MrPoopie. I obviously have a lot finishing work to do but wanted to see if there any other glaring issues before I put all the work in on things that aren’t approveable. One are of concern I do have is the tank being even with the back piece at the top. Is that ok like that? On the reference photo it’s down a little bit but I’ve also seen other photos from ROTJ where it looks even. I could add a piece of styrene and to raise the top of the back if needed without reprinting a new back and tank. Thanks for all the advice and help everyone! Quote Link to comment Share on other sites More sharing options...
Retrofire Posted January 13 Share Posted January 13 Hi Chris. The tank shouldn't be even with the back armor top. Take a look at the back armor pics in the scoutopedia here: http://www.501stpathfinders.com/scoutopedia.php You'll want to nudge the tank down at least 1/2" (1.25 cm) or a bit more if possible. Remember you're going for the look. The tanks on the film scouts wasn't perfect by any means and you can see that from the photos. The other item I'm noticing from the tank photo is that the line is inscribed into the tank with the trapezoid detail inscribed as well. The tanks typically use striping tape to form that line. That shouldn't matter for basic approval but you might want to check with your GML in the Bluegrass Garrison https://bluegrassgarrison.org/ You're doing great! Keep it going! Quote Link to comment Share on other sites More sharing options...
LookBehindYou Posted January 13 Author Share Posted January 13 1 hour ago, Retrofire said: Hi Chris. The tank shouldn't be even with the back armor top. Take a look at the back armor pics in the scoutopedia here: http://www.501stpathfinders.com/scoutopedia.php You'll want to nudge the tank down at least 1/2" (1.25 cm) or a bit more if possible. Remember you're going for the look. The tanks on the film scouts wasn't perfect by any means and you can see that from the photos. The other item I'm noticing from the tank photo is that the line is inscribed into the tank with the trapezoid detail inscribed as well. The tanks typically use striping tape to form that line. That shouldn't matter for basic approval but you might want to check with your GML in the Bluegrass Garrison https://bluegrassgarrison.org/ You're doing great! Keep it going! Thanks! Moving the tank down isn’t really an option with out re printing the back and the tank from a different file, I don’t think it’d line up right. So what I plan on doing is making the the back a little hire with styrene. Or at least that’s the plan, if it doesn’t work out I’ll reprint the pieces. And yeah I’m definitely going to fill the lines in and go with decals. But I’ll do that after trying to raise the back, so if that doesn’t work I’ll just reprint it without the lines in already. Already on touch with BluegrassGarrison! Went to Joann’s today to get material for the boots and of course they’re going out of business in two days and had nothing left in the store. So I’ll order that online. On the boot tutorial there was a link chopper posted for the vinyl he used. So I’m going to order that. Have to wait a few days anyway as I got the wrong boots that had a two tone sole. Good thing I noticed before I started carving. Thanks for the help and advice! Quote Link to comment Share on other sites More sharing options...
Retrofire Posted January 14 Share Posted January 14 On 1/9/2024 at 10:11 AM, Chopper said: Hi Chris, the CRL is considered both a visual and written guide, so the indents on the tank will need to be filled in. Please review Chopper's quote. He's an expert in the ROTJ armor. It should be easy to fill in the indents using putty and sanding it smooth. Then you can apply the striping tape. This is a good time to consider what rank striping pattern you want as well. You can find a lot of that information in the CRL and as always we're here for you should need anything. You're doing a great job so keep it up! Quote Link to comment Share on other sites More sharing options...
LookBehindYou Posted January 16 Author Share Posted January 16 Making some progress. I filled in the space above the snout. Added some trim around the snout. Also raised the edge of the back so the tank wouldn’t be even. Another light coat of bondo and some sanding and I think everything will be ready for prime and paint! Also filled in the lines on the tank. One more light coat of bondo on those areas and it should be good to go! 2 Quote Link to comment Share on other sites More sharing options...
Aradun Posted January 17 Share Posted January 17 Great mods! Nice adjustment with the addition of material to raise the back armor above the tank. Things are really coming along. I see that your tank top has a recessed area for the tank topper to sit in. I’m tagging @Chopper to see if that too needs to be filled in so that the topper can be mounted to a flat top or if it’s okay as is. Quote Link to comment Share on other sites More sharing options...
Chopper Posted January 17 Share Posted January 17 If the tank topper plate is thick enough that, when mounted, it appears as if it was riveted onto the top of the tank, then the indent should be fine. If the indent makes the tank topper flush with the surface, then it would need to be filled. 1 Quote Link to comment Share on other sites More sharing options...
LookBehindYou Posted January 17 Author Share Posted January 17 11 minutes ago, Chopper said: If the tank topper plate is thick enough that, when mounted, it appears as if it was riveted onto the top of the tank, then the indent should be fine. If the indent makes the tank topper flush with the surface, then it would need to be filled. Thanks! I definitely thinks it’s good, it rises probably 3 or 4 mm above the top. Will also be adding the rivet to it as well to better the look. I’ve decided to reach for level 2 approval with everything I’m doing (won’t get it because unfortunately I ordered the suit with faux suede) but I figure if I do everything to that standard then level one should be very doable. 1 Quote Link to comment Share on other sites More sharing options...
LookBehindYou Posted January 18 Author Share Posted January 18 Little by little. Really happy with how filling in the lines of the tank and raising the back turned out. Might be ready for paint next week. One question, all the white marine vinyl I’ve found is not “bright white” to me it looks off white, but my wife says I’m crazy. I passed on the stuff from hobby lobby and Joann’s and ended up going with a link I found from I think @Chopper had posted. https://www.fabricguru.com/marine-vinyl/marine-grade-vinyl-outdoor-upholstery-fabric-white.html I think it still looks off white, but maybe that’s right and I’m over thinking it lol. This weekend I’m carving up some king show boots. Next week we hit the 50s for a couple days so hoping to get paint done! Quote Link to comment Share on other sites More sharing options...
Harbinger Posted January 18 Share Posted January 18 It will probably be fine. The scout armor (all white armor, really) is not pure white, either. Quote Link to comment Share on other sites More sharing options...
Aradun Posted January 19 Share Posted January 19 Make sure to test spray first if your gonna spray outdoors in the 50s. Most spray paints recommend a minimum temp of 65. If it’s too cold, the paint will start to dry before it hits the armor creating a very rough texture. That happened once on some amor I was working on, and the temp was in the low 60s. It created quite the mess. I needed to sand all the paint off, and wait for a little warmer temp. Quote Link to comment Share on other sites More sharing options...
LookBehindYou Posted January 19 Author Share Posted January 19 8 hours ago, Aradun said: Make sure to test spray first if your gonna spray outdoors in the 50s. Most spray paints recommend a minimum temp of 65. If it’s too cold, the paint will start to dry before it hits the armor creating a very rough texture. That happened once on some amor I was working on, and the temp was in the low 60s. It created quite the mess. I needed to sand all the paint off, and wait for a little warmer temp. Good call, I have a few failed pieces I can prime and test pain on. Along those lines are there any preferred colors/brands of spray paint? Quote Link to comment Share on other sites More sharing options...
Aradun Posted January 20 Share Posted January 20 You don’t want anything resembling off white so I’d avoid any cute funny names like blossom white, etc. You’re looking for something along the lines of an appliance white in a gloss or semi-gloss finish. Quote Link to comment Share on other sites More sharing options...
LookBehindYou Posted January 20 Author Share Posted January 20 Just now, Aradun said: You don’t want anything resembling off white so I’d avoid any cute funny names like blossom white, etc. You’re looking for something along the lines of an appliance white in a gloss or semi-gloss finish. Good deal, that’s what I figured but wanted to make sure. Thanks! Quote Link to comment Share on other sites More sharing options...

Recommended Posts
Join the conversation
You can post now and register later. If you have an account, sign in now to post with your account.