LookBehindYou Posted January 23 Author Share Posted January 23 Morning everyone! I have started wet sanding the primed pieces and did a test paint on the shoulder bells. I’m glad I did something easy to resand if needed. I discovered the clear coat gives a yellow tint! Check out the pic below. Part of me started to say it actually looked better than the straight white before the clear. You can see the difference between the two below. I wanted to see if anyone had any thoughts before I redo the one that has a tint to it. 1 Quote Link to comment Share on other sites More sharing options...
Chopper Posted January 23 Share Posted January 23 Honestly, I'm not seeing a huge difference in shade. Either should be fine. Quote Link to comment Share on other sites More sharing options...
LookBehindYou Posted January 23 Author Share Posted January 23 4 hours ago, Chopper said: Honestly, I'm not seeing a huge difference in shade. Either should be fine. Thanks! I took it out into the sunlight and it was more noticeable, I got a new clear coat doesn’t do that on another piece I tested so I’ll just redo the one shoulder piece. Quote Link to comment Share on other sites More sharing options...
LookBehindYou Posted January 29 Author Share Posted January 29 Making some great progress! Most of armor is done, just the forearms and holster left for that. Then it’s on to the greeblies, blaster and TD. Also need to get back to working on the boots. I started those but stabbed myself like three times with the xacto so took a break lol. 1 Quote Link to comment Share on other sites More sharing options...
LookBehindYou Posted January 29 Author Share Posted January 29 3 minutes ago, LookBehindYou said: Making some great progress! Most of armor is done, just the forearms and holster left for that. Then it’s on to the greeblies, blaster and TD. Also need to get back to working on the boots. I started those but stabbed myself like three times with the xacto so took a break lol. Oh I also need to repaint the front of the helmet. Had a run so just stopped. Will have to wait for it cure before I can sand it and repaint then clear. 1 Quote Link to comment Share on other sites More sharing options...
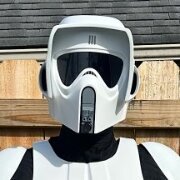
LookBehindYou Posted January 31 Author Share Posted January 31 First masking job was a success. Now just hope to repeat one more time for the snout. 3 Quote Link to comment Share on other sites More sharing options...
LookBehindYou Posted February 2 Author Share Posted February 2 All the white painting is done. Just have to add stickers to helmet, paint the snout black, and weather the blaster. Gloves from Endor Finders will be here tomorrow. Hopefully soft parts in a couple weeks from KriptonTop. Next week will be making the boots. 1 Quote Link to comment Share on other sites More sharing options...
LookBehindYou Posted February 3 Author Share Posted February 3 I went ahead and printed the holster from @MrPoopiein the event the one I did is not approvable. Fits the GA EC-17 nicely. Quote Link to comment Share on other sites More sharing options...
LookBehindYou Posted February 5 Author Share Posted February 5 Got some more done this weekend. Just threw on some black pants and shirt to test out the straps for the pieces on. Belt doesn’t have any straps yet, just slid it into place so it’s lower than it should be. Knees don’t have the second strap riveted on. Reinforced shoulder and helmet seam for the top/back with fiberglass. (DEFINITELY do that before painting, wouldn’t have been so tedious and could’ve added more. Lesson learned lol) Cut the eye piece out, not glued in yet. Did an attempt at weathering the blaster. Turned out ok for first time I think. Need to remove zippers from gloves. 2 Quote Link to comment Share on other sites More sharing options...
LookBehindYou Posted February 7 Author Share Posted February 7 Current state of affairs. All painting done! (Unless I have an oh crap how’d I miss that moment). Just need to pin stripe the rank, put a red pin stripe on the tank topper and do the helmet decals. 3 Quote Link to comment Share on other sites More sharing options...
LookBehindYou Posted February 7 Author Share Posted February 7 Also, newly learned tip. Tamiya acrylic light grey is not very light. 😳 1 Quote Link to comment Share on other sites More sharing options...
Aradun Posted February 7 Share Posted February 7 Everything looks great! Looking forward to seeing you suit up for full effect! 1 Quote Link to comment Share on other sites More sharing options...
LookBehindYou Posted February 7 Author Share Posted February 7 I’m now the proud owner of a thermal detonator! edit: And the helmet is done! 3 Quote Link to comment Share on other sites More sharing options...
LookBehindYou Posted February 8 Author Share Posted February 8 On 2/6/2024 at 8:38 PM, LookBehindYou said: Also, newly learned tip. Tamiya acrylic light grey is not very light. 😳 Thanks! It’s boot build time which I’ve been procrastinating on, but it’ll be at least two weeks before the undersuit arrives (which at this point I kind of wish I’d had made myself just for the satisfaction) Quote Link to comment Share on other sites More sharing options...
LookBehindYou Posted February 8 Author Share Posted February 8 Did another test fit, because why not lol. 4 Quote Link to comment Share on other sites More sharing options...
LookBehindYou Posted February 11 Author Share Posted February 11 Belt done and attached! Down to finishing the belt, and making the boots. Then it’s the wait for the suit which will hopefully ship this week. 4 Quote Link to comment Share on other sites More sharing options...
LookBehindYou Posted February 16 Author Share Posted February 16 Boot tread cut, staring the vinyl tomorrow! 2 Quote Link to comment Share on other sites More sharing options...
LookBehindYou Posted February 16 Author Share Posted February 16 Also did another test fit of the what I’ve done so far. A few adjustments, but not worth making til the undersuit is here. Edit: i was slightly annoyed after looking at these pics. Shortly after I took them I realized my decals I had printed for the back vents were in the mailbox (thanks @Pluggerfor the file!) 2 Quote Link to comment Share on other sites More sharing options...
Aradun Posted February 16 Share Posted February 16 Coming together nicely. Finish line in sight! 1 Quote Link to comment Share on other sites More sharing options...
LookBehindYou Posted February 23 Author Share Posted February 23 Suit is in, working on the boots then it’s off to do some sewing. The cod piece is just held in place with the belt so it’s up to high, thinking I’m going to sew the Velcro part for it to the suit so it’s positioned right. Also need to do Velcro for armor pieces and some other things, and fill the pouches for shape. But it’s looking good so far! 6 Quote Link to comment Share on other sites More sharing options...
LookBehindYou Posted February 27 Author Share Posted February 27 I got boots. Bought a sewing machine just for these lol. 4 Quote Link to comment Share on other sites More sharing options...
LookBehindYou Posted February 29 Author Share Posted February 29 I finished!! Think I’m ready to submit for approval! 2 Quote Link to comment Share on other sites More sharing options...
Chopper Posted February 29 Share Posted February 29 Nearly there, but first, check those pouches -- you've got them reversed! 1 Quote Link to comment Share on other sites More sharing options...
LookBehindYou Posted February 29 Author Share Posted February 29 1 minute ago, Chopper said: Nearly there, but first, check those pouches -- you've got them reversed! Doh!!! I took them off to iron them, and didn’t even pay attention putting them back on. That’s an easy fix!! 1 Quote Link to comment Share on other sites More sharing options...
Aradun Posted February 29 Share Posted February 29 Good luck and keep us posted! 1 Quote Link to comment Share on other sites More sharing options...

Recommended Posts
Join the conversation
You can post now and register later. If you have an account, sign in now to post with your account.