Aradun Posted October 18, 2023 Share Posted October 18, 2023 You’ll be fine with an SC kit. WTF is the one that is inaccurate. Your mark looks fine. Here’s an image from Scoutopedia for reference: 1 Quote Link to comment Share on other sites More sharing options...
Tarok Posted October 18, 2023 Author Share Posted October 18, 2023 Thanks @Aradun . Much appreciated Quote Link to comment Share on other sites More sharing options...
Chopper Posted October 18, 2023 Share Posted October 18, 2023 FYI, the WTF kit is considered inaccurate for the ROTJ Scout. The WTF armor (but not the helmet) was used for the Mando Scout on the TV show, so it's technically the screen used type for the Mando Scout. The SC armor is still fine for L2 Mando Scout applications. 2 Quote Link to comment Share on other sites More sharing options...
Chopper Posted October 18, 2023 Share Posted October 18, 2023 Here are some photos of how the Mando webbing was slotted into the drop boxes, from this thread: https://forum.501stpathfinders.com/topic/21147-sdcc-mandalorian-scout-reference/ 1 Quote Link to comment Share on other sites More sharing options...
Tarok Posted October 18, 2023 Author Share Posted October 18, 2023 Thanks @Chopper . I’d had a look at the SDCC photos as well as the CRL, which I guess is what threw me. I wasn’t sure if I should be cutting the slot at the top or bottom of the rectangle. Easier to ask than to wreck the kit Quote Link to comment Share on other sites More sharing options...
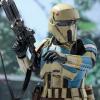
Tarok Posted October 25, 2023 Author Share Posted October 25, 2023 Helmet Painting the helmet is perhaps one of the more daunting tasks of this build. I started off by masking the visor and snout, and disassembling the helmet into its 2 main parts. Then it was pretty much the same technique as before And a fully assembled video (follow the link as I can't embed a mp4 ), featuring the 3M bolts kindly gifted by my good friend @Dragon_a. The bolts still need weathering, which I'll do during the next painting session. https://imgur.com/feliGlP 2023/10/29: Updated ear screw photo: 2 Quote Link to comment Share on other sites More sharing options...
Aradun Posted October 26, 2023 Share Posted October 26, 2023 Looking good! 1 Quote Link to comment Share on other sites More sharing options...
Tarok Posted October 28, 2023 Author Share Posted October 28, 2023 On 10/26/2023 at 11:43 PM, Aradun said: Looking good! Thanks Dennis Quote Link to comment Share on other sites More sharing options...
Tarok Posted October 28, 2023 Author Share Posted October 28, 2023 Shoulder Armour SC's shoulder armour needed nothing more that a cursory rub with a sanding pad to dull the trimmed edges. Whilst I hot glued the 25mm ribbed elastic into place, I suspect strongly I'll redo that in the future with my favoured E6000. I've elected to install snaps to connect the shoulders to the chest/back, so fitted a double-snapped snap plate to the top of each shoulder. And then only painting It was pretty much what's the standard process now, although after stippling with the sea foam, I decided to try a further round of stippling with a clean, dry brush. I was really happy with the outcome - I think this will become my new approach 👍 Quote Link to comment Share on other sites More sharing options...
FogOut Posted October 28, 2023 Share Posted October 28, 2023 Looking good.I used Velcro for all my rigging. Hot glue will not do it. Use e6000. I didn’t use any other glue except the adhesive from the Velcro. Need someArmor maintenance after 10 troop. Velcro starting to peel off but e6000 will fix it. Weathering looks good Sent from my iPhone using Tapatalk 1 Quote Link to comment Share on other sites More sharing options...
Tarok Posted October 29, 2023 Author Share Posted October 29, 2023 On 10/28/2023 at 6:31 PM, FogOut said: Looking good. I used Velcro for all my rigging. Hot glue will not do it. Use e6000. I didn’t use any other glue except the adhesive from the Velcro. Need some Armor maintenance after 10 troop. Velcro starting to peel off but e6000 will fix it. Weathering looks good Thanks Eri. I'm sure I'll be re-gluing with E6000, but I've got velcro in the chest area. Quote Link to comment Share on other sites More sharing options...
FogOut Posted October 29, 2023 Share Posted October 29, 2023 Thanks Eri. I'm sure I'll be re-gluing with E6000, but I've got velcro in the chest area. I had no problems with the chest Velcro. The ones that will be coming off are those on the knee and shoulder. Those see the most movement. Sent from my iPhone using Tapatalk 1 Quote Link to comment Share on other sites More sharing options...
Tarok Posted October 29, 2023 Author Share Posted October 29, 2023 Chest Armour And chest armour is done. Well, almost. I just have the side strapping to sort, which is a next weekend job. The chest and hip box recessed rectangles were painted (a couple of months ago) with a Rust-Oleum Granite Grey, after being thoroughly masked to avoid over-spray. Fast forward to today, and the oil paints were applied. 3 Quote Link to comment Share on other sites More sharing options...
Tarok Posted October 29, 2023 Author Share Posted October 29, 2023 Back Armour: Might as well keep at it while the weather holds I found the back somewhat tricky to put together. Mostly trying to get the tank to sit somewhat well. My first attempt involved trying to E6000 both top and bottom of the tank to the back plate. Unfortunately I had some movement at the bottom overnight, which resulted in me removing the dried glue from the end. After leaving it for a week, just to ensure that any remaining residue had dried, I CA glued the bottom of the tank into place, and ran a bead down the sides. The greeblie was CA'd into place, and riveted (3.2mm aluminium rivet, FWIW) a day or so later. And then onto painting today The greeblie red strip was painted using a Vallejo red (I forget which one). 3 Quote Link to comment Share on other sites More sharing options...
FogOut Posted November 5, 2023 Share Posted November 5, 2023 Tank to back armor mounting. Maybe you can consider magnets. Me and Psyfool use magnets to attach our tanks Sent from my iPhone using Tapatalk 1 Quote Link to comment Share on other sites More sharing options...
Chopper Posted November 5, 2023 Share Posted November 5, 2023 On 10/29/2023 at 8:42 AM, Tarok said: Back Armour: Might as well keep at it while the weather holds I found the back somewhat tricky to put together. Mostly trying to get the tank to sit somewhat well. My first attempt involved trying to E6000 both top and bottom of the tank to the back plate. Unfortunately I had some movement at the bottom overnight, which resulted in me removing the dried glue from the end. After leaving it for a week, just to ensure that any remaining residue had dried, I CA glued the bottom of the tank into place, and ran a bead down the sides. The greeblie was CA'd into place, and riveted (3.2mm aluminium rivet, FWIW) a day or so later. And then onto painting today The greeblie red strip was painted using a Vallejo red (I forget which one). You have SC armor, correct? Is there still a shelf like bump on the back, near the top of the rear armor? You should be able to run your rivet through the tank topper, through the tank, and through the bump on the back to affix the tank. Edit: Looks like your armor is from Creative Studios? Looks a whole lot like Studio Creations armor, so I'm curious if you rear armor has a bump for mounting the tank. If not, you can mount it like we used to do it on the old days, which was to mount a L shaped bracket to hold the tank in place. Check the post from 11 July 2012 in Pandatroopers scout build: 2 Quote Link to comment Share on other sites More sharing options...
Tarok Posted November 6, 2023 Author Share Posted November 6, 2023 Tank to back armor mounting. Maybe you can consider magnets. Me and Psyfool use magnets to attach our tanks Sent from my iPhone using TapatalkI think about copying your magnet idea, but then just went with gluing it if the glue fails, I’ll definitely revisit magnets Quote Link to comment Share on other sites More sharing options...
Tarok Posted November 6, 2023 Author Share Posted November 6, 2023 You have SC armor, correct? Is there still a shelf like bump on the back, near the top of the rear armor? You should be able to run your rivet through the tank topper, through the tank, and through the bump on the back to affix the tank. Edit: Looks like your armor is from Creative Studios? Looks a whole lot like Studio Creations armor, so I'm curious if you rear armor has a bump for mounting the tank. If not, you can mount it like we used to do it on the old days, which was to mount a L shaped bracket to hold the tank in place. Check the post from 11 July 2012 in Pandatroopers scout build: Yes sir, it does indeedy have the hump I used E6000 to fix the tank to the hump. Unfortunately it was at the bottom that the tank moved overnight. I only removed that glue, and CA’ed the bottom and sides of the tank. I also drilled a hole through the hump to run the rivet through the greeblie, tank and back. Quote Link to comment Share on other sites More sharing options...
FogOut Posted November 6, 2023 Share Posted November 6, 2023 I chose magnets more for ease of storage and packing for moving around. The top of the tank are held with magnets and the bottom with Velcro. 1 Quote Link to comment Share on other sites More sharing options...
Tarok Posted November 10, 2023 Author Share Posted November 10, 2023 Cummerbund, Codpiece and Pouches Moving onto soft parts and drybrushed artist oil weathering for a change of pace The photos seem to have washed out a bit, and don't represent the extent of weathering. A picture of belt hard part is included against the bund for contrast. Quote Link to comment Share on other sites More sharing options...
Tarok Posted November 10, 2023 Author Share Posted November 10, 2023 (edited) Holster The holster probably seems a bit lonely without the boots The curved bit of the holster was slotted into the holster backplate (SC provide a pre-cut slot) and then riveted into position. The 4 (3.2mm or 1/8") corner holes were drilled about 12.5mm (1/2") from the respective edges. Part was weather per above. Edit 2023/11/15: Edited November 15, 2023 by Tarok Added image of boot fitment Quote Link to comment Share on other sites More sharing options...
Tarok Posted November 10, 2023 Author Share Posted November 10, 2023 Tote Bag Using tutorials on these fine forums, I followed the tried and tested tea bag/coffee method of weathering the tote bag. I felt the weathering wasn't as dark as I hoped, despite several attempts, but I wasn't unhappy with it. Next up was a drybrushing using the trusty artist oils. 3 Quote Link to comment Share on other sites More sharing options...
Aradun Posted November 11, 2023 Share Posted November 11, 2023 Great work! Keep it up! 1 Quote Link to comment Share on other sites More sharing options...
Tarok Posted November 15, 2023 Author Share Posted November 15, 2023 Balaclava Just adding this one for completeness and OCD "It's just a balaclava. We've all seen one". Quote Link to comment Share on other sites More sharing options...
Tarok Posted November 15, 2023 Author Share Posted November 15, 2023 Neck Seal: Another one for completeness. I wear this neck seal with my ANH TK, and bought it from Darmann's props a good few years ago. It'll do though. Quote Link to comment Share on other sites More sharing options...

Recommended Posts
Join the conversation
You can post now and register later. If you have an account, sign in now to post with your account.