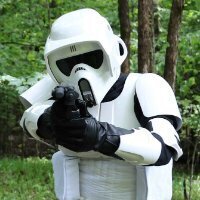
Cpt_Chops Posted July 7, 2022 Author Share Posted July 7, 2022 I got my scout completed last week - just in time for a fun weekend trip to Endor (my in-laws backyard) for some pictures! I am stoked to have it all finished! I hope it all looks correct - otherwise let me know if something should be adjusted I even got to borrow my father-in-law's MG-34 for a photo It's not part of my submission as its way too heavy to carry for more than a few minutes. However it made for a fun picture. I am currently working on submitting my photos for approval! Thanks for all the help! 3 Quote Link to comment Share on other sites More sharing options...
Aradun Posted July 7, 2022 Share Posted July 7, 2022 Thomas, you look great and you did a fantastic job with your build. Well done! I'm sure basic approval will be no problem. I don't recall if your intention is to go for Lancer or not. If you do decide to apply (and I hope you do!), consider adding an elastic band to the inside of your boot with the holster, as you have a slight boot droop due to the added weight. The band is typically attached to the inside of the boot behind the holster so that the stitching isn't visible. However, it would require you to remove the holster and reattach it. You can go that route if you're looking for a permanent solution. However, if you're looking for a simpler, semi-permanent fix, add a piece of self-adhesive loop to the inside of the boot behind the holster (no stitching required), and then sew the hook side to an elastic strap that will wrap tightly around your calf, and that will do the trick. You definitely want the self-adhesive part attached to the boot, as it will loose it's adhesiveness if attached to the undersuit when you wash it. Another quick tip for Lancer submission photos: make sure that your handler/photographer is familiar with the "ideal" look of the scout so that he/she can make adjustments to your armor as needed for each shot. You'll be surprised how much things move around on you as you're taking those photos. Take the shot, then look it over with a discerning eye, make any adjustments, and retake as needed so that your final photos are spot on. For example, looking at your front photo, your left shoulder bell is rotated back farther than your right. Catching those little details as you take your photos and correcting them, will make for one stellar Lancer app. Good luck on your initial approval! Looking forward to you're becoming an official Pathfinder! 1 Quote Link to comment Share on other sites More sharing options...
Harbinger Posted July 8, 2022 Share Posted July 8, 2022 Looking great! Wish I had a backyard that went with my TB, easy action shots! 1 Quote Link to comment Share on other sites More sharing options...
OnkelPaschulke Posted July 8, 2022 Share Posted July 8, 2022 Great pictures and build! I had to laugh about the „I just borrowed the MG34“… Gesendet von iPhone mit Tapatalk 1 1 Quote Link to comment Share on other sites More sharing options...
shashachu Posted July 28, 2022 Share Posted July 28, 2022 Have just been browsing other WIPs as I work on mine, and wow I am so impressed by the quality of your build. I would have never guessed these are 3D printed parts. What paint did you end up using for your armor? And it's mind blowing how you sewed your own gloves! This coming from someone who can only sew in a straight line about 75% of the time. Incredible work! 1 Quote Link to comment Share on other sites More sharing options...
EC-17 Holdout Blaster Posted August 13, 2022 Share Posted August 13, 2022 On 6/22/2022 at 1:04 AM, Cpt_Chops said: Alright - it's gloves time! After many pattern iterations, practice gloves, and patience, I was able to sew a pair of scout gloves! I used real Aniline leather and some suede left over from my riding patches. I tried to take pictures while I made them, so if anyone else wants to give it a whirl I would be happy to share some instructions and the pattern I made. I would love to see a walkthrough and pattern of what you made for your gloves, they are quite hard to find. 1 Quote Link to comment Share on other sites More sharing options...
Cpt_Chops Posted August 27, 2022 Author Share Posted August 27, 2022 TB-17253 reporting in for duty! Level 1 approved! Thank y'all for all the support and guidance on making my scout - I am so excited to have joined. Summary of my build: Armor and blaster: 3D printed thanks to @MrPoopie's fantastic armor files Greeblies: resin printed by a friend of mine Thermal Detonator hose: from SC Helmet: 3D printed Jesus Salmeron's excellent design Soft parts: sewn by me with a lot of forum guidance Boots: made by me (base was Kingshow 1366 work boots) Decals: Helmet decals from Jesus Salmeron and tank decals made by me - printed at home with water-slide decal paper 1 Quote Link to comment Share on other sites More sharing options...
Cpt_Chops Posted August 27, 2022 Author Share Posted August 27, 2022 On 7/7/2022 at 6:44 AM, AradunFF said: I don't recall if your intention is to go for Lancer or not. If you do decide to apply (and I hope you do!), My original hope (provided all went well) was to go for Lancer - what is the best way to proceed from here? I know of a couple of things that would likely need updating: boot droop, boot material (the material I used may be too textured). Before making changes though, I would love to have a "laundry list" of changes that need to be made before I make the commitment and start modifying my current armor. On 7/28/2022 at 10:49 AM, shashachu said: What paint did you end up using for your armor? Sorry to miss your question! For my primer coat I used Krylon 2in1 filler primer and for the white I used Krylon Gloss White. The filler primer is great stuff (even though it takes a ton of it) and I really liked the gloss white color. I had a bunch of issues with peeling when trying to seal the gloss white with a clear coat. So only some of my armor pieces have a clear coat. On 7/28/2022 at 10:49 AM, shashachu said: And it's mind blowing how you sewed your own gloves! This coming from someone who can only sew in a straight line about 75% of the time. I definitely learned a lot from making the gloves (mostly in patience) ;D Because I also cannot sew in a straight line very often! Quote Link to comment Share on other sites More sharing options...
MrPoopie Posted August 27, 2022 Share Posted August 27, 2022 Great job and dedication to the small details. You're just a stone's throw away from Lancer. 1 Quote Link to comment Share on other sites More sharing options...
Cpt_Chops Posted August 27, 2022 Author Share Posted August 27, 2022 On 8/13/2022 at 9:07 AM, EC-17 Holdout Blaster said: I would love to see a walkthrough and pattern of what you made for your gloves, they are quite hard to find. Just started a thread with a tutorial on how I made the gloves - hope it helps! 1 Quote Link to comment Share on other sites More sharing options...
Chopper Posted August 27, 2022 Share Posted August 27, 2022 35 minutes ago, Cpt_Chops said: My original hope (provided all went well) was to go for Lancer - what is the best way to proceed from here? I know of a couple of things that would likely need updating: boot droop, boot material (the material I used may be too textured). Before making changes though, I would love to have a "laundry list" of changes that need to be made before I make the commitment and start modifying my current armor. Instructions on how to apply for Level 2/ Lancer is in the link below. There's also some general guidance on common issues that have come up in the apps over time. As to specific issues that you will need to fix -- due to the time involved in a Lancer review, we don't offer "pre-reviews". The best way to find out what to fix is to apply! http://forum.501stpathfinders.com/index.php?/topic/20150-lancer-deployment-request-rev-2022/ 1 1 Quote Link to comment Share on other sites More sharing options...
Cpt_Chops Posted August 27, 2022 Author Share Posted August 27, 2022 2 minutes ago, Chopper said: Instructions on how to apply for Level 2/ Lancer is in the link below. There's also some general guidance on common issues that have come up in the apps over time. As to specific issues that you will need to fix -- due to the time involved in a Lancer review, we don't offer "pre-reviews". The best way to find out what to fix is to apply! Super - thanks! Quote Link to comment Share on other sites More sharing options...
Aradun Posted August 27, 2022 Share Posted August 27, 2022 If you want to proceed with a Lancer app, best thing to do is to grab the CRL and see what, if anything, needs to be adjusted or changed with your current set up to meet the requirements. If everything looks good, then apply using the guidelines Chopper provided. The review team will inform you of anything that may need to be addressed and then you can decide whether you want to pursue the changes or you can withdraw your app. No pressure. My advice would be to get a few troops under your belt first to see what adjustments you’ll need to make to your armor for comfort and fit in the field. Then give some thought to applying. 1 Quote Link to comment Share on other sites More sharing options...
Cpt_Chops Posted August 27, 2022 Author Share Posted August 27, 2022 My advice would be to get a few troops under your belt first to see what adjustments you’ll need to make to your armor for comfort and fit in the field. Then give some thought to applying. Great suggestion - thanks!Sent from my SM-G991U1 using Tapatalk Quote Link to comment Share on other sites More sharing options...
cdraudt17 Posted August 30, 2022 Share Posted August 30, 2022 This thread gives me hope! I'm in the process of printing everything out. Yours looks fantastic! 1 1 Quote Link to comment Share on other sites More sharing options...
Cpt_Chops Posted August 31, 2022 Author Share Posted August 31, 2022 9 hours ago, cdraudt17 said: This thread gives me hope! I'm in the process of printing everything out. Yours looks fantastic! Thanks! Good luck with yours - it's definitely a lot of work, but the result is well worth it! Quote Link to comment Share on other sites More sharing options...

Recommended Posts
Join the conversation
You can post now and register later. If you have an account, sign in now to post with your account.