MikerScout Posted June 22, 2021 Share Posted June 22, 2021 Ok... here we go. I figured the Mandalorian scout would be a good first try, I'm looking forward to the build, this has been years in the waiting. In all honesty, I'm still on the fence between mando or ROTJ. The armor is on order so there is still time to change my mind. BUILD LIST Armor - SC - (ordered 6/22/21 - Arrived 6/26/21) Helmet - SC - (ordered 6/22/21 - Arrived 6/26/21) EC-17 Blaster - 3D Printed (MrPoopie's), in assembly process (7/27/21) Gloves - Wampa - Received (years ago) Flight Suit - amazon - (ordered 6/23/21 - Arrived 7/1/21) Cummerbun - Home sewn - Complete - 7/27/21 Cod - Home sewn - Complete - 7/27/21 Boots - Home built - Complete Neck Seal - Trooperbay - (ordered 6/27/21 - Arrived 7/7/21) Tote Bag - Brodustrial Light and Magic - (ordered 6/29/21 Arrived 7/3/21) Quote Link to comment Share on other sites More sharing options...
BikerScout007 Posted June 22, 2021 Share Posted June 22, 2021 Just remember for the Mando Scout you need a TIE fighter pilot undersuit, which differs from the suit used by the ROTJ Scout. @StephTrooper specializes in Mando Scout soft goods, and she was the one that made them for the TV show. 1 Quote Link to comment Share on other sites More sharing options...
MikerScout Posted June 22, 2021 Author Share Posted June 22, 2021 Thanks @BikerScout007! 1 Quote Link to comment Share on other sites More sharing options...
MikerScout Posted June 26, 2021 Author Share Posted June 26, 2021 Can someone please move this to the Mandalorian section? Quote Link to comment Share on other sites More sharing options...
Retrofire Posted June 26, 2021 Share Posted June 26, 2021 Done. Let me know if you have any issues. 1 Quote Link to comment Share on other sites More sharing options...
MikerScout Posted June 26, 2021 Author Share Posted June 26, 2021 Its begun Sent from my SM-G960U using Tapatalk 1 Quote Link to comment Share on other sites More sharing options...
MikerScout Posted June 27, 2021 Author Share Posted June 27, 2021 Oooh yeah! It's a crappy picture below, sorry. Same boot though! Sent from my SM-G960U using Tapatalk Quote Link to comment Share on other sites More sharing options...
MikerScout Posted June 29, 2021 Author Share Posted June 29, 2021 Got to work on the TD, almost done with that. I need a new pop rivet gun though, this one failedSent from my SM-G960U using Tapatalk Quote Link to comment Share on other sites More sharing options...
MikerScout Posted June 29, 2021 Author Share Posted June 29, 2021 Interesting color comparison i did on a spare chin piece. The whitest white is raw ABS followed by X2 white primer and X2 gloss white and then X2 "smoke gray". I think its close enough to use on the helmet alone without spraying all the armor. I am hoping the gray works for the snout and accentsSent from my SM-G960U using Tapatalk Quote Link to comment Share on other sites More sharing options...
Chopper Posted June 29, 2021 Share Posted June 29, 2021 If you're doing a Mando build then the red brown weathering will likely cover any discernable color differences. 1 Quote Link to comment Share on other sites More sharing options...
MikerScout Posted June 29, 2021 Author Share Posted June 29, 2021 If you're doing a Mando build then the red brown weathering will likely cover any discernable color differences.Oh true! I didn't even think of that.Sent from my SM-G960U using Tapatalk Quote Link to comment Share on other sites More sharing options...
MikerScout Posted July 2, 2021 Author Share Posted July 2, 2021 Doooods! I'm having so much fun with this. Made some progress today. Belt and drop boxes are roughed in and slots cut. Tie fighter flight suit came in today, fits great. I test fit the tank to the back armor, trimmed a bit and glued the tank topper on. The TD is done and ready for weathering. On the flight suit... There is an ID holder on the left arm mostly covered by the glove and arm armor. I imagine this needs to be there? It bunches up and is fairly cumbersome with the glove. If it needs to stay for CRL or possible level 2 I'll leave it but probably sew it down so it doesn't bunch everything up. Also, is it true we do our best work once the sun goes down? I'm thinking that's the case. Sent from my SM-G960U using Tapatalk Quote Link to comment Share on other sites More sharing options...
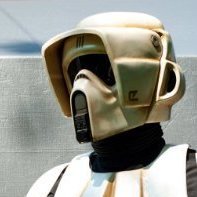
MikerScout Posted July 3, 2021 Author Share Posted July 3, 2021 Did some helmet work today.... man so scary!! I tried to follow the lines@equuspolo used on his SC helmet on mine. I cut also all the slots for the webbing and elastic then washed everything with hot soap and water so the sticky velcro has a fighting chance.Sent from my SM-G960U using Tapatalk Quote Link to comment Share on other sites More sharing options...
Aradun Posted July 4, 2021 Share Posted July 4, 2021 Dude you’re doing a fantastic job on this! Keep it up. Quote Link to comment Share on other sites More sharing options...
MikerScout Posted July 4, 2021 Author Share Posted July 4, 2021 Dude you’re doing a fantastic job on this! Keep it up. Thank! I'm having a ton of fun! Piecing together the helmet is a bit stressful but so far so goodSent from my SM-G960U using Tapatalk 1 Quote Link to comment Share on other sites More sharing options...
MikerScout Posted July 4, 2021 Author Share Posted July 4, 2021 Gluing and screwing. The seam on the helmet is going to be filled and faired with bondo, so I punched a couple holes with the pin vise and screwed the lit cap in place. Ill pull the screws, sand, prime and bondo. The face piece is finicky, I let stuff over sized so I can trim to fit. Still waiting to hear back about the gray bolts so the bucket might be on hold after I get things rough fit.Sent from my SM-G960U using Tapatalk Quote Link to comment Share on other sites More sharing options...
MikerScout Posted July 4, 2021 Author Share Posted July 4, 2021 Test fit for symmetry before I start bondo. I also need to research how to properly mount the 3M head band and flip up face piece. Im guessing wood screws are not the right way lol. What do you think? @Chopper@BikerScout007 Sent from my SM-G960U using Tapatalk Quote Link to comment Share on other sites More sharing options...
BikerScout007 Posted July 5, 2021 Share Posted July 5, 2021 I think it looks good. A Scout helmet is never going to be perfectly symmetrical -- they certainly weren't in the movie! The goal is to be close enough and I think you're there. 1 Quote Link to comment Share on other sites More sharing options...
Chopper Posted July 5, 2021 Share Posted July 5, 2021 I do have one comment about the top of your visor? It looks like it's jammed right up against the top of the helmet? Are you able to open it all the way without scraping? The original ROTJ scouts had the 3M head band riveted to the helmet. The rivets went through the "wings" on the sides of the band and through the left and right sides of the helmet, underneath where the visor comes down, so you can't see the rivet heads from the outside. Quote Link to comment Share on other sites More sharing options...
MikerScout Posted July 5, 2021 Author Share Posted July 5, 2021 @Chopper It is jammed in there pretty good but it does not scrape. When I get my bolt kit I'll either move it forward a tad or clearance some of the ABS away. I left a bit of ABS behind just incase. I'll see how the sides look with the proper bolts, I don't want that gap too big. In the end, I'll carry the gap that is on the left all the way around so it looks uniform. Ahhh ok.. thanks for the info about the band, that gives me something to go on. I'll do some more searching here on the forums too. Great feedback buddy, thank you!! Quote Link to comment Share on other sites More sharing options...
Chopper Posted July 5, 2021 Share Posted July 5, 2021 If you can, you might want to see if it's possible to carefully trim away some of the material from the top of the visor. Quote Link to comment Share on other sites More sharing options...
MikerScout Posted July 5, 2021 Author Share Posted July 5, 2021 Thats what I was thinking too. There is plenty of meat there for the dremmelSent from my SM-G960U using Tapatalk Quote Link to comment Share on other sites More sharing options...
MikerScout Posted July 5, 2021 Author Share Posted July 5, 2021 Last coat of filler. Making the gap on the visor. Debating on attaching the visor with rivets and a rubber washer like in the kropsirkl (sp), or using the 3M bits... maybe with a thin rubber washer for tension....Sent from my SM-G960U using Tapatalk Quote Link to comment Share on other sites More sharing options...
Retrofire Posted July 5, 2021 Share Posted July 5, 2021 The filler at the back is starting to look good. Nice work there! I’d go with the 3M bits for the helmet. That will give you much more allowance for adjusting once you get it all together. Here’s a list to help you find them. Fibre-Metal by Honeywell FM4001 Quick-Lok Helmet Adapter Kit (these bolts are identical to the 3M Speedglas bolts and they are available in the correct shade of gray) https://www.amazon.com/Fibre-Metal-Honeywell-FM4001-Quick-Lok-Adapter/dp/B002BUMS8Y/ref=psdc_7491811011_t1_B015MG1SMK?fbclid=IwAR0A2QyyDYSMHR5Sh64p7_d1JGEe8DjJNHuuVtbOzABbufXA3Mah_jJiTSM With the headband kit: https://headgear.weldinghelmet.biz/fibre-metal-hard-hat-3rc-headgear-replacement-suspension.html?fbclid=IwAR1UQJ0mxXKuyng07EUXrtGDST5Gf7ltES7QRfQvAeh1QcfG3HUV0DBbqwI Accurate TB Helmet Hardware kit & Headband kit http://forum.501stpathfinders.com/index.php?/topic/10270-fs-accurate-tb-helmet-hardware-kit-headband-kit/ 1 Quote Link to comment Share on other sites More sharing options...
MikerScout Posted July 5, 2021 Author Share Posted July 5, 2021 Haha, I just ordered those bolts last night. I got the headband a week or so ago but it didn't come with the hardware as advertised.Sent from my SM-G960U using Tapatalk Quote Link to comment Share on other sites More sharing options...

Recommended Posts
Join the conversation
You can post now and register later. If you have an account, sign in now to post with your account.