THUNDERCAT Posted September 18, 2017 Author Share Posted September 18, 2017 Hey Ferra Desert 95 BDU thanks for checking on my progress, all the pockets have been removed from both pants and shirt, I am getting a friend to make the pockets on the pants with the excess material. Then I will start the dying process I still need to buy Rit Colour stay. Boots Thanks for the heads up I will keep looking around, I just noticed the zipper it would be visible even with the armor on looks like, Thanks for the advice :-) Quote Link to comment Share on other sites More sharing options...
THUNDERCAT Posted September 18, 2017 Author Share Posted September 18, 2017 Dying Tips Once my pc leg pouches and completed I am going to use the following products 2 Packets of Rit Dark Brown and a touch of Rit Black Both dying processes will be immediately followed up with Rit Color Stay for Dying tips and tutorials Check out Rit Dye on Youtube 2 Quote Link to comment Share on other sites More sharing options...
Grumpy Posted September 19, 2017 Share Posted September 19, 2017 The main body of the boots are tan or khaki colored. The soles are tan. Do not go by the picture in the CRL. At one point, the body of the boot "was" white. But, with the whining of some members (Who for some reason no longer have their Kashyyyk Trooper after all of the bitching they did...) declaring that the boots were tan, instead of white and a wee bit dirty, with some Kashyyyk sand on them...they are now TAN. (And have been that way for quite a few years now.) The CRL picture needs to be updated. So, if you find boots that are already tan...not much work to do to them, except some sole modifications. Quote Link to comment Share on other sites More sharing options...
THUNDERCAT Posted September 19, 2017 Author Share Posted September 19, 2017 Oh kool Grumpy That will help heaps make things a little easier I was actually getting excited dying boots to get them white ok so tan. Quote Link to comment Share on other sites More sharing options...
THUNDERCAT Posted September 20, 2017 Author Share Posted September 20, 2017 Back Tank - Greebie Ok so I began tackling one part of the armor I've been avoiding but with some research and trial and error, I found methods to more or less measure the area to cut. I created a template in which to give a guide. Traced the outline of the object onto the tank more or less where it needs to sit. [/url] Decided to use a hot knife to make the cutting easier Still, need to buy E6000 glue lol I think I am going to need to allot maybe. Quote Link to comment Share on other sites More sharing options...
THUNDERCAT Posted September 20, 2017 Author Share Posted September 20, 2017 Tank Size - cutting These three pics are not mine I saved them a while ago while conducting research on how to measure and cut the tank, so far they look like a great guide to start off with I tried finding the original thread on Bikerscout.net but with Photobucket third-party sharing disabled I can't find the original lucky I saved them. Quote Link to comment Share on other sites More sharing options...
THUNDERCAT Posted September 20, 2017 Author Share Posted September 20, 2017 Paint Test I probably won't use this paint but... having said that I think the colors came out pretty good. Quote Link to comment Share on other sites More sharing options...
Bally Posted September 20, 2017 Share Posted September 20, 2017 The main body of the boots are tan or khaki colored. The soles are tan. Do not go by the picture in the CRL. At one point, the body of the boot "was" white. But, with the whining of some members (Who for some reason no longer have their Kashyyyk Trooper after all of the bitching they did...) declaring that the boots were tan, instead of white and a wee bit dirty, with some Kashyyyk sand on them...they are now TAN. (And have been that way for quite a few years now.) The CRL picture needs to be updated. So, if you find boots that are already tan...not much work to do to them, except some sole modifications. Oh man are you f'ing kidding me. I've just spent 6 months modding the sole of a set of boots to get them as perfect as possible and and have started painting them white, to avoid the inevitable "it doesn't look like the CRL" feedback on review.... Any chance of getting the cummerbund changed to "grey or khaki" too while we're at it? FFS... /endthreadhijack Hot knife looks like a great idea for all general armour trimming. Does it work well or create a molten mess? Also what colours are you looking at? I came out of Bunnings with a fistful of swatches and after culling them down to the ones that matched best, funnily enough ended up with two that had 'olive' and 'earth brown' in their names. I know everyone goes for spray paints but I'm wondering if standard interior/exterior paint is workable if you're going to use a sponge and clear coat over it anyway. Quote Link to comment Share on other sites More sharing options...
THUNDERCAT Posted September 20, 2017 Author Share Posted September 20, 2017 The hot knife works well but for me, it took practice I would personally only use it for straight cuts and curves and your cutting speed needs to be consistent and not to stop otherwise the plastic will cut through like butter and the plastic might blog up if you stop overall I am happy with the outcome. Colors I chose the following Humbrol paint (but I might be going with the same color another Kashyyyk in my garrison has. Another Kashyyyk in my Knightfall has the following colors: The 3 colours I found to match the required Kashyyk Scout Trooper scheme were: Dulux Bunker - brown... shade P12B9 Dulux Bracken Green - dark green... shade P22B7 Dulux White Cabbage - light green for the base colour... shade P19C3 it may be worthwhile for you to make an account to view his build thread to get some ideas. https://forum.501tag.com/thread-5838.html?highlight=kashyyyk Quote Link to comment Share on other sites More sharing options...
Bally Posted September 20, 2017 Share Posted September 20, 2017 Thanks, I have an account on TAG and have seen Fish's build. Funny I didn't have those in the ones I collected. My final colours were Dulux Green Olive and Brown Earth. I couldn't find anything that matched perfectly for the base coat but Wattyl Serengetti looks OK from what I can see. Not a great photo (olive looks greener irl) but you get the idea. PM me your email and I'll send you a document I made with my paint research... too big to attached here. Quote Link to comment Share on other sites More sharing options...
ferra Posted September 20, 2017 Share Posted September 20, 2017 I liked krylon camo colors, just wasn´t happy with the green, so i used another more "wine bottle toned" then with the satin varnish it darkened a little.... Quote Link to comment Share on other sites More sharing options...
Grumpy Posted September 21, 2017 Share Posted September 21, 2017 SAC, the wording in the CRL for the boot is correct. The boot shown in the picture is not. It was one of the previous Kashyyyk Armourers. (Only a few of the Kashyyyk pictures, used in the CRL, are of my son's Kashyyyk.) At the time of the "fix," the wording was changed, but not the picture. The body of the boot is tan or khaki, the sole is also tan or khaki. And, sorry, but the cummerbund is still grey, but "weathered." Quote Link to comment Share on other sites More sharing options...
Bally Posted September 22, 2017 Share Posted September 22, 2017 SAC, the wording in the CRL for the boot is correct. The boot shown in the picture is not. It was one of the previous Kashyyyk Armourers. (Only a few of the Kashyyyk pictures, used in the CRL, are of my son's Kashyyyk.) At the time of the "fix," the wording was changed, but not the picture. The body of the boot is tan or khaki, the sole is also tan or khaki. And, sorry, but the cummerbund is still grey, but "weathered." No worries mate. Just venting a bit. Love your work. 1 Quote Link to comment Share on other sites More sharing options...
ferra Posted September 25, 2017 Share Posted September 25, 2017 Still trying to get some time to get the pics up fr the boots, should I take the picture with the armor plates or without? Quote Link to comment Share on other sites More sharing options...
Bally Posted September 26, 2017 Share Posted September 26, 2017 Still trying to get some time to get the pics up fr the boots, should I take the picture with the armor plates or without? I'd say without. To add to the colour discussion these are some of the examples I've found (first picture not mine): CRL states: Krylon khaki tan Panzer olive green or equiv Flat earth brown Although it probably just adds more questions... I don't like any of the Rustoleum coulours at all. In my research I also found there is a large range of "Panzer Olive" in the modelling community. I'll drop by Bunnings on the way home today to try and find the samples of your colours to compare to what I ended up with... like we NEED an excuse to go to Bunnings... Quote Link to comment Share on other sites More sharing options...
THUNDERCAT Posted September 30, 2017 Author Share Posted September 30, 2017 really tough choices are there any other Kashyyyks in your garrison maybe copying their colour scheme? I might copy fishers Quote Link to comment Share on other sites More sharing options...
THUNDERCAT Posted September 30, 2017 Author Share Posted September 30, 2017 Shins Started talking the shin and thigh armour pieces. did anyone have issues with sliding their foot through the shin pieces the arch of my foot doesn't go through :-( I used painters tape as a guide for a straight line I made a mistake on one front shin piece but ill find a way to fix it I had to apply some heat with a heat gun to mould it into shape ill need more Earth magnets to keep all the seems in line and then apply more heat. Quote Link to comment Share on other sites More sharing options...
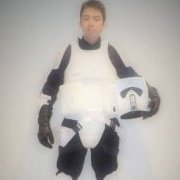
THUNDERCAT Posted October 3, 2017 Author Share Posted October 3, 2017 Shin Thigh Armour Test Fit I decided to put on the army pants for the Kashyyyk (undyed, however) and see how it looks I had to use a heat gun to mould the thigh piece of armour but I had to stop because I need more earth magnets to help keep the shape consistent with both pieces of armour ill explain in more detail when I get more Earth Magnets. The armour piece is also a bit too long for my legs they will have to be shortened to make room for the knee armour pieces. Quote Link to comment Share on other sites More sharing options...
Bally Posted October 3, 2017 Share Posted October 3, 2017 Nice mate. I'm assuming you're looking at using 25mm wide slots for the webbing. What spacing are you thinking overall for the straps? Quote Link to comment Share on other sites More sharing options...
ferra Posted October 7, 2017 Share Posted October 7, 2017 I would make the legs a little shorter to get more room for the knees. To get the best results in making the legs seamless and also strong I used fiber glass putty, then car putty/bondo to get the smoother... https://www.dropbox.com/sh/4lw2c1jv4tvlql0/AABrIg--y4Qrwp3PGEMw7deUa?dl=0 Quote Link to comment Share on other sites More sharing options...
THUNDERCAT Posted October 9, 2017 Author Share Posted October 9, 2017 Nice mate. I'm assuming you're looking at using 25mm wide slots for the webbing. What spacing are you thinking overall for the straps? Hey I am not at that part just yet still on the shin and thigh armour pieces, but with spacing with the two straps I was going judge it from a couple of the kashyyyk troopers and the cartoon pics Quote Link to comment Share on other sites More sharing options...
THUNDERCAT Posted October 9, 2017 Author Share Posted October 9, 2017 I would make the legs a little shorter to get more room for the knees. To get the best results in making the legs seamless and also strong I used fiber glass putty, then car putty/bondo to get the smoother... https://www.dropbox....PGEMw7deUa?dl=0 Thaks for that yer I made a mistake on one of the shin pieces I didn't cut it straight so there is a gap on the bottom front corners of the shin armour, excellent ill look up fibreglass putty thanks 1 Quote Link to comment Share on other sites More sharing options...
THUNDERCAT Posted October 11, 2017 Author Share Posted October 11, 2017 Boots Still undecided but below is one boot I am leaning towards not too expensive and they already look like they have similar patterns not the same though but pretty close. [u Quote Link to comment Share on other sites More sharing options...
comm tech Posted October 14, 2017 Share Posted October 14, 2017 THese are are exactly the boots we are using. Just use a dremil tool and notch all of the cut outs in the sole and dremel the arch will look great. And a slight dusting of white paint 1 Quote Link to comment Share on other sites More sharing options...
Bally Posted October 14, 2017 Share Posted October 14, 2017 THese are are exactly the boots we are using. Just use a dremil tool and notch all of the cut outs in the sole and dremel the arch will look great. And a slight dusting of white paint CRL says for the boots: "Main body of boot is beige coloured - similar to Beige Desert Military Boots" The photo is wrong apparently... as I've recently found out a little too late. So I wouldn't bother with the white paint. Quote Link to comment Share on other sites More sharing options...

Recommended Posts
Join the conversation
You can post now and register later. If you have an account, sign in now to post with your account.