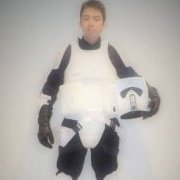
THUNDERCAT Posted August 31, 2016 Share Posted August 31, 2016 Ok so I have had this kit for a while after completing my Bikerscout it was long over due to start work on this Kashyyyk. Started to Cut and sand some parts. Just a quick test fit, not sure how to tackle this problem just yet its a litte dat big for my tiny feet. 1 Quote Link to comment Share on other sites More sharing options...
ferra Posted August 31, 2016 Share Posted August 31, 2016 Here´s my build: http://forum.bikerscout.net/index.php?showtopic=13749&st=0 On the first page you can see foot plates already cut, but later I revised the way they were cut and also trimmed them down to a smaller size, hope it helps... 2 Quote Link to comment Share on other sites More sharing options...
HAVOC28 Posted August 31, 2016 Share Posted August 31, 2016 I will be following this with great interest. 1 Quote Link to comment Share on other sites More sharing options...
THUNDERCAT Posted September 8, 2016 Author Share Posted September 8, 2016 Hey guys here's a couple of updates so far. Helmet So I have cut out the eye sockets and the side vents my next step is going to be cutting out a rectangle incision on the visor as stated on the CRL. Hard Armor Ok so these are the parts I have completed I still need to go back and fix the front breast plate armor piece has a little crap. Armor to be completed. This is going to be tricky the back tank piece needs to be trimmed its way to big the the shins, curve pieces also need to be trimmed, this is going to be tough as I don't know how to cut in a straight line lol so the shin and curve piece meet. Quote Link to comment Share on other sites More sharing options...
THUNDERCAT Posted September 8, 2016 Author Share Posted September 8, 2016 Here´s my build: http://forum.bikersc...opic=13749&st=0 On the first page you can see foot plates already cut, but later I revised the way they were cut and also trimmed them down to a smaller size, hope it helps... Thanks for that :-) ill definitely check it out Quote Link to comment Share on other sites More sharing options...
THUNDERCAT Posted September 8, 2016 Author Share Posted September 8, 2016 I will be following this with great interest. Thanks HAVOC :-) Quote Link to comment Share on other sites More sharing options...
THUNDERCAT Posted September 11, 2016 Author Share Posted September 11, 2016 Camo Color Research. Ok so I have been speaking to 501st approved Kashyyyks and armorers on Bikerscout.net. Krylon seems to be the popular brand of choice for the camo painting. Ok so the CRL states: Krylon khaki tan for the base coat. Panzer Olive green or equivalent. Flat Earth brown. So I have made an order for the Krylon Khaki based coat. and I have ordered the Brown and Black I still need to find a flat or matte color that looks like Panzer Olive green still searching. Kashyyyk Trooper Gloves - Update I have almost got all the parts to commence working on the Kashyyyk gloves Grey Vinyl Fake Brown leather (extremely hard to find for some reason) Greebies came with the kit Gloves (on there way and how I found these I searched for winter motorcycle gloves in Australia) Gloves below are similar to the owns I purchased. Glove making tutorial I found this video on Fish's post and on Bikerscout.net great video to show how to make the gauntlets. 1 Quote Link to comment Share on other sites More sharing options...
Grumpy Posted September 12, 2016 Share Posted September 12, 2016 Those gloves are exactly the style I used for the gloves I made. Good choice! 2 Quote Link to comment Share on other sites More sharing options...
THUNDERCAT Posted September 13, 2016 Author Share Posted September 13, 2016 Thanks Matt, It took allot of digging on the internet to find them lol but I was determined I eventually found that pic of the gloves and posted into google image came up with a few result 1 Quote Link to comment Share on other sites More sharing options...
THUNDERCAT Posted September 13, 2016 Author Share Posted September 13, 2016 Camouflage paint update. I have put together a chart listed below I think I am going to go with those colours. Thanks heaps Matt for your advice 2 Quote Link to comment Share on other sites More sharing options...
bselphfsu282 Posted September 13, 2016 Share Posted September 13, 2016 Looking good man! You'll be along soon. I have a pair of Matt's gloves and they are awesome! Can go wrong with your choice. 1 Quote Link to comment Share on other sites More sharing options...
THUNDERCAT Posted September 14, 2016 Author Share Posted September 14, 2016 Gloves came in the mail today very nice ans snag Quote Link to comment Share on other sites More sharing options...
THUNDERCAT Posted September 14, 2016 Author Share Posted September 14, 2016 Helmet Update. Completed the rectangle cut on the visor today. Not sure yet how to cut the helmet in two pieces, not sure where to cut :-( Quote Link to comment Share on other sites More sharing options...
Bally Posted September 14, 2016 Share Posted September 14, 2016 Gloves came in the mail today very nice ans snag I assume the plan is to cut the strap off and the zip will be covered by the gauntlets. Is that right? Quote Link to comment Share on other sites More sharing options...
THUNDERCAT Posted September 14, 2016 Author Share Posted September 14, 2016 Hey Sac, I am not entirely sure yet but what I am thinking, I am going to unpick the strap it has stitching I can get to. I made a template for the grey vinyl sections Ill take a photo soon so you can have a look, the zip part I am not entirely sure I could cut that part and sew the brown leather gauntlet to it, I am going to ask Matt (Grumpy) before I make a move since his made plenty of glove in the pas lol, Still doing research Ill post some progress shots hopefully soon Quote Link to comment Share on other sites More sharing options...
Grumpy Posted September 14, 2016 Share Posted September 14, 2016 If they are the same style of gloves, you can take the stitching out of the strap and remove the other part of the Velcro, too. For the zippered pouch (With the mitten) Take a seam ripper and carefully remove the zipper. Then you can sew that opening shut. You can cover the former-zipper opening with the grey wrist strap. It just goes in the right spot. At the end of the actual black glove, you can sew the brown gauntlet to that. Or cut a small bit of the black off, if it's too long. (This does involve opening the bottom side seam and turning the glove inside out.) It's easier to sew the grey knuckle pad and larger grey pad to the top of the hand. And then the wrist strap and the gauntlet. Whew! (Just some of the reasons I don't sew them anymore.) I've killed MANY sewing machine needles in my days... The arrow in the picture below points to the zipper, that can be removed. (The gloves at the top right were not made by me. They came with my Kashyyyk armor waaaaaay back in 2009...) In some of the earlier sets of gloves that I made, I used craft foam strips for the knuckle pads and wrist strap. I glued them on with E-6000. My wife's gloves are over 5 years old and the glue still holds. After a couple of years, I changed my whole glove-making process and began to take the gloves apart and sew in grey vinyl (leather-like) pieces of material for the knuckle pads and wrist strap. (Time consuming...) In the below picture, I have my all black gloves for my White Kashyyyk, and my son's regular Kashyyyk gloves. On his, I still have the zipper, but I put the gauntlet over top of it, to hide it. On the all black gloves, I believe I removed the zipper and sewed the wrist strap over the location where the zipper used to be. (At least I think) I haven't made a pair of gloves in well over a year...almost two. I got burnt out on it...and did I mention all of the broken needles...sheesh! The length of the black part of the glove, near the wrist, and the length of the brown gauntlet is determined by the length of the wearer's forearm. The whole thing should go up most of the forearm, but not too close to the elbow, because you still have the elbow armor right there. Here's a picture comparing the first style of gloves with the foam pieces...(On the right) to the second style of gloves that I made, with the fabric pieces...knuckle pads, wrist strap.... (On the left) Cheers! 1 Quote Link to comment Share on other sites More sharing options...
Bally Posted September 15, 2016 Share Posted September 15, 2016 Thanks, that's exactly what I was getting at about the strap and the zip. 1 Quote Link to comment Share on other sites More sharing options...
THUNDERCAT Posted September 11, 2017 Author Share Posted September 11, 2017 Great all the photos are down thanks, photobucket and Yes thank you Flickr :-) Helmet I have done most of the sanding and trimming for the bucket but.. I have no idea how to connect the visor the main body? e6000 glue? drill it in? Helmet side bolts ? not sure how to install these.. Quote Link to comment Share on other sites More sharing options...
THUNDERCAT Posted September 12, 2017 Author Share Posted September 12, 2017 Ok so we are going to Glue the visor with E6000 Glue first then after the complete paint job is done we will paint and glue the bolts on might get some black plug holes to make this simpler. Local Victorian supplier might drive there on the weekend. https://www.houseofadorn.com/glue-e6000-industrial-strength-adhesive-range Quote Link to comment Share on other sites More sharing options...
THUNDERCAT Posted September 12, 2017 Author Share Posted September 12, 2017 This British DDPM (Desert Disruptive Pattern Material) Shirt and Trousers pattern 95- Purchased It was difficult to locate a local supplier but I did manage to find a New Zealand supplier https://www.armyandoutdoors.co.nz/ Quote Link to comment Share on other sites More sharing options...
THUNDERCAT Posted September 12, 2017 Author Share Posted September 12, 2017 Gloves Gloves and other material purchased and almost ready to go I am getting some assistance from fellow cosplayers with the gloves. Quote Link to comment Share on other sites More sharing options...
THUNDERCAT Posted September 14, 2017 Author Share Posted September 14, 2017 (edited) Bondo and Sanding the Bucket Sanding down Shoulder, Bicep and forearm pieces Edited September 14, 2017 by THUNDERCAT Quote Link to comment Share on other sites More sharing options...
THUNDERCAT Posted September 18, 2017 Author Share Posted September 18, 2017 Helmet Completed Finally, the helmet has been completed I decided to rivet the sides in to hold them in place some Kashyyyks bolted the sides in with screws but personally, that was too much the screws went deep inside the headspace of the helmet. Quote Link to comment Share on other sites More sharing options...
THUNDERCAT Posted September 18, 2017 Author Share Posted September 18, 2017 Undersuit - British Desert 95 Style BDU It's becoming increasingly difficult to find a pair of these since they are no longer in production I was very fortunate to find a pair from a New Zealand site [/url] Undersuit Dying The Kashyyyks say to use dark brown and with a little black. I have decided to use Rit dye I bought two packets of dark brown and one packet of black with you can find and lincraft or spotlight below is a video tutorial on how to dye with Rit all-purpose liquids I will keep you posted shortly Oh! and also realised I may use this technique with the boots to dye white. Dying Boots White Below are some boots I find that might just do the trick. Dying Shoes - Tutorial I will most likely use Rit Colour remover first on the boots then follow the dying process to make them white. Quote Link to comment Share on other sites More sharing options...
ferra Posted September 18, 2017 Share Posted September 18, 2017 Hey! Don´t buy the versions with the side zippers! Just keep looking and you will find some god boots to work on online! Before dying the camo have you made the necessary changes to it? The velcro, removing the buttons and pouches and also making the new pouches in the legs? Quote Link to comment Share on other sites More sharing options...

Recommended Posts
Join the conversation
You can post now and register later. If you have an account, sign in now to post with your account.