

LookBehindYou
-
Posts
62 -
Joined
-
Last visited
-
Days Won
1
Everything posted by LookBehindYou
-
I’m using the Galactic Armory files (have a WIP here as well). Looking through my emails it appears he updated his files on 12/28/23 to include the rectangular detail. @MrMike when did you order your kit? I’d assume if they’re printing his stuff they’d get the updates to the files as well. As far as modifying it to make the indentation it may be possible. It depends how thick that band is and if you’re going straight through it or not. On mine you don’t see the indentation on the back which means it’s thick enough. Would probably require some detailed bondo work or some styrene. I think it’s possible but a matter of how much time and effort your wanting to invest with the string possibility that it just won’t work no matter what.
-
We’re definitely running side by side in this one! Yours is looking superb! I’ve got to start on the boots this week and maybe the belt. After that I’m waiting on my undersuit. I had one made though I do kind regret that I won’t have the satisfaction of making that myself.
-
Also, newly learned tip. Tamiya acrylic light grey is not very light. 😳
-
Current state of affairs. All painting done! (Unless I have an oh crap how’d I miss that moment). Just need to pin stripe the rank, put a red pin stripe on the tank topper and do the helmet decals.
-
Galactic Armory 3D ROTJ Scout Model Assessment
LookBehindYou replied to MrPoopie's topic in ROTJ Biker Scout Armor/Helmet
You may want to wait for more reputable info but my understanding is the there has to be some area between top of tank and top of back. I added some plastic to the top of my back to address. As far as the pins/holes I think that’s up to you whether you use them or not. But either way the rivets (both top with visible washer and bottom) and elastic straps have to be seen whether actually functional or not. heres some pics of my back and tank. Haven’t added the rivets any strap yet… -
Sorry to hear about your job. That’s a big time bummer and hope you find something even better! Your armor and helmet look incredible from my novice eyes!!!
-
Got some more done this weekend. Just threw on some black pants and shirt to test out the straps for the pieces on. Belt doesn’t have any straps yet, just slid it into place so it’s lower than it should be. Knees don’t have the second strap riveted on. Reinforced shoulder and helmet seam for the top/back with fiberglass. (DEFINITELY do that before painting, wouldn’t have been so tedious and could’ve added more. Lesson learned lol) Cut the eye piece out, not glued in yet. Did an attempt at weathering the blaster. Turned out ok for first time I think. Need to remove zippers from gloves.
-
Galactic Armory 3D ROTJ Scout Model Assessment
LookBehindYou replied to MrPoopie's topic in ROTJ Biker Scout Armor/Helmet
So first part. There is no indentation, it was “covered” up. See photos below. After looking at more photos, should I do the opposite and remove the part that covered the indent and sand down outward more to make it even so the strap essentially lays in the indent even with the back piece? Second part, easy fix. I actually already printed your holster print, just need to paint. The galactic armory ec17 surprisingly fits it nicely. -
I went ahead and printed the holster from @MrPoopiein the event the one I did is not approvable. Fits the GA EC-17 nicely.
-
All the white painting is done. Just have to add stickers to helmet, paint the snout black, and weather the blaster. Gloves from Endor Finders will be here tomorrow. Hopefully soft parts in a couple weeks from KriptonTop. Next week will be making the boots.
-
Galactic Armory 3D ROTJ Scout Model Assessment
LookBehindYou replied to MrPoopie's topic in ROTJ Biker Scout Armor/Helmet
Is any of this a deal breaker for level 1? I’ve been working on the armor and helmet, all from GA. Here is what I’ve kept/done… helmet, rounded outside upper edges of visor. Added piece to dome to meet visor better. Replacing snout with one from @MrPoopie. Using rear vent stickers from @Plugger. Rest of stickers from trooper bay. chest, left as is. back, printed mandalorian instead of ROTJ, so had to raise back edge above tank. tank, left as is other than drilling hole in bottom for elastic strap that goes around back and gets riveted to top shoulder bells, @MrPoopie biceps, used tbits from @MrPoopie, slightly scaled down to fit GA armor forearms, @MrPoopie Belt and TD, @MrPoopie hip boxes, left as is knees, drilled rivet holes, rest as is holster, drilled rivet holes, rest as is I know a lot comes down to fit. But I’ve invested a TON of time into finishing this stuff and don’t want to have to redo anything that I “think” is done at the end. I’d rather get it over with now… Thanks everyone! -
First masking job was a success. Now just hope to repeat one more time for the snout.
-
Oh I also need to repaint the front of the helmet. Had a run so just stopped. Will have to wait for it cure before I can sand it and repaint then clear.
-
Making some great progress! Most of armor is done, just the forearms and holster left for that. Then it’s on to the greeblies, blaster and TD. Also need to get back to working on the boots. I started those but stabbed myself like three times with the xacto so took a break lol.
-
Awesome! Things are looking fantastic! I’m hard at work on my build too!
-
Thanks! I took it out into the sunlight and it was more noticeable, I got a new clear coat doesn’t do that on another piece I tested so I’ll just redo the one shoulder piece.
-
Morning everyone! I have started wet sanding the primed pieces and did a test paint on the shoulder bells. I’m glad I did something easy to resand if needed. I discovered the clear coat gives a yellow tint! Check out the pic below. Part of me started to say it actually looked better than the straight white before the clear. You can see the difference between the two below. I wanted to see if anyone had any thoughts before I redo the one that has a tint to it.
-
Good deal, that’s what I figured but wanted to make sure. Thanks!
-
Good call, I have a few failed pieces I can prime and test pain on. Along those lines are there any preferred colors/brands of spray paint?
-
Little by little. Really happy with how filling in the lines of the tank and raising the back turned out. Might be ready for paint next week. One question, all the white marine vinyl I’ve found is not “bright white” to me it looks off white, but my wife says I’m crazy. I passed on the stuff from hobby lobby and Joann’s and ended up going with a link I found from I think @Chopper had posted. https://www.fabricguru.com/marine-vinyl/marine-grade-vinyl-outdoor-upholstery-fabric-white.html I think it still looks off white, but maybe that’s right and I’m over thinking it lol. This weekend I’m carving up some king show boots. Next week we hit the 50s for a couple days so hoping to get paint done!
-
Thanks! I definitely thinks it’s good, it rises probably 3 or 4 mm above the top. Will also be adding the rivet to it as well to better the look. I’ve decided to reach for level 2 approval with everything I’m doing (won’t get it because unfortunately I ordered the suit with faux suede) but I figure if I do everything to that standard then level one should be very doable.
-
Making some progress. I filled in the space above the snout. Added some trim around the snout. Also raised the edge of the back so the tank wouldn’t be even. Another light coat of bondo and some sanding and I think everything will be ready for prime and paint! Also filled in the lines on the tank. One more light coat of bondo on those areas and it should be good to go!
-
Thanks! Moving the tank down isn’t really an option with out re printing the back and the tank from a different file, I don’t think it’d line up right. So what I plan on doing is making the the back a little hire with styrene. Or at least that’s the plan, if it doesn’t work out I’ll reprint the pieces. And yeah I’m definitely going to fill the lines in and go with decals. But I’ll do that after trying to raise the back, so if that doesn’t work I’ll just reprint it without the lines in already. Already on touch with BluegrassGarrison! Went to Joann’s today to get material for the boots and of course they’re going out of business in two days and had nothing left in the store. So I’ll order that online. On the boot tutorial there was a link chopper posted for the vinyl he used. So I’m going to order that. Have to wait a few days anyway as I got the wrong boots that had a two tone sole. Good thing I noticed before I started carving. Thanks for the help and advice!
-
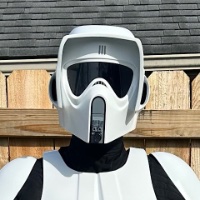
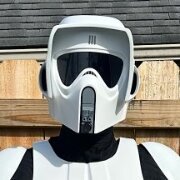
I made some changes with more to come. Rounded out the top of the visor that had the hard edge, still think I can round some more. Still need to fill in above the snout for the decal as well as the line on the tank. Also replaced the snout and t greeblies with those from MrPoopie. I obviously have a lot finishing work to do but wanted to see if there any other glaring issues before I put all the work in on things that aren’t approveable. One are of concern I do have is the tank being even with the back piece at the top. Is that ok like that? On the reference photo it’s down a little bit but I’ve also seen other photos from ROTJ where it looks even. I could add a piece of styrene and to raise the top of the back if needed without reprinting a new back and tank. Thanks for all the advice and help everyone!
-
Thanks! I messaged Mr poopie to see if they’ll sell/share the stls. I’m going to assume the thermal detonator, t shapes and top of tank may not be approvable either so seeing if he can provide those as well.
