

MikerScout
-
Posts
272 -
Joined
-
Last visited
-
Days Won
4
Everything posted by MikerScout
-
 Need some boot feedback . The toecaps are glued and the boots are currently over stuffed with socks to fill their volume. The top is just resting on there as is the dog bone. I wrapped the upper around my leg and I can just slide my hand between the upper and my jeans. Velcro is 1" and stitched pretty darn close to the edge. Top stitch is 3/8 down from the top ( I used the edge of the presser foot as a guide) Does this stitching look OK for level 2? (thinking about making the top stitch closer to the top) Are the "laces lumps" on the toe cap going to be an issue? If so, how should I go about getting rid of them? Not so tight with the vinyl? Any glaring issues or should I sew the other side and glue them up? Sent from my SM-G960U using Tapatalk
 -
I see what you're doing here.....
-
Boots... I was hoping to be sewing these tonight but don't have any 1" velcro. Sent from my SM-G960U using Tapatalk
-
Awesome, thanks for the info!!
-
Thanks buddy!! I'm having a lot of fun!
-
I'm looking for the "go to" print files for a hold out blaster. I have a really nice hero blaster but it's heavy. I need something nice and light for trooping. I have SC armor, which we all know has big holsters so a "bigger" print would be nice, though I'm sure it can be scaled at the printer? I don't smack about 3D printing but my little brother uses it in his regular business so I'll be going to him to get the printing done.
-
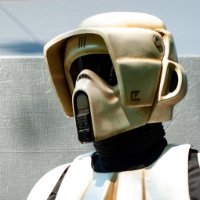
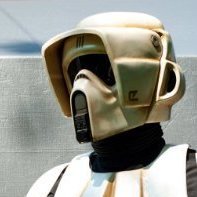
Helmet is just about there! Some touch ups, comfort issues, and then on to weathering. Though weathering probably won't happen till last. I want to give this paint every opportunity to fully cure before throwing oil paints at it. Sent from my SM-G960U using Tapatalk
-
Yeah! Looking good! I hope to start my bund this week. I'm still fighting with my helmet and have been working on the boots. It's been an interesting weekend here for sure.
- 254 replies
-
- 1
-

-
- lady
- rs prop masters
- (and 4 more)
-
So... after some Google searches this seems to be a common problem with the Rust-Oleum Painters Touch 2X Paint+Primer. It seems, it's not compatible even with itself if you let it completely dry. I used the 2X primer to first prime the ABS which was probably a mistake. It does seem that the 2X Painters Touch is good to go. It's only the 2X Paint+Primer that has issues. After the first failure I let the bucket sit for 48+ hours then wet sanded everything down. Today I sprayed 2 thin coats letting it tack up between and I get this crap. So that said, 99% of the helmet is good. I'll try to knock these down with 1000 grit and polish it then let the weathering hide the rest. I'm done sanding and respraying. Sent from my SM-G960U using Tapatalk
-
DANG! Sharp!! looks great!
-
Ok time for an update. The helmet is going to need to be wet sanded and resprayed. This x2 is some strange stuff. It crackles even when used with its own primer. You basically can't second coat it after any amount of time regardless of what the directions say. That said, I have been able to get the face nearly done Since I had the fine line out, I used it to lay out the tank. I also need to sort the boots. I assume the soles are supposed to be "one color". I know I have the same boots used in the show but the display is clearly one color. I wonder if the soles were weathered to match the mid sole. In the show you see the orangeish color in some scenes bit in others its difficult to tell.
-
I used fine line tape. This was my procedure 1. Use a finger and a pencil to create your marks. You can hold a pretty even line all the way around. You're not trying to "draw" the shape, just put a few guides for running your fine line. 2. Run your first straight with the fine line in one pull. Tack it at the bottom, pull the tape somewhat tight and drop it in place giving your first side a nice straight line. Press the tape to the part just prior to the start of your curve. 3. Keeping the tape under tension start gently going around the curve pressing the tape to the part. If you get a "flat" spot or you go wide just a couple millimeters off and retack it. Work your way around the curve pressing where the tape is tangent to the curve. 4. once you get just past the end of your curve pull off several inches and finish your final straight, again in one take keeping the tape straight. Fine line tape can be found at most auto part stores. It's a vinyl tape with low tac and high stretch. Once you get it on, mask off your part and spray. Nice LIGHT coats, just enough to make it black and no more. Once the paint has tacked up you can pull off the fine line. Pull the tape slightly toward the painted area. Not straight up or away, you can stretch the paint and it will drop out side your line. By pulling toward your paint the fine line will cut the paint leaving a nice clean edge. Ok video here.:
-
Biker Scout Boots Tutorial
MikerScout replied to cheesewhoopy's topic in ROTJ Biker Scout Soft Parts
Magnet trick and boot stiffness? What is the magnet trick for holding the pistol in to the holster? Do you put the magnet into the capacitor on the grip or in the body of the gun? Are the boots stiff enough to hold up a resin pistol? Mine is 1lb even If not, what are some tricks for that? Plastic sewn in? Leg strap? Or try to find the lightest pistol I can for the boot (I'll need recommendations for that) -
Pathfinders Virtual Armor Party 9 July 2021 (Friday Evening PST)
MikerScout replied to MrPoopie's topic in Announcements
Thanks for hosting this! It was fun and great to see you all. @M.J I'm sure I'll have soft parts questions in coming weeks!! -
Pathfinders Virtual Armor Party 9 July 2021 (Friday Evening PST)
MikerScout replied to MrPoopie's topic in Announcements
I'm going to try to be there! I just ran into 2 questions this afternoon haha! Oh to be the new guy -
Weird... ok... Weird. Thanks guys!
-
What is the black on the helmet wings? Velcro to keep the visor shut? Elastic for the chin strap? paint?
-
On a bright note, I started gluing up the straps on all the arm & knee armor with some E6000
-
Well.... It was bound to happen. I had my first major mishap. I filled and faired the helmet seam with bondo. It was old (probably my first mistake) and it had been in my shed for... years? I probably should not have used it but it mixed up well. My activator was new. The bondo went on fine and seemed to harden up well. I post cured it with a hair dryer before sanding. I primed it with Mr Surfacer 1200 (probably my second mistake). It looked great and surfacer dried nice and smooth and was sanding up really nicely. Up toward the face of the helmet at the "wings" some cracks started to form. There is quite a gap in there from funky fitment so jammed some more Oatey plastic glue and some bits of ABS to fill the void (probably my 3rd mistake). I think.... the ABS absorbed the styrene and caused it to remain soft with the application of the Oatey. Or the bondo absorbed the Oatey glue and prevented it from off gassing. Either way I made the helmet soft and basically melted slightly over night. I attacked it after work today and dug all the bondo out, some of which was soft, I think because of the Oatey glue. I then set the helmet in the sun to just off gas as best it could. It's hardened up now but if I hit it with a hair dryer it gets really soft really quick in those two little spots. The ABS smells of styrene in that spot, I'm hoping it will just gas out over the next couple days and become durable again.... If not, I'll be buying another helmet. It's not a big spot but it's just behind where the face piece attaches and will be getting constantly touched.
-
Haha, I just ordered those bolts last night. I got the headband a week or so ago but it didn't come with the hardware as advertised. Sent from my SM-G960U using Tapatalk
-
Last coat of filler. Making the gap on the visor. Debating on attaching the visor with rivets and a rubber washer like in the kropsirkl (sp), or using the 3M bits... maybe with a thin rubber washer for tension.... Sent from my SM-G960U using Tapatalk
-
Thats what I was thinking too. There is plenty of meat there for the dremmel Sent from my SM-G960U using Tapatalk
-
@Chopper It is jammed in there pretty good but it does not scrape. When I get my bolt kit I'll either move it forward a tad or clearance some of the ABS away. I left a bit of ABS behind just incase. I'll see how the sides look with the proper bolts, I don't want that gap too big. In the end, I'll carry the gap that is on the left all the way around so it looks uniform. Ahhh ok.. thanks for the info about the band, that gives me something to go on. I'll do some more searching here on the forums too. Great feedback buddy, thank you!!
-
Test fit for symmetry before I start bondo. I also need to research how to properly mount the 3M head band and flip up face piece. Im guessing wood screws are not the right way lol. What do you think? @Chopper@BikerScout007 Sent from my SM-G960U using Tapatalk
-
Gluing and screwing. The seam on the helmet is going to be filled and faired with bondo, so I punched a couple holes with the pin vise and screwed the lit cap in place. Ill pull the screws, sand, prime and bondo. The face piece is finicky, I let stuff over sized so I can trim to fit. Still waiting to hear back about the gray bolts so the bucket might be on hold after I get things rough fit. Sent from my SM-G960U using Tapatalk

