Aradun
-
Posts
2,624 -
Joined
-
Last visited
-
Days Won
90
Everything posted by Aradun
-

Happy Trooper DLT-19 $50 Hardware Store Build
Aradun replied to greenyone's topic in ROTJ Biker Scout Weapons
Nice work Kurt! Can’t beat the price either. I did this build about two years ago with some modifications. I didn’t take too many photos of the build process but I’ll dig up what I have and try to post them. I know I made the body a little different from Happy’s directions. I used two stair treads that I had lying around, which gave me the perfect width When compared to real blueprints of the mg that I found online. The blue prints enabled me to fine tune the build to get it to proper scale. -
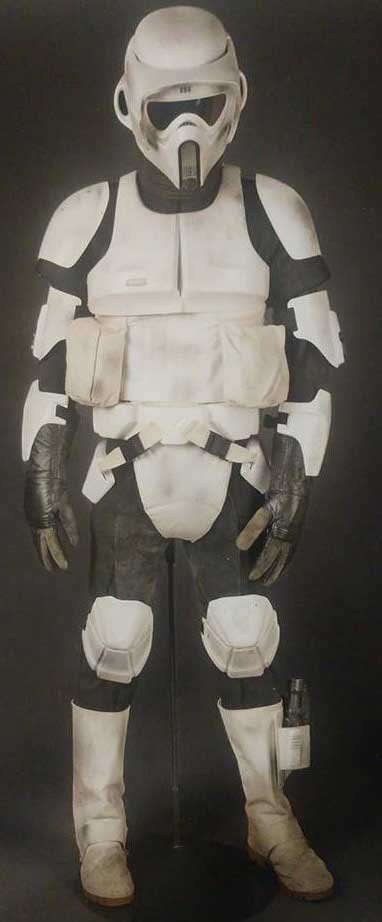
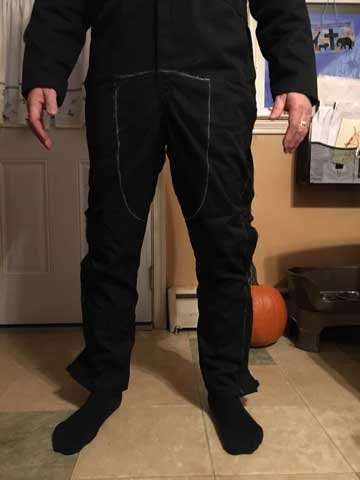
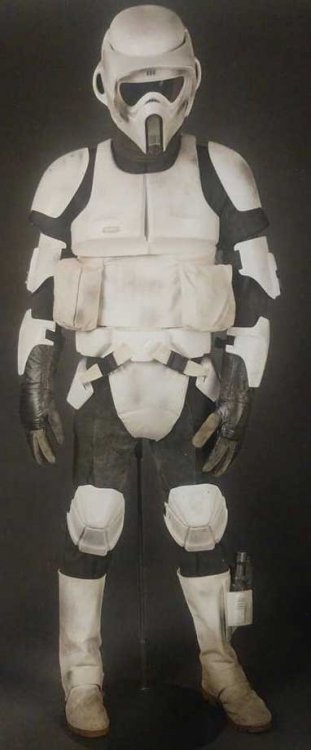
I'm looking for feedback on the layout of my front riding patches before I cut the pigskin. They start where the zipper ends on my Red-Kap and end about 1-1.5" above the knee. Using the reference photo below, I have them set to come just shy of mid thigh on either side before tapering at the bottom.
-
Thanks. Drill Fabric is on my radar, but has been impossible to find at Joann. They always seem to be out of it. Must be due to a ton of scouts living in my area 😉. The bed sheet idea might be worth a look. Some use a sateen fabric but I can’t find it in cotton. It always 100% poly. But if it can be a cotton-poly blend then that would open up some nice possibilities.
-
I’m trying to source a decent fabric for the CB and cod piece. Polished cotton is apparently a thing of the past and only available via vintage fabric dealers online. Looking through selections at my local Joann Fabrics the best looking fabrics that catch the sheen of the originals are always a cotton-poly blend. Would a cotton-poly blend be lancer acceptable, as the CRL states the CB and Cod must be cotton for lancer specs but doesn’t stipulate 100% cotton? Any recommendations from fellow Scouts on what cotton choices they went with, especially if you purchased from Joann Fabric?
-
I’m considering getting these elastic laces for my build. How snug would you say the boot feels using these? My feet tend to ache if my shoes aren’t snug or tied tight so I’m trying to figure out how to make them as snug as possible and yet still be able to get the boot on without issue.
-
I’m digging those wheels Kurt 😎
-
Nice. I’m guessing that’s your bucket in the bottom right stuffed with the blue fabric and the your boots are under the armor. If so, that’s plenty deep.
-
Ahh. That makes perfect sense. I completely forgot about the bund b/c it’s not usually included in photos dealing with the undersuit and flap. I was having a hard time seeing any stitching along the top seam in your Undersuit Mods photos making me think it was a Jedi mind trick. Mystery solved 😉.
-
Iceburgh, Definitely check out the link Stroker noted above. It’s well done. My question isn’t so much on the dimensions, but the “no external visible stitching”. Am I correct in assuming that the pigskin is just cut squarish with unfinished edges, and if so how does one attach it to the undersuit if no external stitching is permitted to be visible? Things that make you go Hmmmm.
-
Thanks Jason. I was looking at that same model from Husky. Good to know!
-
It's awesome Sven. I checked out Assassin Graphics and his work is amazing, top quality too. Adding them to my "to get" list as well! Thanks.
-
Great pics. Thanks Frank! This was helpful.
-
The box looks Imperial 😉. Love the plates with your name and TK #. Did you do them yourself or did you have them custom made for you?
-
Folding Dolly is a great idea! I’m putting that on my “to get” list.
-
Thanks Frank. Looking forward to the pics. So, as a newb, I'm wondering what repair and cleaning supplies you pack in that backpack of yours?
-
SEWING VELCRO (HOOK & LOOP) 101 I don't know if anyone else finds sewing velcro a tactical challenge, but I went through about 7 needles just trying to attached a two inch swath of this stuff onto my mandarin collar, so after several swear words, fist poundings, and a dose of my blood pressure meds, I looked up how to work with this stuff to see if I was doing anything incorrectly and thought I'd share my finds for anyone else who may be venturing into sewing their own build. Hindsight is always 20/20. TIP #1: Buy the Right Hook & Loop There's a lot of hook & loop (Velcro) options. Avoid the self adhesive stuff. It's not what you want as it is not made for sewing applications. You also want to avoid any "industrial strength" products as they will be very tough and less flexible making it hard on your machine and needles. When buying h&l make sure you buy it from a sewing shop like Joann's because their products are designed specifically for sewing applications. It's softer, more flexible and easier to work with by hand and machine. Be careful when buying online because the cheap stuff may have an appealing price point, but from what I read the cheap stuff causes skipped stitches on machines and is difficult to work with. TIP #2: Not Any Old Thread Will Do Make sure you use a quality thread, especially when working with the scratchy side of the hook & loop. Looking into this, the recommended thread is a good polyester thread. Your cheaper threads and cotton threads will break under the pressure needed to sew the h&l to the fabric. It will also snag on the scratchy side making it more likely to break. Tip #3: Pin the H&L in Place This may be a no-brainer for those familiar with sewing, but it wasn't for this newb. Make sure to use straight pins to secure the h&l in place when you sew. TIP #4: Invest in Strong Needles You'll need at minimum 90/14 universal machine needles when sewing h&l and even then if you use cheap h&l, low quality thread, and/or don't bother to pin it in place you'll be eating machine needles left and right (Trust me on this one!). Another option is 100/16 for those who want to err on the side of caution. If you still experience difficulty try a machine needles rated for denim or leather (you'll need a decent leather needle for your riding patches anyway!). TIP #5: Rotating the H&L During Sewing Make sure that your needle is down as far a possible when you finish a line and then rotate the piece to stitch the next line. That may be a no-brainer for those that know their way around a sewing machine, but it wasn't for me. I assumed the needle should be up and out of the fabric not realizing that this causes all sorts of sloppiness and lose threads. Everything I've read says sewing along the edge of the h&l is fine, though a couple of sites and videos recommend adding an "X" pattern from corner to corner too. Again, keep the needle down in the fabric when making your rotation should you decide to add the "X." TIP #6: Sewing H&L by Hand For smaller applications consider sewing the h&l by hand. Again, you'll need a strong needle and the thimble for your thumb. The recommended stitch for sewing h&l by hand is the Backstitch. It's supposedly one of the strongest if not thee strongest hand stitch out there, which is a definite must given the amount of attaching and ripping apart your h&l will endure over the course of trooping. Lastly, if you're still uncertain or apprehensive, do a simple search online as there are a tone of videos on YouTube and articles online that walk you through working with this stuff. Hope this saves someone else from some headaches!
-
I don't know how much traction this thread with get, but as someone who is working on his first build, I'm already thinking ahead to how to store and pack everything up for various deployments. So I was wondering if any Pathfinders would care to share some photos, tips, best practices, etc. for how they stow their gear, and what they use to stow it and transport it to various events.
-
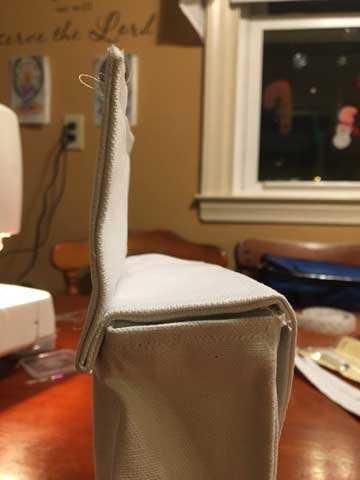
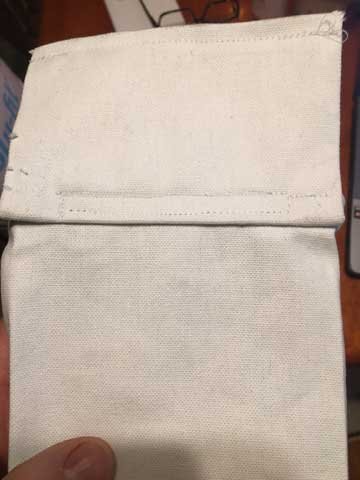
Pouches Using the post detailing the Pouch Dimensions I obtained the pattern provided by Ron "DK5IDE" and laid out the pattern on a 3/4 yard remnant of Duck Cloth that I obtained from Joann Fabric (It was about $4). You don't need to print out the pattern. The pattern is simple and can just be used as a reference for measurements. I measured it out with a ruler and small square for the corners directly onto the fabric. One of the things I found useful in laying out the pattern is to butt the various patterns right up against one another so that they share cut lines. This saves fabric. In fact I used just over half of the 59"x 27" remnant I picked up leaving plenty left over for a spare pouch or two. I could have saved even more material had I butt the attachment/flap pattern up against the pouch pattern. You'll see in the photo that there is about a 2" gap between them. That was precious real estate wasted. The photo below only shows the half that the pattern was laid out on. The square cut out was the side flaps for the inside of the pouch. I cut that out and used them to get a feel for how the sewing machine handled and that was after testing things out on some scrap fabric I had. DK5IDE's pattern meets the new ideal set for Lancer Requirements. Looking at the pattern, the dimensions listed did not account for the narrow tabs that allow the pieces to be seamed and sown together. You should allow an additional 1/4" - 1/2" for each tab along the edge of the pattern. Being a newb with a sowing machine, I added 1/2" to each side of the design for the tabs to allow enough cloth to fold over. Looking at the pattern, the double lines on top seam and the "fold down" came out to be an extra inch (each line was 1/2" in width. That tidbit might be a given, but if you're new to this and forget to account for the width of the tabs, then your pouches will end up being 1/2" - 1" short when you sew it together. TIP: After making the first pouch, I found it easier to sew the top seam of the pouch first before building the box rather than after building the box as indicated on the pattern. TIP: Make sure that you use at least 90/14 machine needles when sowing this together. And make sure you have plenty of extra needles on hand. I guarantee you'll bust a few trying to attaching the flap to the pouch if you doing this for the first time. You can see how thick the material is once fold it is over. I went through three needles before I decided to just stitch the middle of the attachment tab to the pouch because I couldn't get the needle to go through to the edge without breaking. I started about 3/4 of an inch in from the edge of the attachment tab and sewed up to about 3/4" of an inch from the opposite edge making a rectangle as seen in the photo below and that solved my breakage problem. Given that the cummerbund is recommended to be no more than 8" - 9" high, I made the attachment tabs for the pouches 2 3/4" to give me some play when I finalize everything. The pattern calls for 3". I can always seam rip the top and cut it back if needed, but the rest of the pouch meets the new ideal measurements for Lancer in the CRL. And here is the finished product. I gotta say I'm quite proud of myself with this being the first time I've ever used a sowing machine. Up next...the Undersuit (RedKap coverall).


-
Thanks Mickey. I’ll be looking forward to the updated pics as will others I’m sure. I knew the current SC pic in that post was V1, which is why I was originally going to go with CFO, but then when I learned about SC V2 and all of the rave reviews, I was sold. Someone even stated in another post that “RS Props armor is the absolute best, most accurate armor out there.” Given that scout’s expertise and experience, I didn’t need to look any further. 😉
-
Hey Scouts, Here we go. First, thanks to everyone who has posted on this site. The wealth of info is a great resource, and the support of this awesome community of dedicated scouts during this build will be most helpful and welcome. My absolute favorite trooper from the original trilogy was the Biker Scout (although props go to the Shore Trooper from Rogue One - perhaps a future build [emoji16]). Because I absolutely love this trooper, I'm going to shoot for Lancer out of the box. With a little extra attention to detail and investment, I think it's easily doable. I'm also hoping to include in my posts some additional details that I wish I had come across in other builds, tutorials, and best practice guides. I'm going to concentrate on soft parts first. I know it's always best to have the armor on hand to ensure best fit, but I think with careful planning I'll be able to tackle the creation of most of the soft parts and then finish them off once the armor arrives. I remember reading somewhere that the average build of the scouts on the set was 150 lbs and 5'10". I'm pretty close at 5'10" and 170 lbs. I'm hoping to put an order in for my armor by the beginning of the summer (still saving for this investment) with the hope that I'll have it on hand by the end of summer. I'm currently looking at RS as my first choice with CFO/Strider as a close second (thank you Mickey for the ultimate armor comparison thread - that was a huge help in my decision making process!) One recommendation I want to make for any Newbs who may be researching this stuff on this site for the first time: Join the forum and then be sure to click "Follow" under the post for the various builds, tutorials, best practices, and anything else that tickles your fancy. I can't tell you the number of times I stumbled across a gem of information and then couldn't find it again or remember under what post I saw it, especially when going back months after the fact as I continued my research. "Following" the post makes the content accessible under "Settings" for your Screen Name. Wish I had realized that early on! Here's what I have on hand to date (I'll add to this list as additional items are purchased and link when applicable): Redkap Coveralls: 42R Wampawear Scout Gloves: Lg. Under Armor HeatGear Tactical Hood White Duck Cloth for Pouches Black Pig Skin Suede Split EC17 Holdout Blaster - (formerly DVH) Black T-Shirt (For constructing Flak Vest pattern): Lg (order one size up from your normal T-Shirt). 100% Black Cotton Fabic 1.5 yds (Flak Vest): 2" Hook and Loop (Velcro): Black 2" Hook and Loop (Velcro): White 2" Black Elastic Band Kingshow 1366 Boots: 10 Elastic Laces (for no tie option with boots) 1.5" White Elastic Band 1" Black Elastic Band 1/2" Black Elastic Band 90/14 Sewing Machine Needles (If you're making your own stuff) 100/16 Leather Sewing Machine Needles (If you're making your own stuff) Batting for Flak Vest & Cummerbund 2 yds Cotton Sateen Fabric for Cummerbund RS Armor RS Red Label Helmet (2023/01/11: Red Label Helmet Is No Longer Available - See RS Helmet) I made my pouches last weekend and will post some pics in my next post. I've also seam ripped my coveralls and have the legs pinned and chalked for a more tapered look and to eliminate the excessive bagginess. My next project will be the Flak Vest followed by the leather riding patches, mandarian collar, and mud flap for the the coveralls. Then the cummerbund so that I can ensure it's properly fitted with the coveralls and flak vest on. Then I hope to tackle the boots. Let the building and the fun begin! Edit: Updated Links 1/11/2023
-
My new slightly used Woodland sneakers (correction)
Aradun replied to Whiskey's topic in ROTJ Biker Scout Soft Parts
I agree. It’s no $40 bargain like Whiskey stumbled upon, but given that I’ve yet to personally come across a real pair running for less than $300.00 it might be considered a steal by some who’ve been looking for a long time. -
My new slightly used Woodland sneakers (correction)
Aradun replied to Whiskey's topic in ROTJ Biker Scout Soft Parts
In case anyone’s interested, I came across another Camo pair in a search today. Not sure how you’d “fix” the color of the sole. https://www.ebay.com/itm/Vintage-Hi-Tec-Boots-Woodland-Sneaker-Biker-Scout-Cosplay-Sz-9-Men-Original-Camo/293362322038?hash=item444dc1ca76:g:FUkAAOSwbAZd6F4W -
Excellent! I bought the thinner batting and was wondering if it should be doubled. I wasn’t sure if the cod piece needed buckram and the batting or just the buckram, but you answered that too. Thorough as usual. Thanks Mickey.
-
Mickey, Another excellent resource. Thank you. A couple of questions for those who’ve made their own cummerbunds... 1) is there a particular thickness of Batting that works best for the fill of the cummerbund? 2) is the thickness of the Batting the same for the cod piece?
-
Justin, Instead of selling the actual sole or creating $200 + boots, any chance you’d be willing to make your 3D print files available for purchase so Scouts could print their own molds and cast their own soles? Your 3D work is top notch and would be worth every cent.