

HSM76
-
Posts
132 -
Joined
-
Last visited
Everything posted by HSM76
-
I will see about the belt lowering is no problem at all 🙂 Thank you for your help. After, removing the shoulder bridges, I will do some mock ups with tape first before cutting anything. It is not the first time working on an ABS armour. My TK is Centurion level, so yes measuring, sticking with blue tape, measuring, sticking..... And at some distant point after that, cutting 🙂
- 107 replies
-
- 1
-

-
- lancer deployment
- rs prop masters
- (and 1 more)
-
Thanks for the feedback Corey. The belt is sitting on the waist, if I lower it, it will be more on the hips. The dropboxes seem to have slipped up, it should be an inch. But I will check that. The cod strap was something I noticed too. It has a loop and I think I did not center it right while kitting up. I had the fear that the back is to low. I will shorten the shoulder bridges a bit. Will be interesting to see how RS has attached everything there. What do you think how much should I pull it up? Would this be the height:
-
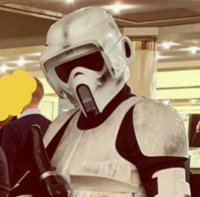
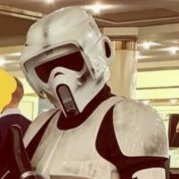
The alterations in the bucket are done, the visor open and closes fine. The opening is wide enough and it stays locked. I did the pictures for basic approval and send them in. Any thoughts, comments and hints concerning the kit, especially concerning Lancer will be greatly appreciated.
-
Nice idea, I think I will borrow that. I have some Plastazote lying around, which would be perfect I think.
-
Any thoughts on the helmet from the Lancer-approval point of view?
-
And the lazy goes on..... The bucket is done. It needs some tweaks. The visor needs to be cut out more in the top, to make it possible to fully open it. I will glue in magnets in the bottom to hold it fully closed. Right now it opens up a bit, if I tilt the head down.
-
Got further with the build but was a bit lazy concerning pictures. The bucket is getting along, the faceplate is glued into the visor. The recess is painted black already und the snout is glued in. Next step will be the weathering before I glue in the lens. As per CRL I tea dyed the straps on the belt drop boxes and the underarm connection of chest and back.
-
No, I did not buy I.B. Boots they are TB STOMPERS by CHRISX909X. I tried to link his vendor thread but could not find it. Gesendet von meinem ONEPLUS A6013 mit Tapatalk
-
And another quick update. The boots and the cumberbund are fully assembled and weathered:
-
Pouches done 🙂
- 107 replies
-
- 1
-
-
- lancer deployment
- rs prop masters
- (and 1 more)
-
This is a 6" by 5" square for the front of the pouches, you see, that the dots are really tiny. With a bit of weathering, they will be gone 🙂
- 107 replies
-
- 1
-
-
- lancer deployment
- rs prop masters
- (and 1 more)
-
The flecks are very tiny, you only notice them in real close up. The pouches get weathered, I'm not sure if I will tea dye the, will see how to proceed, when they are done. As long as the fabric will be okay for lancer, the rest can be done :-) Gesendet von meinem ONEPLUS A6013 mit Tapatalk
- 107 replies
-
- 1
-
-
- lancer deployment
- rs prop masters
- (and 1 more)
-
Would this fabric be okay for lancer pouches? It is a very heavy tent cotton, I have lying around. It is a rather fine weave. The white peace I a sample from the cumberbund fabric. (The ruler is in centimetres)
-
Open it up at the upper seem of the ribs and try stuffing it with padding.
-
A little is an understatement... I had to go down to the primer.
-
Is this better for the holster: Or should I line it up directly below the stitching? Damn it, while the bucket was out after painting it must have gotten caught by a strong windgust or something. The stand I used was heavy, so I can't quite see how it happened but when I went out to take it in it lay face down in the grass:
-
Done with the flight suit. It is the flight suit supplied with the soft parts pack. Now I think it should be fit for lancer.
-
Great, thank you! Gesendet von meinem ONEPLUS A6013 mit Tapatalk
-
Fiddling on many places at once. The flightsuit has gotten fitted a bit more to my body. Removed the faux suede that was on it. Most of the suede is on the flightsuit. The mudflap is on it. The front of the riding patches is done, only the back part of the patches needs to be added. The helmet got white paint and is drying in the sun. Did the first mock up of the holster placement on the right boot. Is that the right positioning?
-
Researching the GREY color of the Biker Scout
HSM76 replied to StudioCreations's topic in ROTJ Biker Scout Armor/Helmet
I used the Vallejo RAL7046. Here a picture of the snout compared to an original bolt: -
Wooohhhhooo, okay. I will be definitely in on the commission run! Gesendet von meinem ONEPLUS A6013 mit Tapatalk
-
Attachment would not have been the problem, I planned to bring it to a shoemaker. Do you need boots to go to you, or would it be possible to get boots supplied by you? Gesendet von meinem ONEPLUS A6013 mit Tapatalk
-
Will you make the soles individually available?
-
Bucket is treated with bondo and filler primer. I Have no photos here. But I tackled the cumberbund problem while the primer is curing. I decided to make one from scratch and use the RS vest an pouches. Here is the cumberbund with the correct 5 ridges 2,5cm wide, pouches at 2,5cm from the outer ridges. What do you think?
- 107 replies
-
- 2
-
-
- lancer deployment
- rs prop masters
- (and 1 more)
-
RS Prop Masters Armor -- My First Impressions of the Kit
HSM76 replied to Chopper's topic in ROTJ Biker Scout Armor/Helmet
Any chance to get these too? Gesendet von meinem ONEPLUS A6013 mit Tapatalk